How to Control Your ESP32 using WhatsApp Messages (Python & MQTT)
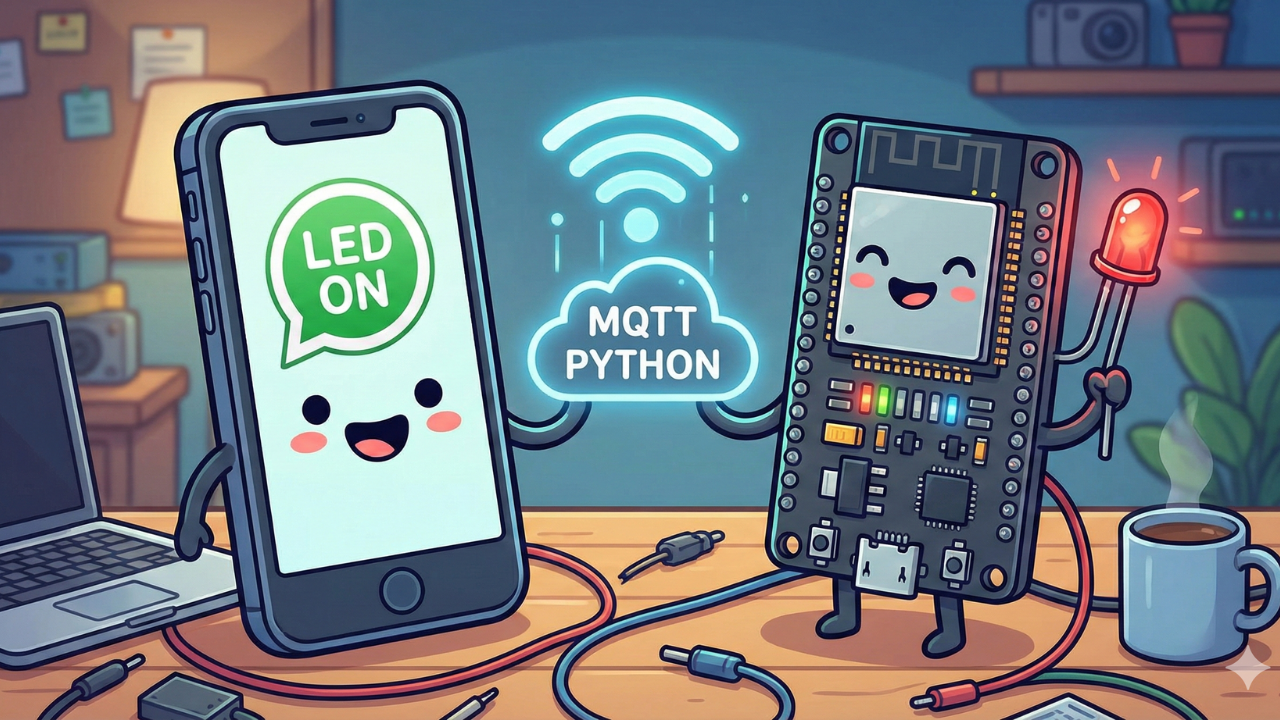
Control your ESP32 via WhatsApp! This tutorial builds a complete two-way bridge using Python & MQTT. Send "LED ON" from your phone and get a real-time reply from your device confirming the action.
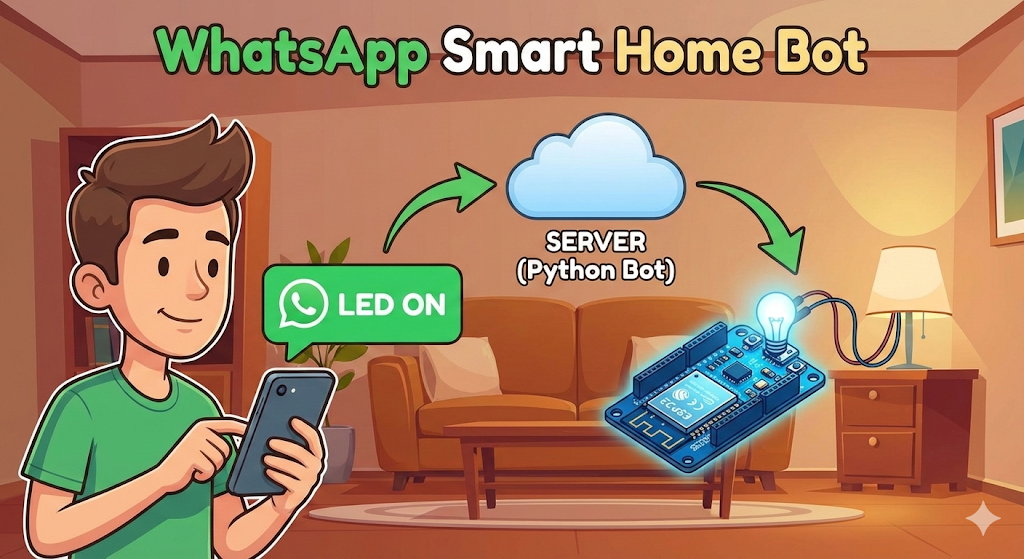
Imagine turning on the lights in your house or triggering a device simply by sending a WhatsApp message to your own personal bot. Today, we're going to make that happen.
In this tutorial, we will build a complete end-to-end system that allows you to control an LED on an ESP32 module by texting "LED ON" or "LED OFF" from your phone. We will use a Python script running on a server to act as a bridge between WhatsApp and the IoT world.
Understanding the Architecture
Before writing code, it's crucial to understand how the data flows from your phone to the microcontroller. We aren't connecting the ESP32 directly to WhatsApp. Instead, we are using a chain of services to translate the message.
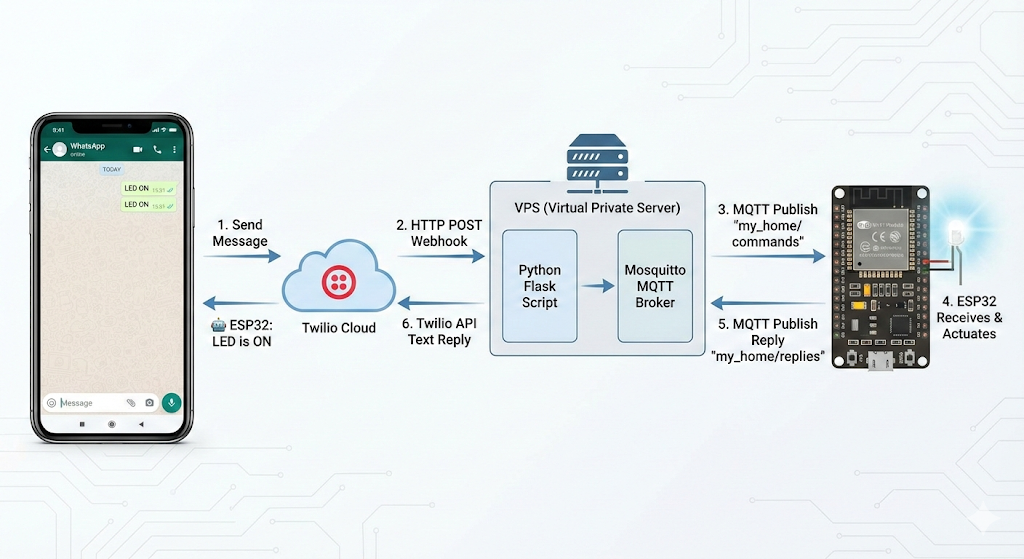
Your Phone (WhatsApp) > Twilio API Cloud > Your Python Server (VPS/Raspberry Pi) > MQTT Broker (Mosquitto) > ESP32Here is the data flow diagram:
- You send a message ("LED ON") to a Twilio Sandbox number on WhatsApp.
- Twilio receives this message and sends a "Webhook" (an HTTP POST request) containing the message text to your custom Python server.
- Your Python script receives the Webhook, reads the text, and determines the command.
- The Python script then acts as an MQTT Publisher, sending a command (like "1" or "0") to a specific MQTT topic.
- Your ESP32 is already subscribed to that topic. It receives the command immediately and turns the LED on or off.
Why Choose This Architecture?
You might be asking, "Why don't I just use a ready-made app like Blynk or a simple web server?" Here is why this specific method is powerful:
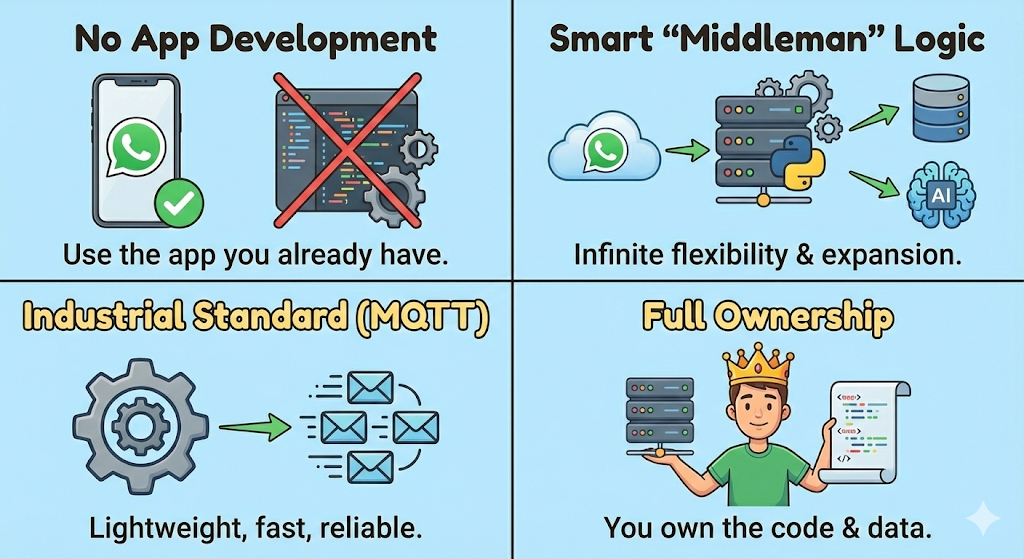
- No App Development Required: The biggest barrier in IoT is often building the mobile app.
- Smart "Middleman" Logic: Because we have a Python script running in the middle (between WhatsApp and the ESP32), we have infinite flexibility.
- Industrial Standard (MQTT): We are using MQTT for the device communication. This is lightweight, fast, and works well even on slow internet connections.
- Ownership: You own the code and the server. You aren't relying on a third-party IoT dashboard that might start charging fees or shut down.
📺 Watch the Video Tutorial
If you prefer learning visually, I have recorded a complete step-by-step walkthrough of this project. In the video, I demonstrate the hardware setup, explain the code logic in detail, and show the live bi-directional communication.
Prerequisites
Before we start, make sure you have:
Hardware:
- ESP32 Development Board: Any standard ESP32 board will work. I recommend the ESP32 DevKit V1.
Software:
- Arduino IDE: Make sure you have the latest version installed.
- ESP32 Board Support: You must have the ESP32 board manager installed in your IDE. Need help? Check out my guide: How to Set Up ESP32 in Arduino IDE 2.0 (Windows/Ubuntu)
- A Server: A VPS (like DigitalOcean, Linode, AWS) or a Raspberry Pi running. Cloud VPS Setup Guide | Setup Raspberry Pi.
- MQTT Broker: Mosquitto installed on your server. (Note: If you haven't set this up, check out Setting Up Your Private MQTT Broker on a Cloud VPS.
- Twilio Account: A free account to access their WhatsApp Sandbox API.
Phase 1: Setting Up Twilio (Get Your API Keys)
Before writing any code, we need a way for our server to "speak" WhatsApp. We use Twilio for this.
Step 1: Create an Account
- Go to Twilio.com and sign up for a free account.
- Verify your email and your personal phone number.
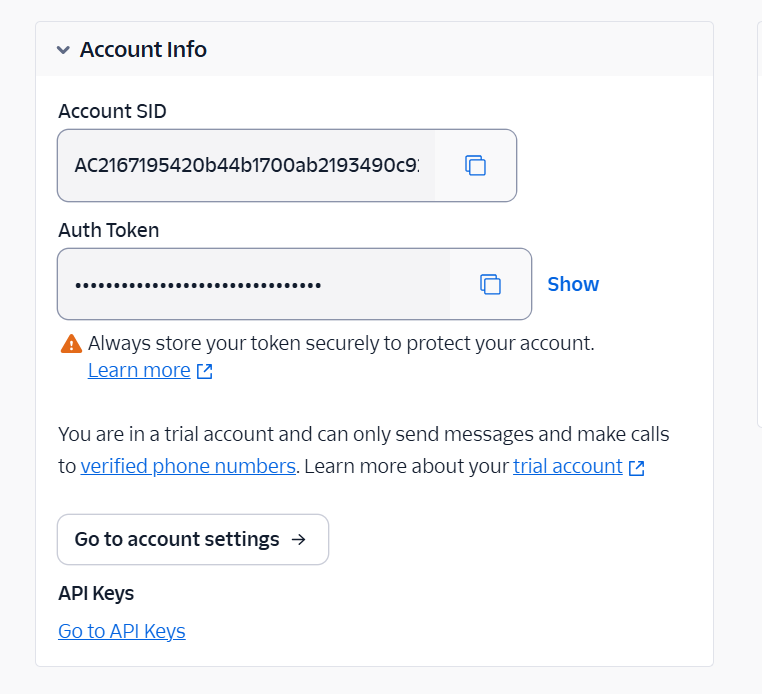
Step 2: Get Your Credentials
- Once logged into the Twilio Console Dashboard, look for the Account Info section.
- You will see an Account SID and an Auth Token.
- Copy these! You will need to paste them into your Python script later.
Step 3: Activate the WhatsApp Sandbox
- On the left sidebar, navigate to Messaging > Try it out > Send a WhatsApp message.
- Twilio will show you a "Sandbox Number" (e.g.,
+1 415 523 8886) and a unique code (e.g.,join something-random). - Open WhatsApp on your phone and send that code to the Sandbox Number.
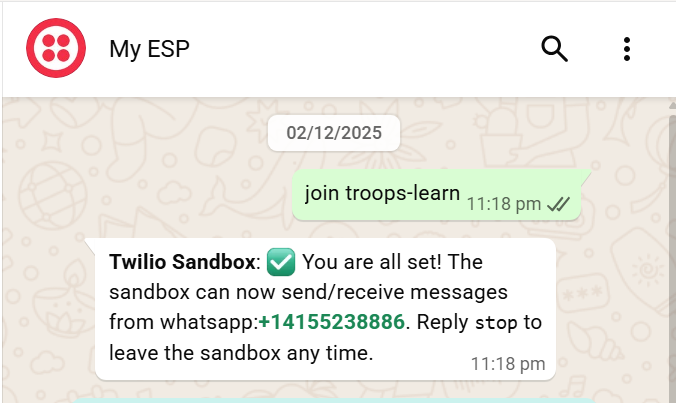
- Twilio should reply: "You are all set!"
- Keep this page open, we will come back to it in Phase 2 to set the Webhook URL.
Phase 2: Setting Up the Server (Python Bridge)
We will host the "brain" of our project on your VPS.
Step 1: Prepare the Environment
Log in to your VPS via terminal/SSH and create a folder for this project:
mkdir whatsapp_bot
cd whatsapp_bot
Step 2: Install Dependencies
Install the required Python libraries:
pip3 install flask paho-mqtt twilio
Step 3: Create the Python Script
Create a new file using the nano editor:
nano bridge.py
Step 4: Paste and Edit the Code
Copy the code below and paste it into the editor. You MUST edit the 4 variables at the top.
import json
from flask import Flask, request
from twilio.rest import Client
import paho.mqtt.client as mqtt

app = Flask(__name__)

# ============ CONFIGURATION (EDIT THESE) ============
TWILIO_SID = "PASTE_YOUR_SID_HERE"
TWILIO_AUTH = "PASTE_YOUR_AUTH_TOKEN_HERE"
TWILIO_FROM = "whatsapp:+14155238886"  # The Number from Twilio Sandbox
MY_NUMBER = "whatsapp:+8801700000000"  # Your Number (Must include country code like +880 or +1)

# MQTT Configuration
MQTT_BROKER = "127.0.0.1" # Use localhost if Mosquitto is on the same VPS
MQTT_PORT = 1883

# TOPICS
TOPIC_CMD = "my_home_123/commands"  # Server sends commands here
TOPIC_MSG = "my_home_123/replies"   # ESP32 replies here

# Initialize Clients
twilio_client = Client(TWILIO_SID, TWILIO_AUTH)
mqtt_client = mqtt.Client()

# ============ MQTT FUNCTIONS ============
def on_connect(client, userdata, flags, rc):
    print("✅ Connected to MQTT Broker!")
    client.subscribe(TOPIC_MSG)

def on_message(client, userdata, msg):
    text = msg.payload.decode()
    print(f"📩 Received from ESP32: {text}")
    try:
        # Send reply to WhatsApp
        twilio_client.messages.create(
            from_=TWILIO_FROM,
            body=f"🤖 ESP32: {text}",
            to=MY_NUMBER
        )
        print("✅ WhatsApp reply sent!")
    except Exception as e:
        print(f"Twilio Error: {e}")

mqtt_client.on_connect = on_connect
mqtt_client.on_message = on_message

try:
    mqtt_client.connect(MQTT_BROKER, MQTT_PORT, 60)
    mqtt_client.loop_start()
except Exception as e:
    print(f"❌ MQTT Connection Error: {e}")

# ============ FLASK WEBHOOK ============
@app.route('/whatsapp', methods=['POST'])
def whatsapp_webhook():
    msg = request.values.get('Body', '').lower()
    print(f"📱 WhatsApp: {msg}")
    mqtt_client.publish(TOPIC_CMD, msg)
    return "OK", 200

if __name__ == '__main__':
    app.run(host='0.0.0.0', port=5000, threaded=True)
Save and Exit: Press Ctrl + X, then Y, then Enter.
Step 5: Configure the Firewall (Crucial Step) We need to open two ports:
- Port 5000: For Twilio to send WhatsApp messages to our Python Flask server.
Run these commands:
sudo ufw allow 5000/tcpStep 6: Run the Server Start the script:
python3 bridge.py
You should see "Starting Flask Webhook Server on port 5000..."
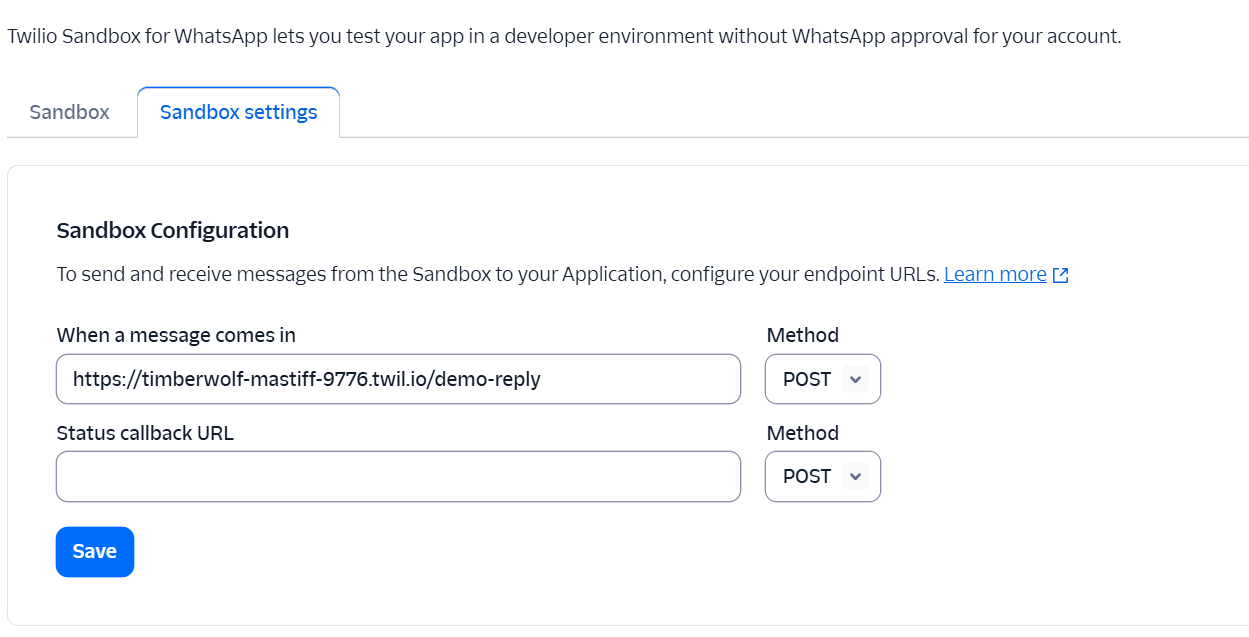
Step 6: Connect Twilio to Server
- Go back to the Twilio Sandbox Settings.
- Find "When a message comes in".
- Enter your VPS URL:
http://YOUR_VPS_IP:5000/whatsapp - Set the method to POST.
- Click Save.
Phase 3: Uploading Code to ESP32
Now we program the hardware to listen to your server.
Step 1: Prepare Arduino IDE
- Open Arduino IDE.
- Go to Tools > Board and select your ESP32 board (e.g., "ESP32 Dev Module").
- Go to Sketch > Include Library > Manage Libraries.
- Search for PubSubClient (by Nick O'Leary) and install it.
Step 2: The ESP32 Code Copy the code below. You MUST edit the WiFi and Server IP.
#include <WiFi.h>
#include <PubSubClient.h>

// ============ CONFIGURATION (EDIT THESE) ============
const char* ssid = "YOUR_WIFI_NAME";
const char* password = "YOUR_WIFI_PASSWORD";
const char* mqtt_server = "YOUR_VPS_IP_ADDRESS";

// Topics (Must match Python script exactly)
const char* topic_cmd = "my_home_123/commands";
const char* topic_msg = "my_home_123/replies";

WiFiClient espClient;
PubSubClient client(espClient);
const int LED_PIN = 2; // Default onboard LED

void callback(char* topic, byte* payload, unsigned int length) {
  String message = "";
  for (int i = 0; i < length; i++) {
    message += (char)payload[i];
  }

  Serial.print("🔥 Command: ");
  Serial.println(message);

  if (message == "led on") {
    digitalWrite(LED_PIN, HIGH);
    client.publish(topic_msg, "LED is ON ✅");
  }
  else if (message == "led off") {
    digitalWrite(LED_PIN, LOW);
    client.publish(topic_msg, "LED is OFF ❌");
  }
  else if (message == "status") {
    int state = digitalRead(LED_PIN);
    String status = "System Online. Light is " + String(state ? "ON" : "OFF");
    client.publish(topic_msg, status.c_str());
  }
}

void reconnect() {
  while (!client.connected()) {
    Serial.print("Attempting MQTT connection... ");
    String clientId = "ESP32Client-";
    clientId += String(random(0xffff), HEX);

    if (client.connect(clientId.c_str())) {
      Serial.println("connected");
      client.subscribe(topic_cmd);
    } else {
      delay(5000);
    }
  }
}

void setup() {
  Serial.begin(115200);
  pinMode(LED_PIN, OUTPUT);

  WiFi.begin(ssid, password);
  while (WiFi.status() != WL_CONNECTED) {
    delay(500);
  }

  client.setServer(mqtt_server, 1883);
  client.setCallback(callback);
}

void loop() {
  if (!client.connected()) {
    reconnect();
  }
  client.loop();
  delay(100);
}
Step 3: Upload
- Connect your ESP32 to your computer via USB.
- Select the correct Port in Tools > Port.
- Click the Upload (➡️) button.
- Tip: If it gets stuck at "Connecting...", hold the BOOT button on the ESP32 for 2 seconds.
Step 4: Verify Open the Serial Monitor (Top right corner). Set the baud rate to 115200. You should see:
WiFi Connected Attempting MQTT connection... connected
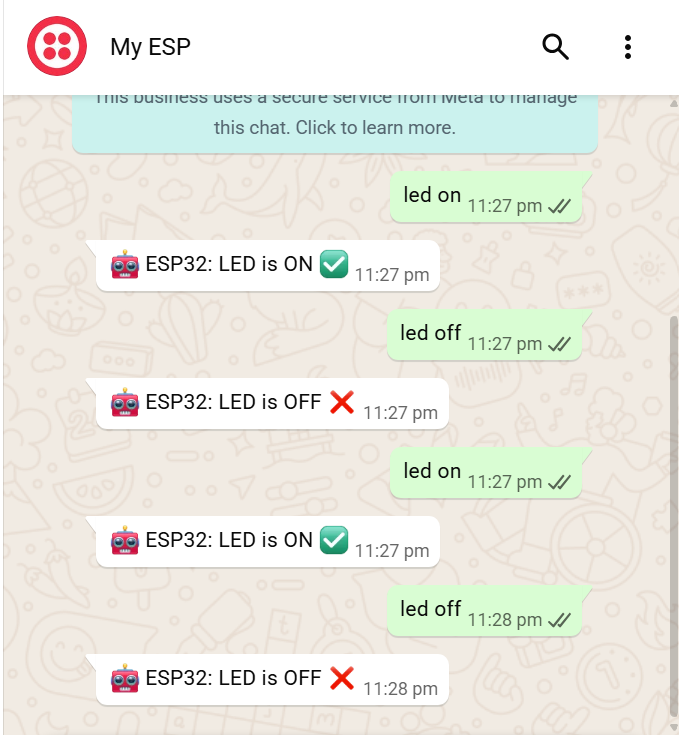
Testing the System
- Ensure
bridge.pyis running on your server. - Open WhatsApp and text your Twilio Sandbox number.
- Send LED ON > ESP32 LED turns ON.
- Send LED OFF > ESP32 LED turns OFF.
- Send STATUS > ESP32 replies with current state.
Conclusion
Congratulations! You have successfully built a Two-Way IoT Controller that works from anywhere in the world.
By combining WhatsApp (for the interface), Python (for the logic), and MQTT (for the device communication), you have created a system that is far more powerful than a simple "blinking LED" project. You now have a scalable architecture that you can use for real-world applications.
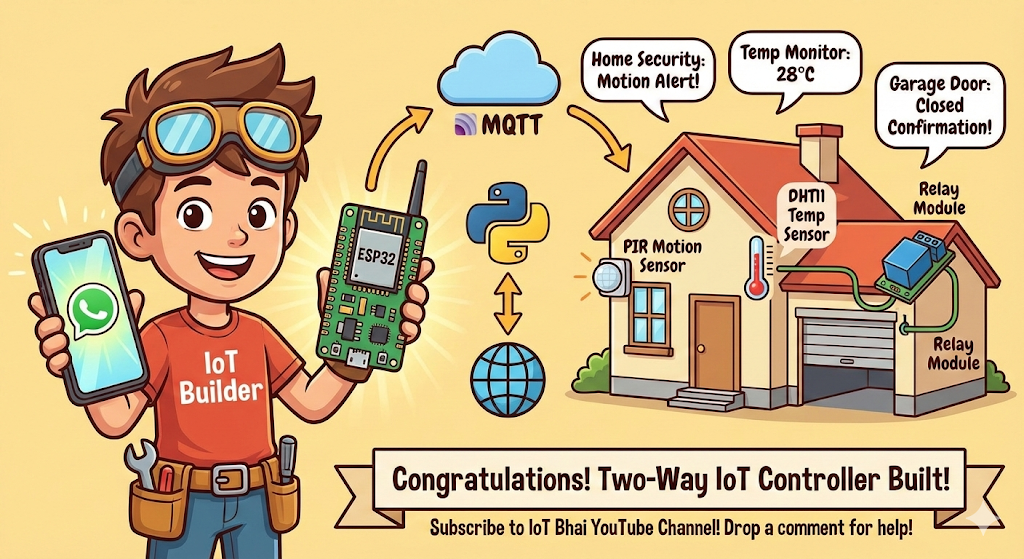
What can you build next with this?
- Home Security: Connect a PIR motion sensor. If motion is detected, have the ESP32 send a WhatsApp alert to your phone automatically.
- Temperature Monitor: Connect a DHT11 sensor. You could text "Temp" and get a reply like "Current Room Temperature: 28°C".
- Garage Door Opener: Use a relay module to trigger your garage door and get a confirmation text when it's closed.
If you faced any issues while following this guide, please drop a comment below or on my YouTube video, and I will do my best to help you out.
Don't forget to subscribe to the IoT Bhai YouTube Channel for more advanced IoT tutorials!