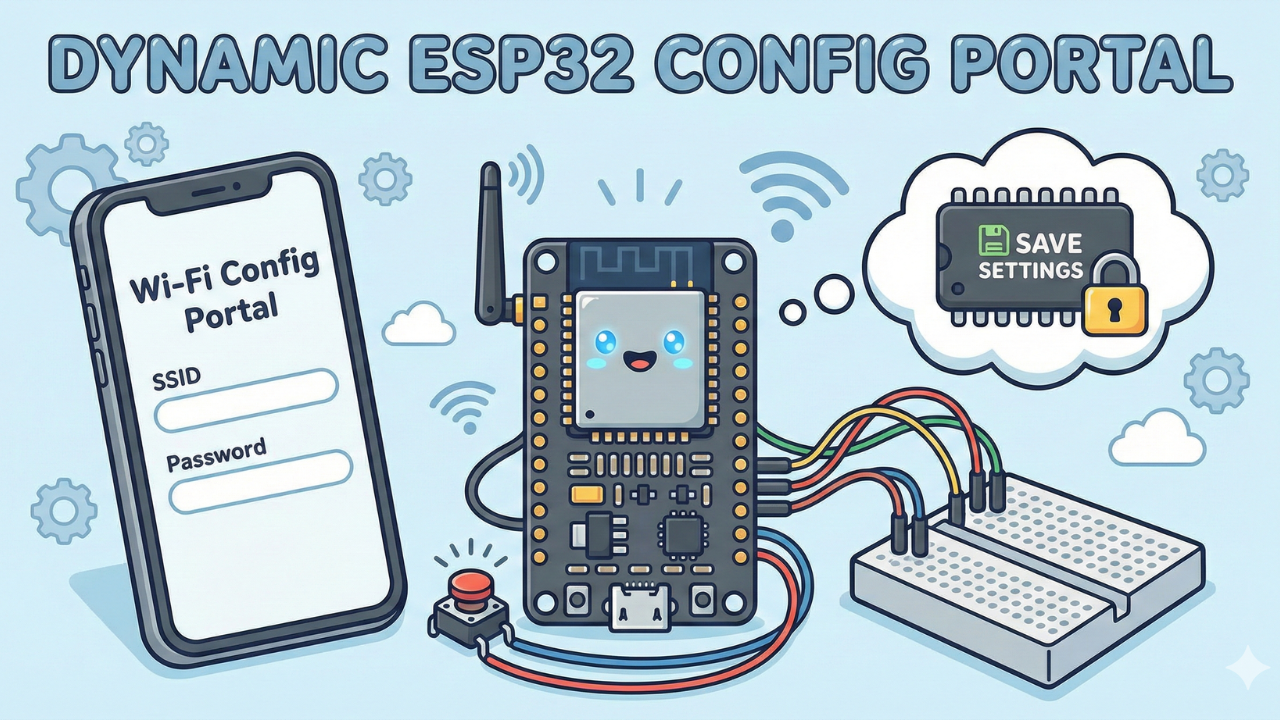
Stop Hardcoding Credentials! Build a Dynamic Config Portal for ESP32
Stop hardcoding Wi-Fi credentials! Learn how to build a professional configuration mode for your ESP32 using the Preferences library and a WebServer.
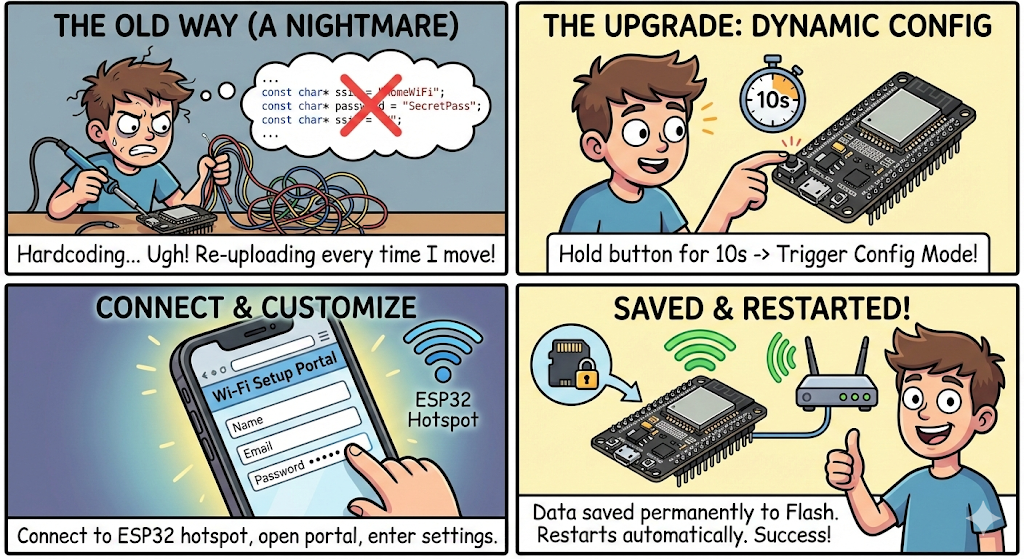
If you are still hardcoding your Wi-Fi SSID and Password directly into your ESP32 code, it’s time to upgrade. Hardcoding means every time you move the device to a new network, you have to edit the code and re-upload it. That’s a nightmare for real-world projects.
In this tutorial, we will build a Dynamic Configuration Portal.
Here is how it works:
- We hold a physical button for 10 seconds to trigger "Config Mode."
- The ESP32 creates its own Wi-Fi Hotspot (Access Point).
- We connect to it with our phone/laptop and open a beautiful web page.
- We enter our settings (Name, Email, Password).
- The ESP32 saves this data permanently to its flash memory using Preferences (NVS) and restarts.
Why Use This in Production?
Hardcoding credentials is fine for testing, but bad for real products. Here is why the "Dynamic Config" method is an industry standard:
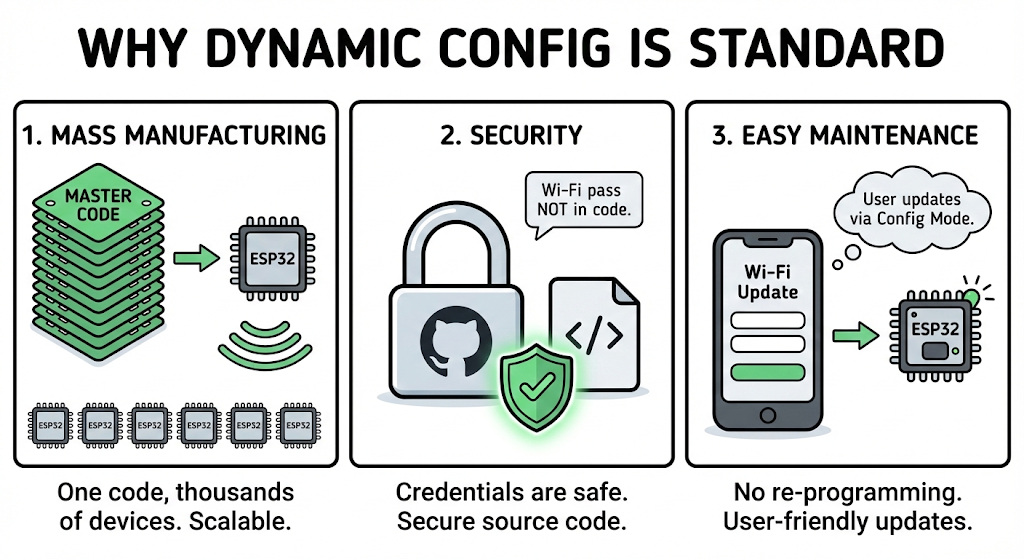
- Mass Manufacturing: You can flash the exact same code to 1,000 devices. You don't need to know the customer's Wi-Fi password beforehand.
- Security: Your Wi-Fi password isn't exposed in the source code on GitHub.
- Easy Maintenance: If a user changes their router password, they can simply enter "Config Mode" and update it themselves—no re-programming required.
Why Preferences.h and not EEPROM.h?
Many old tutorials use EEPROM libraries, which simulate old-school memory sectors. However, the ESP32 has a modern Non-Volatile Storage (NVS) system.

The Preferences library allows us to save variables as Key-Value pairs (like a dictionary).
- Old way (EEPROM): "Write byte at address 0x01." (Confusing, prone to corruption).
- New way (Preferences):
prefs.putString("wifi_pass", "12345");(Clean, safe, modern).
📺 Watch the Video Tutorial
If you prefer learning visually, I have recorded a complete step-by-step walkthrough of this project. In the video, I demonstrate the hardware setup, explain the code logic in detail, and show the live bi-directional communication.
Prerequisites
Before we start building, make sure you have the following ready. This project relies on standard ESP32 libraries, so you won't need to download complex external files, but your environment needs to be set up correctly.
Hardware Required
- ESP32 Development Board
- 1x LED (Any color)
- 1x 330Ω Resistor
- Breadboard and Jumper Wires
- Micro USB Cable
Software Tools
- Arduino IDE: Make sure you have the latest version installed.
- ESP32 Board Support: You must have the ESP32 board manager installed in your IDE. Need help? Check out my guide: How to Set Up ESP32 in Arduino IDE 2.0 (Windows/Ubuntu)
- Required Libraries:
- The best part of this project is that it uses built-in libraries included with the ESP32 core. You do not need to download these from the Library Manager:
WiFi.h(For networking)WebServer.h(To serve the HTML page)Preferences.h(To save data to flash memory)
- The best part of this project is that it uses built-in libraries included with the ESP32 core. You do not need to download these from the Library Manager:
If your code compiles without errors, your environment is ready!
Circuit Diagram & Wiring
The wiring for this project is extremely straightforward because we are using the ESP32's internal resistors.
The Logic: Usually, buttons need an external 10kΩ resistor to prevent a "floating state." However, in our code, we used pinMode(BUTTON_PIN, INPUT_PULLUP);. This activates a resistor inside the ESP32 chip itself, saving us from using extra components.
| Component | Pin A | Pin B |
| Push Button | GPIO 23 (D23) | GND (Ground) |
Visual Diagram:
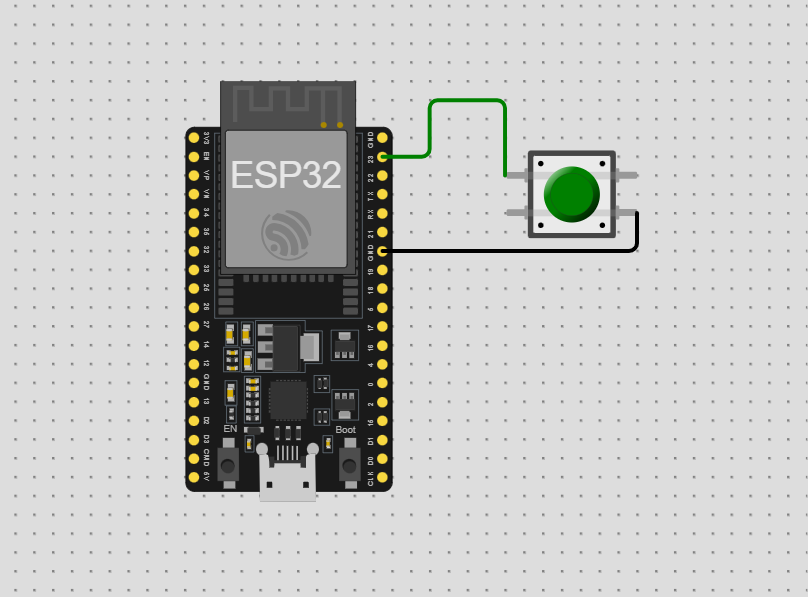
- Step 1: Place the ESP32 on the breadboard.
- Step 2: Insert the push button into the breadboard.
- Step 3: Connect one leg of the button to GPIO 23.
- Step 4: Connect the diagonal or opposite leg of the button to GND.
Note: If your button has 4 legs, legs on the same side are usually connected internally. Use legs across the body from each other to be safe.
The Code
To keep our code clean and professional, we are splitting the project into three files. This is standard practice in firmware engineering because it separates the "logic" from the "configuration."
How to Create .h and .cpp Files in Arduino IDE
If you have never used multiple files in the Arduino IDE before, don't worry—it is very simple.
- Open Arduino IDE and start a new sketch.
- Look at the top right corner of the blue bar (below the serial monitor icon). You will see a small down-arrow icon (▼) or three dots (...).
- Click that icon and select "New Tab" (or press
Ctrl+Shift+N). - A box will appear asking for a name. Type
WebPageHandler.hand click OK. - Repeat the process: Click "New Tab" again, name it
WebPageHandler.cpp, and click OK.
You should now see three tabs at the top of your screen:
YourSketchName(The main file)WebPageHandler.hWebPageHandler.cpp
Now, copy and paste the code below into the corresponding tabs.
1. The Header File (WebPageHandler.h)
This file acts as a "blueprint." It tells the compiler what functions and variables we plan to use.
#ifndef WEBPAGE_HANDLER_H
#define WEBPAGE_HANDLER_H

#include <WebServer.h>
#include <Preferences.h>

class WebPageHandler {
public:
  WebPageHandler(WebServer& server);
  void begin();
  bool isConfigDone();

private:
  WebServer& _server;
  Preferences _prefs;
  bool configDone = false;

  static const char* htmlForm;
  void handleRoot();
  void handleSubmit();
  String buildSuccessPage();
};

#endif
2. The Logic & HTML (WebPageHandler.cpp)
This file contains the "heavy lifting." It stores the HTML code for our website and handles the saving of data to the ESP32's flash memory.
#include "WebPageHandler.h"
#include <WiFi.h>

// This is our HTML Web Page styled with CSS
const char* WebPageHandler::htmlForm = R"rawliteral(
<!DOCTYPE html>
<html>
<head>
  <meta name="viewport" content="width=device-width, initial-scale=1.0">
  <title>ESP32 Config</title>
  <style>
    body {
      font-family: 'Segoe UI', sans-serif;
      background: linear-gradient(to right, #83a4d4, #b6fbff);
      margin: 0; padding: 0;
      display: flex; align-items: center; justify-content: center;
      height: 100vh;
    }
    .container {
      background: white; padding: 24px;
      border-radius: 12px; box-shadow: 0 4px 12px rgba(0,0,0,0.15);
      width: 90%; max-width: 400px;
    }
    h2 { text-align: center; color: #333; }
    label { display: block; margin-top: 15px; font-weight: bold; }
    input[type="text"], input[type="email"], input[type="password"] {
      width: 100%; padding: 10px; margin-top: 6px;
      border: 1px solid #ccc; border-radius: 6px; box-sizing: border-box;
    }
    input[type="submit"] {
      width: 100%; margin-top: 20px; padding: 12px;
      background-color: #0078D7; border: none; color: white;
      font-size: 16px; border-radius: 6px; cursor: pointer;
      transition: background 0.3s;
    }
    input[type="submit"]:hover { background-color: #005bb5; }
    @media (max-width: 600px) {
      .container { margin: 10px; padding: 20px; }
    }
  </style>
</head>
<body>
  <div class="container">
    <h2>Device Configuration</h2>
    <form action="/submit" method="POST">
      <label for="device_name">Device Name</label>
      <input type="text" id="device_name" name="device_name" required>

      <label for="email">Email</label>
      <input type="email" id="email" name="email" required>

      <label for="password">Password</label>
      <input type="password" id="password" name="password" required>

      <input type="submit" value="Save Settings">
    </form>
  </div>
</body>
</html>
)rawliteral";

WebPageHandler::WebPageHandler(WebServer& server) : _server(server) {}

void WebPageHandler::begin() {
    _prefs.begin("device_prefs", false); // Namespace "device_prefs"

    _server.on("/", HTTP_GET, [this]() { handleRoot(); });
    _server.on("/submit", HTTP_POST, [this]() { handleSubmit(); });
    _server.begin();
}

void WebPageHandler::handleRoot() {
    _server.send(200, "text/html", htmlForm);
}

void WebPageHandler::handleSubmit() {
    String deviceName = _server.arg("device_name");
    String email = _server.arg("email");
    String password = _server.arg("password");

    // Save data to Flash Memory (NVS)
    _prefs.putString("device_name", deviceName);
    _prefs.putString("email", email);
    _prefs.putString("password", password);

    _server.send(200, "text/html", buildSuccessPage());
    delay(2000);
    configDone = true;
}

String WebPageHandler::buildSuccessPage() {
  return R"rawliteral(
<!DOCTYPE html>
<html>
<head>
  <meta name="viewport" content="width=device-width, initial-scale=1.0">
  <title>Settings Saved</title>
  <style>
    body { font-family: 'Segoe UI', sans-serif;
           background: linear-gradient(to right, #83a4d4, #b6fbff);
           display: flex; align-items: center; justify-content: center; height: 100vh; margin: 0; }
    .container { background: white; padding: 24px; border-radius: 12px; text-align: center; }
  </style>
</head>
<body>
  <div class="container">
    <h2>Settings Saved Successfully!</h2>
    <p>You can now restart the device.</p>
  </div>
</body>
</html>
)rawliteral";
}

bool WebPageHandler::isConfigDone() { return configDone; }
3. The Main Sketch (main.ino)
This is the brain of the operation. It uses an Interrupt to detect when you press the button.
Key Features:
- Hold Time: 10 Seconds to trigger config mode.
- Timeout: The portal stays open for 2 minutes. If no one connects, it turns off to save power.
#include <WiFi.h>
#include <WebServer.h>
#include <Preferences.h>
#include "WebPageHandler.h"
Preferences prefs;
WebServer* server = nullptr;
WebPageHandler* pageHandler = nullptr;
#define AP_NAME "test_device"
#define AP_PASS "12345678"
#define HOLD_TIME 10000 // 10 seconds hold to trigger
#define BUTTON_PIN 23
const unsigned long CONFIG_PORTAL_TIMEOUT = 120000; // 2 minutes timeout
volatile bool buttonPressed = false;
static bool messageShown = false;
unsigned long buttonPressStart = 0;
String name, email, password;
bool configRunning = false;
// Interrupt Service Routine (ISR)
void IRAM_ATTR handleButtonInterrupt() {
if (!buttonPressed) {
buttonPressed = true;
buttonPressStart = millis();
}
}
void runConfigPortal() {
configRunning = true;
// Reset WiFi modes
WiFi.disconnect(true); delay(100);
WiFi.softAPdisconnect(true); delay(100);
WiFi.mode(WIFI_OFF); delay(100);
WiFi.mode(WIFI_AP);
// Start Access Point
WiFi.softAP(AP_NAME, AP_PASS);
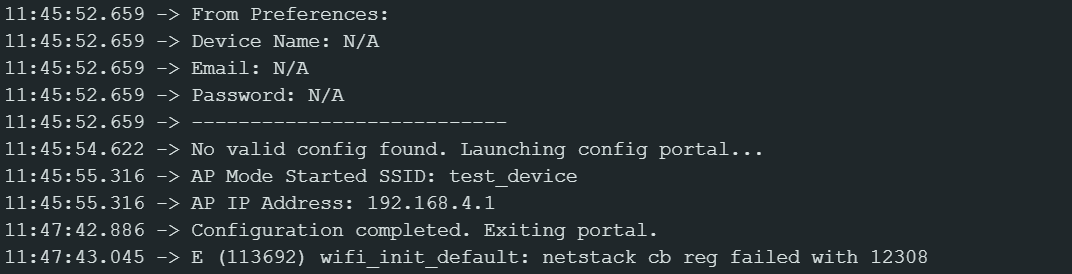
Serial.println("AP Mode Started SSID: " + String(AP_NAME));
Serial.println("AP IP Address: " + WiFi.softAPIP().toString());
if (server) delete server;
if (pageHandler) delete pageHandler;
server = new WebServer(80);
pageHandler = new WebPageHandler(*server);
pageHandler->begin();
unsigned long startTime = millis();
while (millis() - startTime < CONFIG_PORTAL_TIMEOUT) {
server->handleClient();
delay(1);
if (pageHandler->isConfigDone()) {
Serial.println("Configuration completed. Exiting portal.");
break;
}
}
server->stop();
WiFi.disconnect(true); delay(100);
WiFi.softAPdisconnect(true); delay(100);
WiFi.mode(WIFI_OFF); delay(100);
Serial.println("Portal closed.");
// Read back the new data to verify
prefs.begin("device_prefs", true);
name = prefs.getString("device_name", "N/A");
email = prefs.getString("email", "N/A");
password = prefs.getString("password", "N/A");
prefs.end();
Serial.println("NEW DATA SAVED:");
Serial.println("Device Name: " + name);
Serial.println("Email: " + email);
Serial.println("Password: " + password);
Serial.println("---------------------------");
configRunning = false;
}
void setup() {
Serial.begin(115200);
pinMode(BUTTON_PIN, INPUT_PULLUP);
// Attach interrupt to the button pin
attachInterrupt(digitalPinToInterrupt(BUTTON_PIN), handleButtonInterrupt, FALLING);
// Load existing data on startup
prefs.begin("device_prefs", true);
name = prefs.getString("device_name", "N/A");
email = prefs.getString("email", "N/A");
password = prefs.getString("password", "N/A");
Serial.println("From Preferences:");
Serial.println("Device Name: " + name);
Serial.println("Email: " + email);
Serial.println("Password: " + password);
Serial.println("---------------------------");
delay(2000);
// If no data exists, force config mode
if (name == "N/A" || email == "N/A" || password == "N/A") {
Serial.println("No valid config found. Launching config portal...");
runConfigPortal();
}
}
void loop() {
if (buttonPressed) {
if (digitalRead(BUTTON_PIN) == LOW) {
if (!messageShown) {
Serial.println("Button pressed. Hold to confirm...");
messageShown = true;
}
if (millis() - buttonPressStart >= HOLD_TIME) {
Serial.println("Button held for 10s — starting config portal...");
buttonPressed = false;
messageShown = false;
runConfigPortal();
}
} else {
// Button released early
buttonPressed = false;
messageShown = false;
}
}
}How to Use It
- Upload the Code: Make sure you have the ESP32 board package installed.
- Open Serial Monitor: Set baud rate to 115200.
- Trigger Config: Hold the button on GPIO 23 for 10 seconds until you see "Starting Portal...". If no saved config data it will open config portal automatically for first time.
- Connect Wi-Fi: On your phone or laptop, search for the Wi-Fi named test_device and enter password
12345678. - Open Browser: Go to
192.168.4.1.
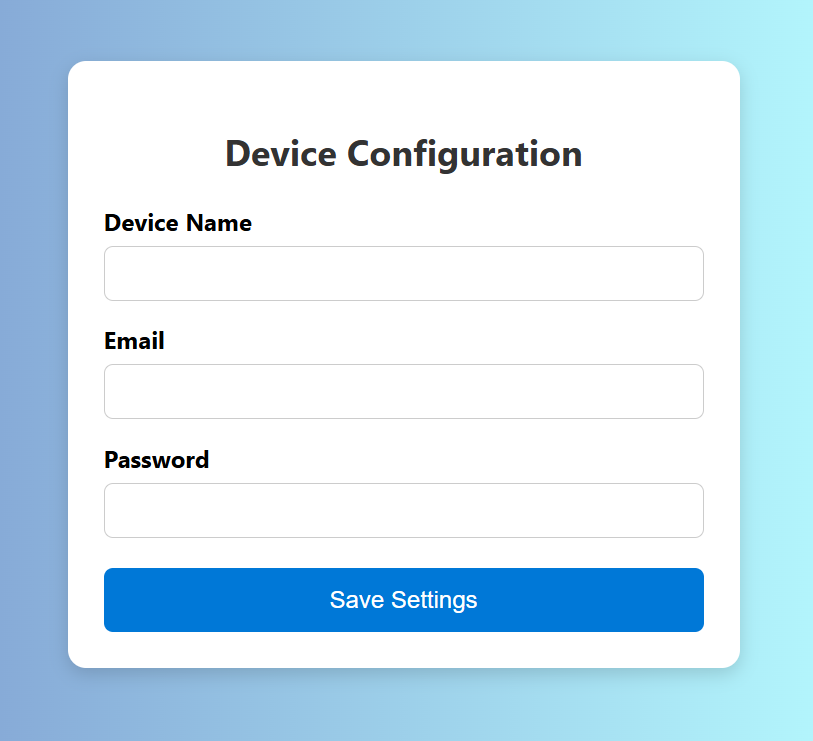
- Save Data: Enter your details and click Save.
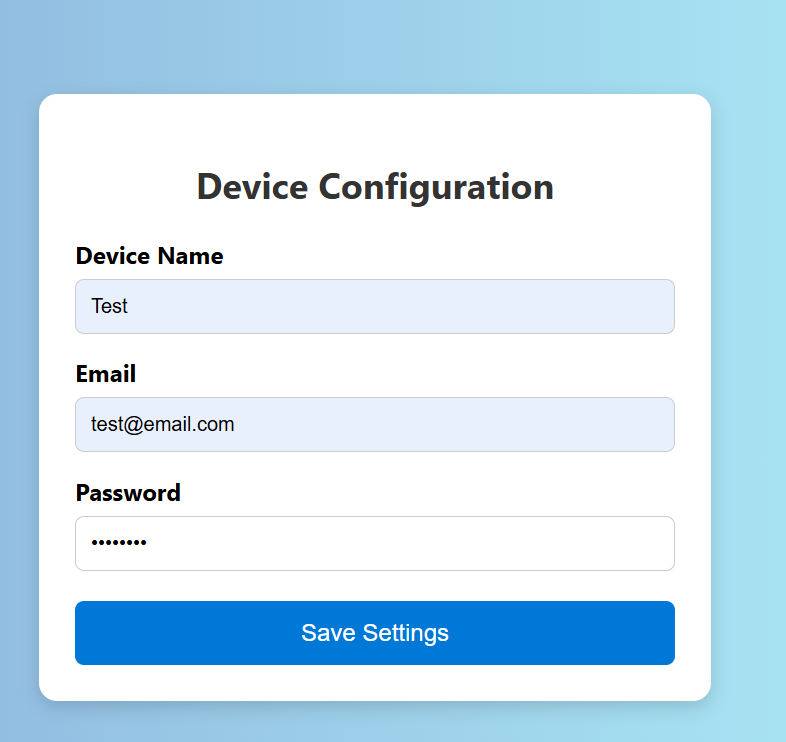

- You can see the saved data on the serial monitor

Conclusion & What's Next
Congratulations! You have successfully built a device that can save its own configuration settings without needing to be reprogrammed. By using ESP32 Preferences, you have moved away from the old, unreliable EEPROM methods and created a more professional, "product-like" experience.
Coming Soon: The Full Wi-Fi Manager
While this project handles device names and emails perfectly, you might be wondering: "How do I scan for available Wi-Fi networks and connect to them dynamically?"
That is exactly what we are building next. In the upcoming tutorial, we will expand this code to create a Full Wi-Fi Manager that scans for networks, lets you select one from a list, and handles connection failures automatically.
Link to the Wi-Fi Manager tutorial will be added here soon!
Stay tuned and keep building!