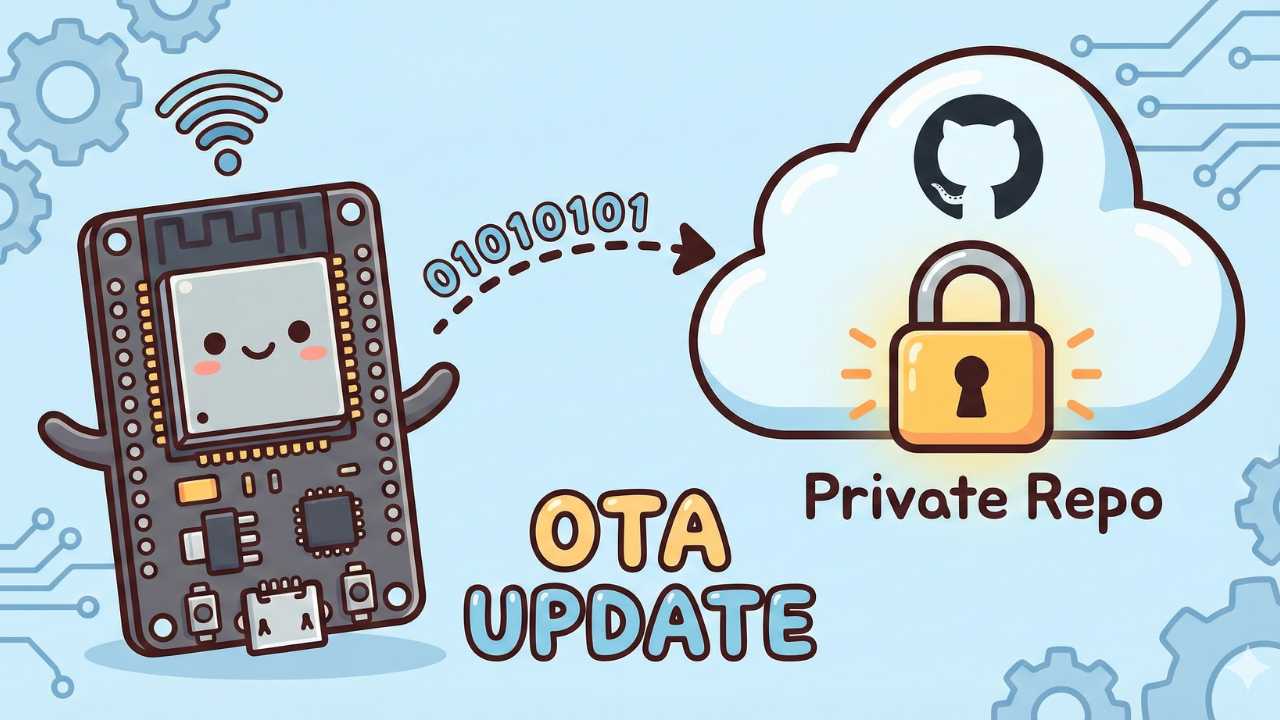
ESP32 OTA Firmware Updates from a Private GitHub Repository
Securing your firmware is critical. In this tutorial, we ditch the public clouds and build a secure, automated Over-the-Air (OTA) update system for the ESP32 using Private GitHub Repositories and Personal Access Tokens.
In the world of IoT, the ability to update your devices remotely is non-negotiable. While updating from a public server is easy, real-world commercial projects require security. You cannot leave your proprietary firmware code open to the public.

In this guide, I will share a production-ready method to perform Over-the-Air (OTA) updates on an ESP32 directly from a Private GitHub Repository. We will use the GitHub API, a Personal Access Token (PAT) for security, and the ArduinoJson library to handle the update logic intelligently.
Why This Method?
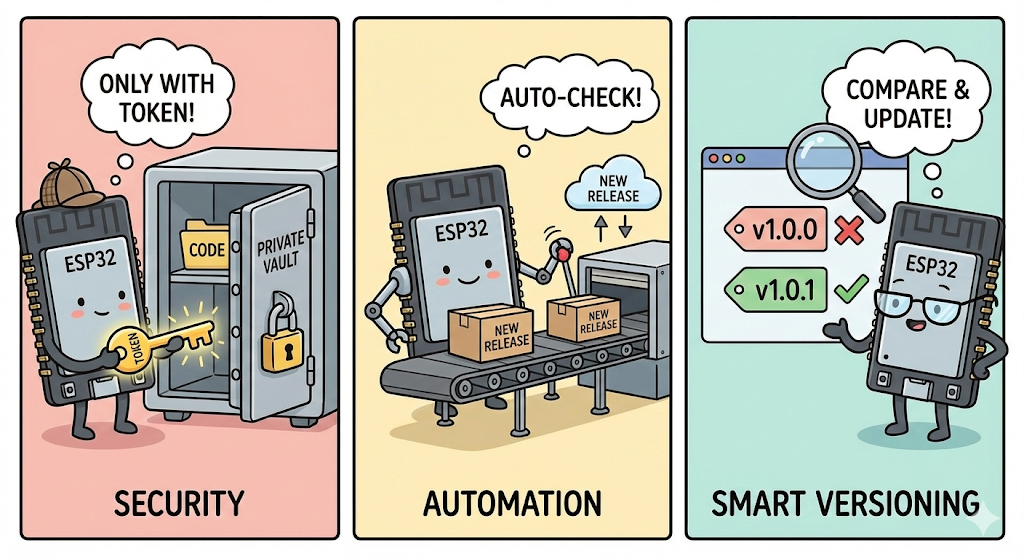
- Security: Your code stays private. Only devices with the correct token can download updates.
- Automation: The ESP32 automatically checks for new releases.
- Smart Versioning: It compares the Semantic Version tags (e.g.,
1.0.0vs1.0.1) to avoid unnecessary downloads.
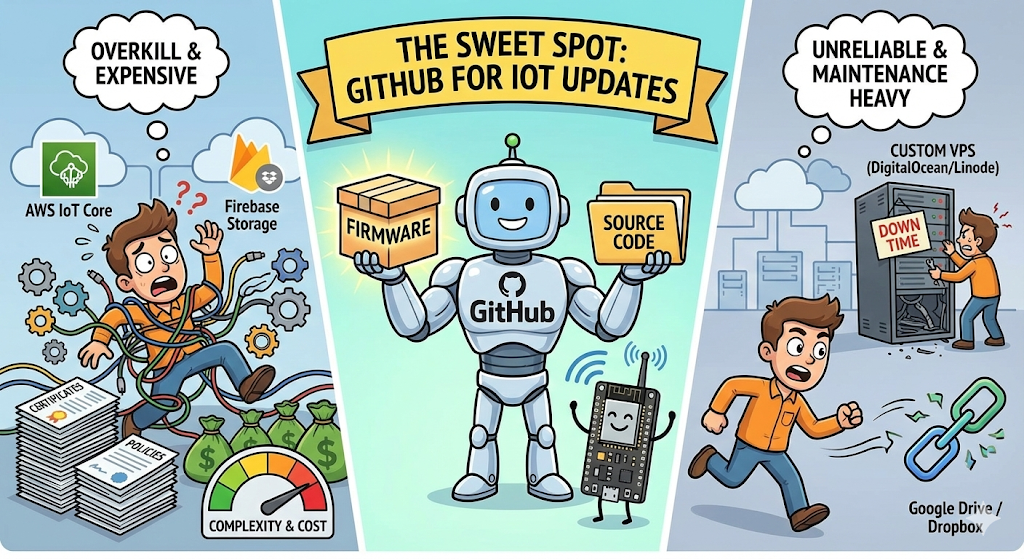
Why Choose GitHub Over AWS, Firebase, or Google Drive?
You might be wondering: "Why not just put the file on Google Drive or use AWS IoT?"
While those platforms are powerful, they often introduce unnecessary complexity or cost for firmware updates. Here is why using a Private GitHub Repository is the "Sweet Spot" for many IoT engineers:
| Method | Complexity | Cost | Maintenance | Best For |
| AWS / Azure IoT | High | High (at scale) | Medium | Enterprise massive fleets |
| Google Drive | Medium | Free | High (Links break) | Never recommended for OTA |
| Custom Server | Medium | $5-10/mo | High (Security/Uptime) | Full control freaks |
| GitHub Private Repo | Low | Free | Zero | Developers & Small-Med Fleets |
📺 Watch the Video Tutorial
If you prefer learning visually, I have recorded a complete step-by-step walkthrough of this project. In the video, I demonstrate the hardware setup, explain the code logic in detail, and show the live bi-directional communication.
Prerequisites
Before we start, make sure you have:
Hardware Required
- ESP32 Development Board
Software Tools
- Arduino IDE: Make sure you have the latest version installed.
- ESP32 Board Support: You must have the ESP32 board manager installed in your IDE. Need help? Check out my guide: How to Set Up ESP32 in Arduino IDE 2.0 (Windows/Ubuntu)
- ArduinoJson Library: Go to Sketch > Include Library > Manage Libraries, search for "ArduinoJson", and install the latest version (by Benoit Blanchon).
Phase 1: The GitHub Setup
We need a secure place to store our firmware.
1. Create a Private Repository
- Go to GitHub and create a New Repository.
- Name it
ESP32-Private-OTA. - Crucial: Select Private.
- Click Create repository.
2. Generate a Personal Access Token (PAT)
Since your repository is private, the ESP32 needs a key to access it. This is called a Personal Access Token (PAT).
- Log into GitHub and go to Settings > Developer settings > Personal access tokens > Tokens (classic).
- Click Generate new token (classic).
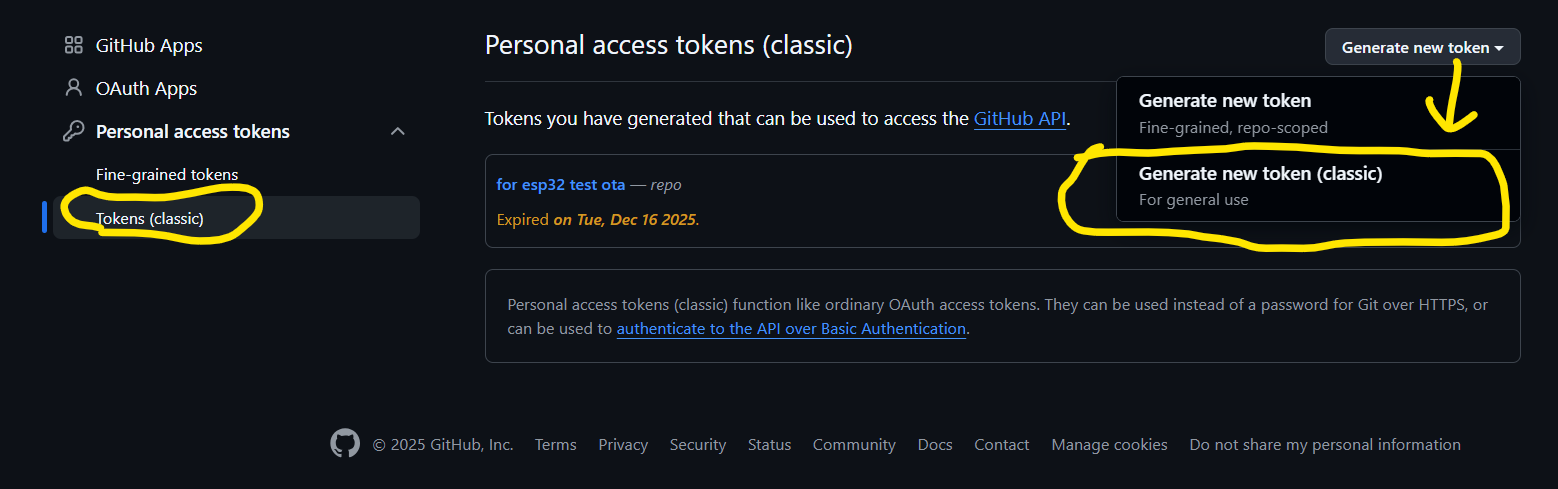
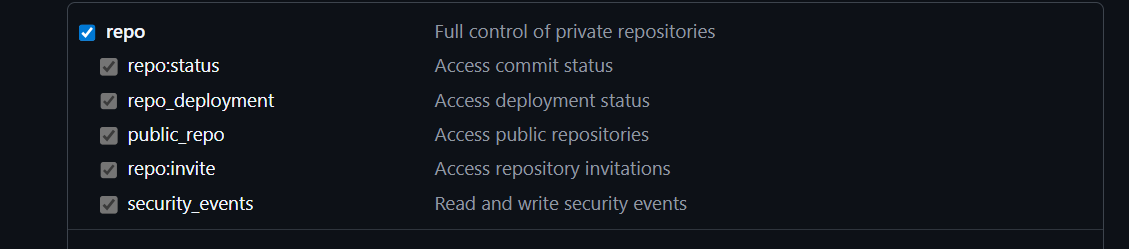
- Scopes: You must check the
repobox. This grants full control of private repositories. - Copy the Token: Copy this string immediately. You won't see it again.
Phase 2: Deploy & Test
Let's get the update working.
To keep your code secure, we never hardcode sensitive tokens directly into the main file if we plan to share it. Instead, we use a separate header file.
secrets.h: Stores your Personal Access Token so you can change them easily.main.ino: Contains the actual logic and code.
1. Create secrets.h
- Open Arduino IDE and create a new sketch.
- Click the small arrow icon (...) near the top right of the editor tabs.
- Select "New Tab".
- Name it
secrets.h.
Paste the following code inside it:
#ifndef SECRETS_H
#define SECRETS_H

// Your GitHub Personal Access Token (Keep this private!)
const char* github_pat = "ghp_YOUR_GENERATED_TOKEN_HERE";

#endif
2. The Main Code
Copy the full code below into your main .ino file.
#include <WiFi.h>
#include <HTTPClient.h>
#include <Update.h>
#include <ArduinoJson.h>
#include "secrets.h" // Contains your github_pat token
const char* ssid = ""; // put your wifi name
const char* password = ""; // put your wifi passowrd
// --- GitHub Repo Details ---
const char* github_owner = "YOUR_GITHUB_USERNAME"; // your github username
const char* github_repo = "ESP32-Private-OTA"; // your repo name
const char* firmware_asset_name = "firmware.bin"; // your file name
// --- Current Firmware Version ---
const char* currentFirmwareVersion = "1.0.0";
// --- Update Check Timer ---
unsigned long lastUpdateCheck = 0;
const long updateCheckInterval = 5 * 60 * 1000; // 5 minutes in milliseconds
// =================================================================================
// SETUP: Runs once at boot.
// =================================================================================
void setup() {
Serial.begin(115200);
delay(1000);
Serial.println("\nBooting up...");
Serial.println("Current Firmware Version: " + String(currentFirmwareVersion));
connectToWiFi();
delay(6000);
checkForFirmwareUpdate();
}
// =================================================================================
// LOOP: Runs continuously. This is the heart of the application.
// =================================================================================
void loop() {
}
// =================================================================================
// HELPER FUNCTIONS
// =================================================================================
void connectToWiFi() {
Serial.print("Connecting to WiFi");
WiFi.begin(ssid, password);
int attempts = 0;
while (WiFi.status() != WL_CONNECTED && attempts < 20) {
delay(500);
Serial.print(".");
attempts++;
}
if (WiFi.status() == WL_CONNECTED) {
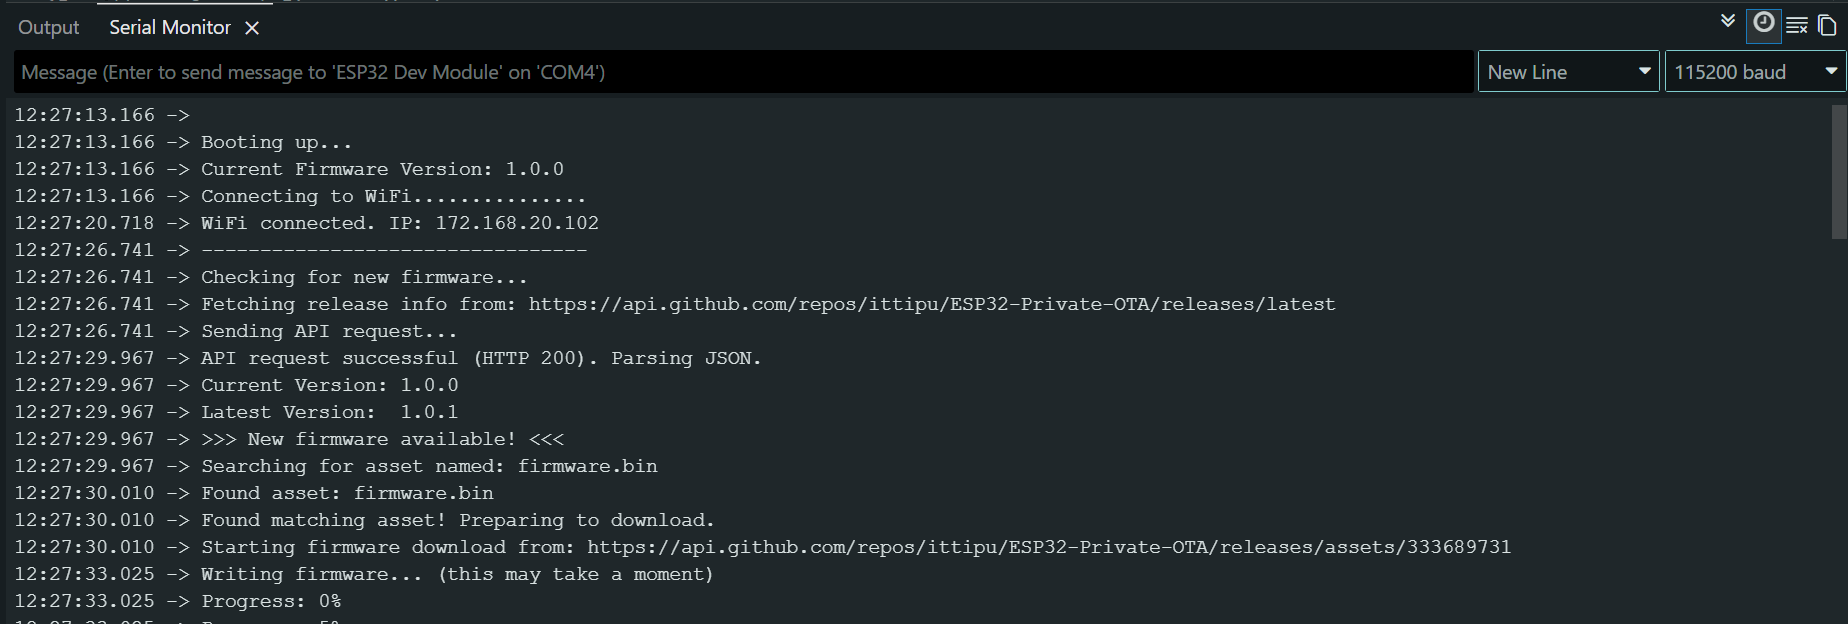
Serial.println("\nWiFi connected. IP: " + WiFi.localIP().toString());
Serial.println("Starting firmware checking process");
} else {
Serial.println("\nFailed to connect to WiFi. Will retry later.");
}
}
void checkForFirmwareUpdate() {
if (WiFi.status() != WL_CONNECTED) {
Serial.println("WiFi not connected. Skipping update check.");
return;
}
String apiUrl = "https://api.github.com/repos/" + String(github_owner) + "/" + String(github_repo) + "/releases/latest";
Serial.println("---------------------------------");
Serial.println("Checking for new firmware...");
Serial.println("Fetching release info from: " + apiUrl);
HTTPClient http;
http.begin(apiUrl);
// 1. Increase timeout to prevent "IncompleteInput" on slow connections
http.setTimeout(10000);
http.addHeader("Authorization", "token " + String(github_pat));
http.addHeader("Accept", "application/vnd.github.v3+json");
http.setUserAgent("ESP32-OTA-Client");
Serial.println("Sending API request...");
int httpCode = http.GET();
if (httpCode != HTTP_CODE_OK) {
Serial.printf("API request failed. HTTP code: %d\n", httpCode);
http.end();
return;
}
Serial.printf("API request successful (HTTP %d). Parsing JSON.\n", httpCode);
// 2. Create a Filter to ignore unnecessary data
// We ONLY want tag_name and the assets list. This saves massive RAM.
StaticJsonDocument<512> filter;
filter["tag_name"] = true;
filter["assets"][0]["name"] = true;
filter["assets"][0]["id"] = true;
// 3. Use DynamicJsonDocument with more memory (16KB)
// The GitHub response is large, even with filtering, we need buffer space.
DynamicJsonDocument doc(16384);
// 4. Deserialize with the filter
DeserializationError error = deserializeJson(doc, http.getStream(), DeserializationOption::Filter(filter));
// Note: We do NOT call http.end() yet because we might need the stream,
// but usually deserializeJson consumes it. We will close it after logic.
if (error) {
Serial.print("Failed to parse JSON: ");
Serial.println(error.c_str());
http.end();
return;
}
String latestVersion = doc["tag_name"].as<String>();
if (latestVersion.isEmpty() || latestVersion == "null") {
Serial.println("Could not find 'tag_name' in JSON response.");
http.end();
return;
}
Serial.println("Current Version: " + String(currentFirmwareVersion));
Serial.println("Latest Version: " + latestVersion);
if (latestVersion != currentFirmwareVersion) {
Serial.println(">>> New firmware available! <<<");
Serial.println("Searching for asset named: " + String(firmware_asset_name));
String firmwareUrl = "";
// Iterate through assets
JsonArray assets = doc["assets"].as<JsonArray>();
for (JsonObject asset : assets) {
String assetName = asset["name"].as<String>();
Serial.println("Found asset: " + assetName);
if (assetName == String(firmware_asset_name)) {
String assetId = asset["id"].as<String>();
// Construct the direct download URL for the asset
firmwareUrl = "https://api.github.com/repos/" + String(github_owner) + "/" + String(github_repo) + "/releases/assets/" + assetId;
Serial.println("Found matching asset! Preparing to download.");
break;
}
}
// Close the JSON connection before starting the download connection
http.end();
if (firmwareUrl.isEmpty()) {
Serial.println("Error: Could not find the specified firmware asset in the release.");
return;
}
// Start the download
downloadAndApplyFirmware(firmwareUrl);
} else {
Serial.println("Device is up to date. No update needed.");
http.end();
}
Serial.println("---------------------------------");
}
void downloadAndApplyFirmware(String url) {
HTTPClient http;
Serial.println("Starting firmware download from: " + url);
http.setFollowRedirects(HTTPC_STRICT_FOLLOW_REDIRECTS);
http.setUserAgent("ESP32-OTA-Client");
http.begin(url);
http.addHeader("Accept", "application/octet-stream");
http.addHeader("Authorization", "token " + String(github_pat));
int httpCode = http.GET();
if (httpCode != HTTP_CODE_OK) {
Serial.printf("Download failed, HTTP code: %d\n", httpCode);
http.end();
return;
}
int contentLength = http.getSize();
if (contentLength <= 0) {
Serial.println("Error: Invalid content length.");
http.end();
return;
}
// Begin the OTA update
if (!Update.begin(contentLength)) {
Serial.printf("Update begin failed: %s\n", Update.errorString());
http.end();
return;
}
Serial.println("Writing firmware... (this may take a moment)");
WiFiClient* stream = http.getStreamPtr();
uint8_t buff[1024];
size_t totalWritten = 0;
int lastProgress = -1;
while (totalWritten < contentLength) {
int available = stream->available();
if (available > 0) {
int readLen = stream->read(buff, min((size_t)available, sizeof(buff)));
if (readLen < 0) {
Serial.println("Error reading from stream");
Update.abort();
http.end();
return;
}
if (Update.write(buff, readLen) != readLen) {
Serial.printf("Error: Update.write failed: %s\n", Update.errorString());
Update.abort();
http.end();
return;
}
totalWritten += readLen;
int progress = (int)((totalWritten * 100L) / contentLength);
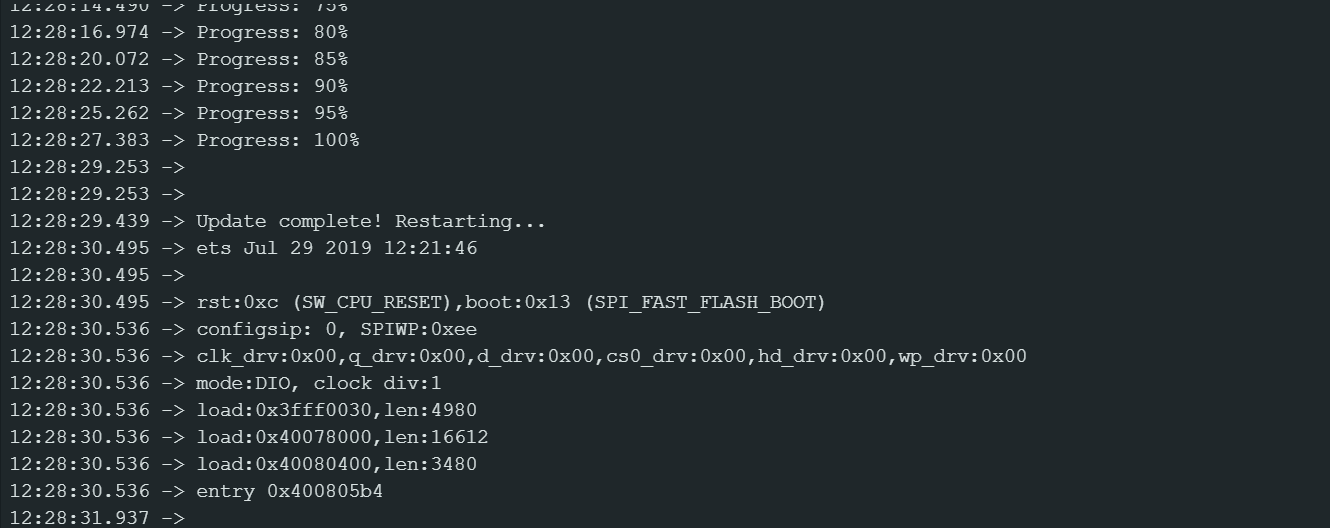
if (progress > lastProgress && (progress % 5 == 0 || progress == 100)) {
Serial.printf("Progress: %d%%", progress);
Serial.println();
if (progress == 100) {
Serial.println();
} else {
Serial.print("\r");
}
lastProgress = progress;
}
}
delay(1);
}
Serial.println();
if (totalWritten != contentLength) {
Serial.printf("Error: Write incomplete. Wrote %d of %d bytes\n", totalWritten, contentLength);
Update.abort();
} else if (!Update.end()) { // Finalize the update
Serial.printf("Error: Update end failed: %s\n", Update.errorString());
} else {
Serial.println("Update complete! Restarting...");
delay(1000);
ESP.restart();
}
http.end();
}3. Prepare the Update (Version 1.0.1)
We want to simulate a situation where the Cloud has a newer version than the device.
- In your code, change
currentFirmwareVersionto "1.0.1". - Go to Sketch > Export Compiled Binary.
- Go to Sketch > Show Sketch Folder >
buildfolder. - Rename the
.ino.binfile tofirmware.bin(must match your code exactly!).
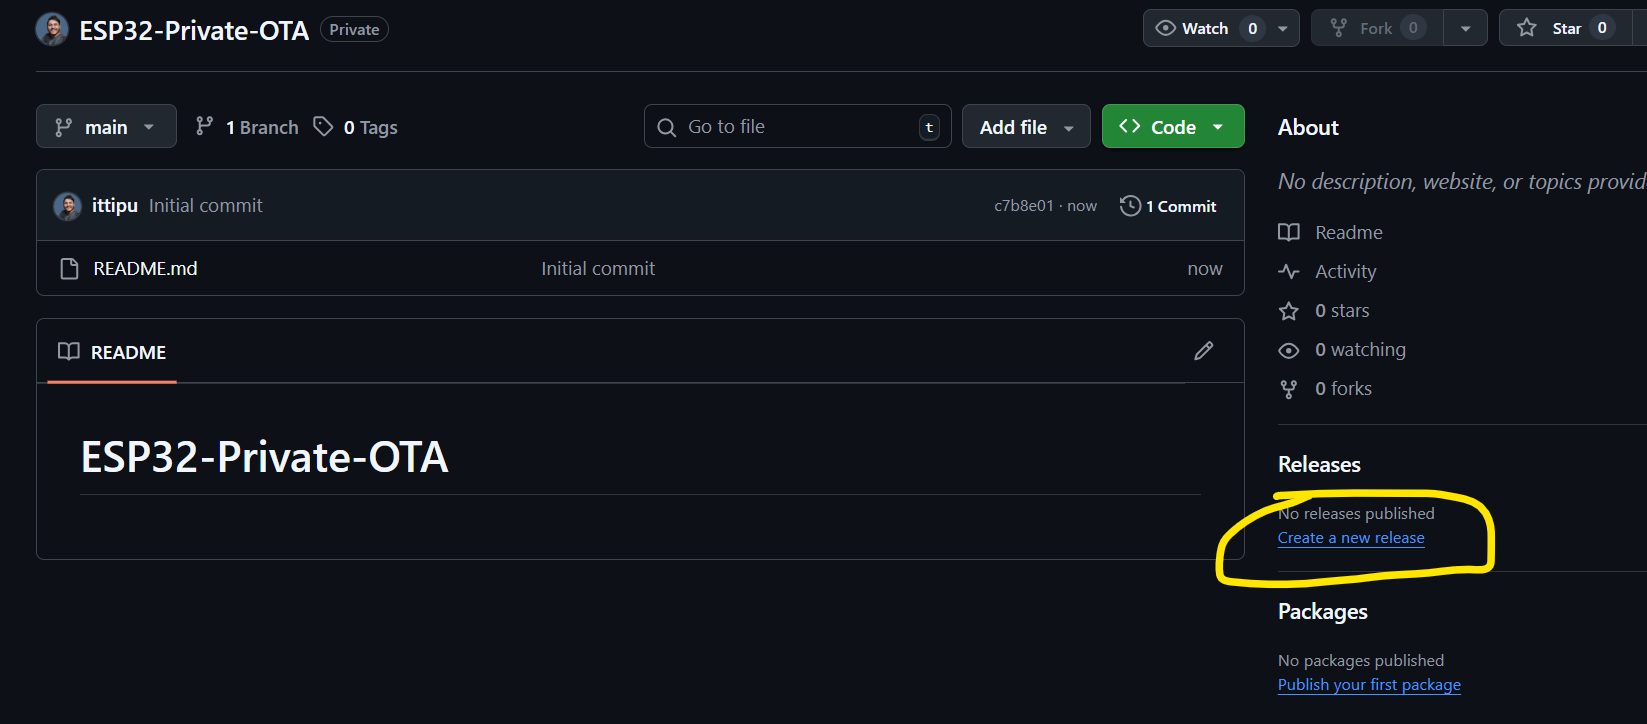
4. Upload to GitHub
- In your GitHub Repo, click Releases > Draft a new release.
- Tag:
1.0.1. - Title:
v1.0.1 Update. - Attach Binaries: Drag and drop your
firmware.bin.
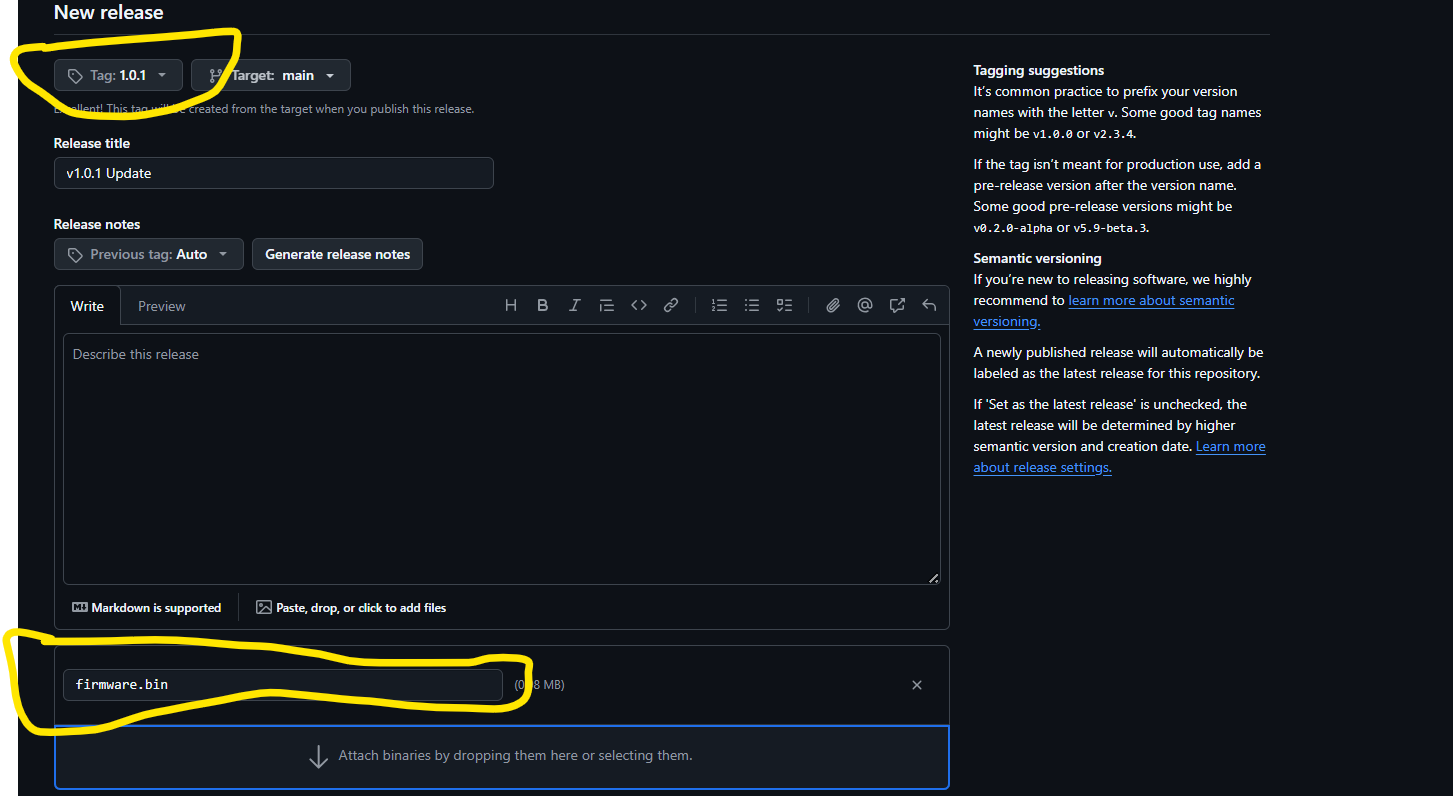
- Click Publish release.
5. Flash the Device (Version 1.0.0)
Now we need to put the "old" version on the physical ESP32.
- In your code, change
currentFirmwareVersionback to "1.0.0". - Connect your ESP32 via USB.
- Upload the code.
Phase 3: The Result
Open your Serial Monitor (Baud 115200). If you did everything right, you will see this sequence:
I suggest please press the restart button of esp32 after opening the serial monitor so you can monitor from beginning.
- Boot: Device wakes up as v1.0.0.
- Check: It asks GitHub "What is the latest version?"
- Compare: GitHub says "1.0.1". Device sees it is on "1.0.0".
- Update: It downloads the secure file using your Token.
Phase 4: How It Works (Code Explanation)
Now that you have seen it work, let's understand the "Why".
1. Secure Authentication
The magic happens in the HTTP headers. A standard HTTP GET request would fail because the repo is private. We add the Authorization header:
http.addHeader("Authorization", "token " + String(github_pat));
This acts like a VIP pass, allowing the ESP32 to see inside your private account.
2. Semantic Versioning Logic
We don't want the device downloading the same file over and over.
- We parse the JSON response from GitHub using
ArduinoJson. - We extract the
"tag_name". - We compare strings:
if (latestVersion != currentFirmwareVersion).
3. The "Raw" Download
GitHub's API is tricky. If you just ask for the file, it gives you metadata (JSON). To get the actual binary file, we must set a specific header:
http.addHeader("Accept", "application/octet-stream");
This tells GitHub servers: "Don't tell me about the file, send me the actual file."
Conclusion
You now have a professional-grade OTA system that costs $0.
You can push code to your private GitHub repo, create a release, and all your deployed ESP32s will automatically update themselves. No expensive cloud platforms, no complex servers.
If you enjoyed this tutorial, check out the video walkthrough on my channel IoT Bhai. Happy coding!