ESP32 OTA Updates via Google Drive: The Ultimate Free Hosting Guide
Deploying IoT devices is easy, but updating them once they are mounted on a wall is hard. Discover how to turn your Google Drive into a free, reliable server for ESP32 Over-The-Air (OTA) updates. Save money on cloud hosting and skip the complex server configuration with this "IoT Bhai" guide.

In the world of IoT, deploying your ESP32 devices is only half the battle. The real challenge begins when you need to fix a bug or add a feature to a device that is already mounted on a wall, hidden in a ceiling, or located miles away.
This is where OTA (Over-The-Air) updates come in. OTA allows you to push new firmware to your devices wirelessly over WiFi.

Typically, hosting OTA files requires setting up a web server or using paid cloud storage like AWS S3. But for hobbyists and makers, there is a fantastic, free alternative: Google Drive.
Typically, hosting OTA files requires setting up a web server or using paid cloud storage like AWS S3. But for hobbyists and makers, there is a fantastic, free alternative: Google Drive.
Why This Method?
Before we dive into the code, you might be wondering why you should use Google Drive over other options. Here are the main benefits:
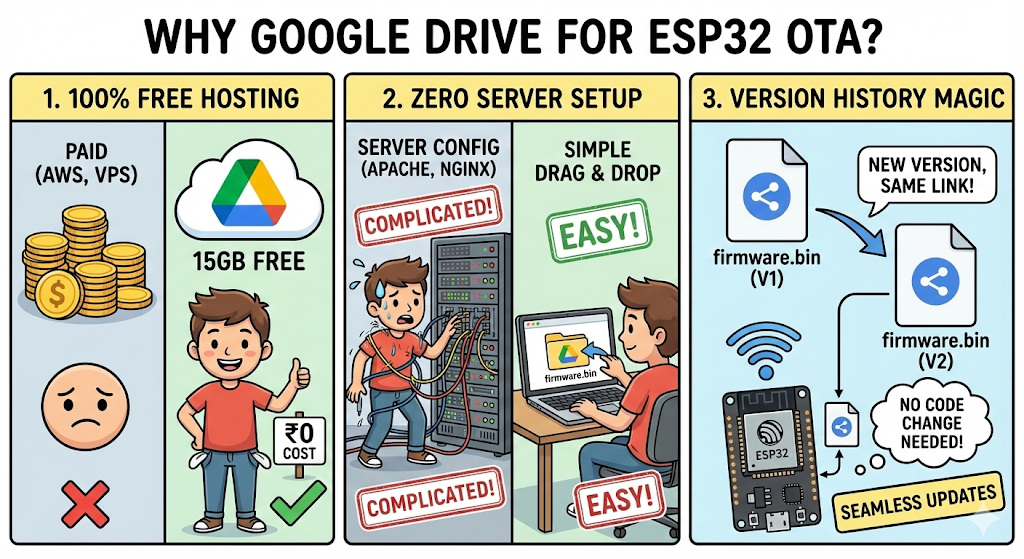
- 100% Free Hosting: Unlike AWS S3 or a dedicated VPS (Virtual Private Server), which can incur monthly costs, Google Drive provides 15GB of free storage—more than enough for thousands of firmware versions.
- Zero Server Setup: You don't need to configure Apache, Nginx, or manage a Linux server. If you know how to drag and drop a file, you can host an OTA server.
- Version History Magic: This is the best part. Google Drive allows you to upload a "New Version" of an existing file while keeping the same share link. This means you don't have to update your ESP32 code with a new URL every time you release an update.
📺 Watch the Video Tutorial
If you prefer learning visually, I have recorded a complete step-by-step walkthrough of this project. In the video, I demonstrate the hardware setup, explain the code logic in detail, and show the live bi-directional communication.
The Challenge: Google Drive Share Links
If you've ever tried this before, you know the main hurdle isn't the ESP32 code—it's Google Drive.
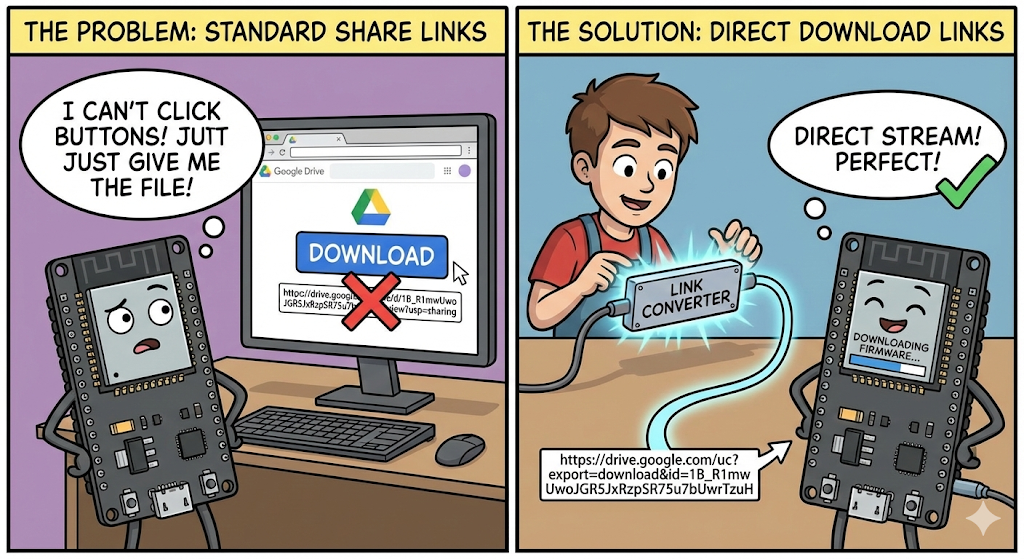
When you share a file on Google Drive, you get a link that looks like this: https://drive.google.com/file/d/1B_R1mwUwoJGR5JxRzpSR75u7bUwrTzuH/view?usp=sharing
If your ESP32 tries to download that link, it won't get the firmware file. Instead, it gets an HTML page asking you to click a download button. The ESP32 can't click buttons.
The Solution: We need to convert those standard share links into direct download links that the ESP32 can stream immediately.
Prerequisites
Before we start, make sure you have:
Hardware:
- ESP32 Development Board: Any standard ESP32 board will work. I recommend the ESP32 DevKit V1.
Software:
- Arduino IDE: Make sure you have the latest version installed.
- ESP32 Board Support: You must have the ESP32 board manager installed in your IDE.Need help? Check out my guide: How to Set Up ESP32 in Arduino IDE 2.0 (Windows/Ubuntu)
- Google Account: You need access to Google Drive to host your files.
Libraries:
- No external libraries are required! We will use the built-in
WiFi,HTTPClient,WiFiClientSecure, andUpdatelibraries that come pre-installed with the ESP32 board package.
Step 1: Setting up Google Drive
We need two files hosted on Google Drive:
- A
.txtfile containing the latest version number. - A
.binfile containing the actual compiled firmware.
1. Create the Version File
- On your computer, create a simple text file named
version.txt. - Inside, just write the current version number, for example:
1.0.1. - Upload this file to a specific folder on your Google Drive.
2. Get the Direct Link for the Version File
- Right-click the uploaded
version.txtin Google Drive and select Share. - Crucial Step: Change general access to "Anyone with the link".
- Click "Copy Link".
- Paste that link somewhere (like Notepad). It will look something like this:
https://drive.google.com/file/d/1h3gwOIR0EKs_LWNwswSupTjut7S1My2WrZTYzmVuSug/view?usp=sharing - Copy the File ID (the long alphanumeric string highlighted above).
- Create the direct link using this format:
https://docs.google.com/document/d/YOUR_FILE_ID_HERE/export?format=txt
Save this final link. This is your versionUrl.
3. Create a Placeholder Binary File
For the code to compile initially, you can create a dummy .bin file or upload a previous one just to get the process started. Upload it to the same Google Drive folder.
4. Get the Direct Link for the Firmware Binary
- Repeat the sharing process for the
.binfile (ensure it's set to "Anyone with the link"). - Extract the File ID from the share link.
https://drive.google.com/file/d/1B_R1mwUwoJGR5JxRzpSR75u7bUwrTzuH/view?usp=drive_link - Copy the File ID (the long alphanumeric string highlighted above)
- Create the direct download link using this specific format used for binary files:
https://drive.google.com/uc?export=download&id=YOUR_FILE_ID_HERE
Save this final link. This is your firmwareUrl.
Step 2: The ESP32 Code
Below is the complete code used in the experiment. You need to install the ESP32 board support package in your Arduino IDE to use it.
The Sketch
#include <WiFi.h>
#include <HTTPClient.h>
#include <WiFiClientSecure.h>
#include <Update.h>

// --- YOUR CREDENTIALS ---
const char* ssid = "YOUR_WIFI_SSID";     // REPLACE WITH YOUR WIFI SSID
const char* password = "YOUR_WIFI_PASSWORD"; // REPLACE WITH YOUR WIFI PASSWORD

// This version refers to the code currently running on the ESP32
const char* currentFirmwareVersion = "1.0.1";

// --- YOUR GOOGLE DRIVE DIRECT LINKS ---
// Replace these with the direct links you generated in Step 1
const char* firmwareUrl = "https://drive.google.com/uc?export=download&id=YOUR_BIN_FILE_ID";
const char* versionUrl = "https://docs.google.com/document/d/YOUR_TXT_FILE_ID/export?format=txt";


void setup() {
  Serial.begin(115200);

  // 1. Connect to WiFi
  WiFi.begin(ssid, password);
  Serial.print("Connecting to WiFi");
  while (WiFi.status() != WL_CONNECTED) {
    delay(500);
    Serial.print(".");
  }
  Serial.println("\nConnected to WiFi!");

  // 2. Check for updates on boot
  if (WiFi.status() == WL_CONNECTED) {
    checkForFirmwareUpdate();
  }
}

void loop() {
  // Your main application logic goes here
}

// --- OTA FUNCTIONS ---

void checkForFirmwareUpdate() {
  Serial.println(F("--- Boot Firmware Check ---"));

  // Safety Check: Ensure enough RAM to start secure connection
  if (ESP.getFreeHeap() < 30000) {
    Serial.println(F("⚠️ Low RAM. Skipping check to prevent crash."));
    return;
  }

  String latestVersion = fetchLatestVersion();

  if (latestVersion == "") {
    Serial.println(F("Could not fetch version from Drive."));
    return;
  }

  // Clean up the fetched string (remove whitespace or hidden characters)
  String cleanVersion = "";
  for (int i = 0; i < latestVersion.length(); i++) {
    if (isdigit(latestVersion[i]) || latestVersion[i] == '.') {
      cleanVersion += latestVersion[i];
    }
  }
  latestVersion = cleanVersion;

  // Compare versions
  if (latestVersion != currentFirmwareVersion) {
    Serial.println("New firmware found: " + latestVersion);
    Serial.println("Current firmware: " + String(currentFirmwareVersion));
    downloadAndApplyFirmware(latestVersion);
  } else {
    String msg = "Firmware is up to date: " + String(currentFirmwareVersion);
    Serial.println(msg);
  }
}

String fetchLatestVersion() {
  String latestVersion = "";

  // Another RAM safety check for HTTPS
  if (ESP.getFreeHeap() < 20000) {
    Serial.println(F("❌ Not enough RAM for HTTPS check!"));
    return "";
  }

  // Use 'new' to allocate client on Heap to save Stack memory
  WiFiClientSecure* client = new WiFiClientSecure;
  if (!client) {
    Serial.println(F("Failed to allocate WiFiClientSecure"));
    return "";
  }

  client->setInsecure();  // Ignore SSL certificate validation
  client->setTimeout(10000);

  HTTPClient http;

  if (http.begin(*client, versionUrl)) {
    // Important: Google Drive often redirects, we must follow.
    http.setFollowRedirects(HTTPC_FORCE_FOLLOW_REDIRECTS);

    int httpCode = http.GET();

    if (httpCode == HTTP_CODE_OK) {
      latestVersion = http.getString();
      latestVersion.trim();
    } else {
      Serial.printf("[HTTP] Version Check Failed, code: %d\n", httpCode);
    }
    http.end();
  } else {
    Serial.println(F("[HTTP] Unable to connect to version URL"));
  }

  delete client; // Free up memory
  return latestVersion;
}

void downloadAndApplyFirmware(String newVersion) {
  Serial.println(F("--- Preparing Download ---"));

  WiFiClientSecure* client = new WiFiClientSecure;
  if (!client) {
    Serial.println(F("❌ Could not allocate Secure Client"));
    return;
  }

  client->setInsecure();
  client->setTimeout(30000); // Longer timeout for large file downloads

  HTTPClient http;
  // Sometimes helpful to set a User Agent
  http.setUserAgent("ESP32-OTA");

  if (http.begin(*client, firmwareUrl)) {
    http.setFollowRedirects(HTTPC_FORCE_FOLLOW_REDIRECTS);

    int httpCode = http.GET();

    if (httpCode == HTTP_CODE_OK) {
      int contentLength = http.getSize();

      String sizeKB = String(contentLength / 1024.0, 1);
      String msg = "Starting Update... | Ver: " + newVersion + " | Size: " + sizeKB + " KB";
      Serial.println(msg);

      // Begin the update process using the Update library
      if (contentLength > 0) {
        if (Update.begin(contentLength)) {
          Serial.println(F("Writing to Flash..."));

          // Get the data stream from HTTP
          WiFiClient* stream = http.getStreamPtr();
          uint8_t buff[1280]; // Buffer for reading data
          size_t written = 0;
          int prevProgress = -1;

          // Loop to read the stream and write to flash
          while (http.connected() && (written < contentLength)) {
            size_t size = stream->available();
            if (size) {
              int c = stream->readBytes(buff, ((size > sizeof(buff)) ? sizeof(buff) : size));
              Update.write(buff, c);
              written += c;

              // Calculate and print progress %
              int progress = (written * 100) / contentLength;
              if (progress != prevProgress && (progress % 10 == 0 || progress == 100)) {
                 Serial.printf("Progress: %d%%\n", progress);
                 prevProgress = progress;
              }
            }
            yield(); // Keep WiFi stack alive
          }
          Serial.println();

          // Finalize update
          if (written == contentLength) {
            if (Update.end() && Update.isFinished()) {
              Serial.println(F("✅ Update Success! Rebooting..."));
              delete client;
              ESP.restart(); // Restart to load new firmware
            }
          } else {
            Serial.printf("Error: Written only %d/%d\n", written, contentLength);
            Update.abort();
          }
        } else {
          Serial.println(F("Error: Not enough space for OTA on flash layout"));
        }
      }
    } else {
      Serial.printf("HTTP Download Failed: %d\n", httpCode);
    }
    http.end();
  } else {
    Serial.println(F("Error: Connection failed to update URL"));
  }

  delete client; // Free memory
}
Step 3: The Workflow - How to Release an Update
Now that your ESP32 is running the code above, here is the exact workflow to push an update.
1. Prepare the Initial State
- Update the code: Set
currentFirmwareVersion = "1.0.1". - Update Google Drive: Edit
version.txtto say1.0.1. - Upload this code to your ESP32 via USB.
- Open Serial Monitor. The ESP32 will boot, check Drive, see that "1.0.1" matches "1.0.1", and report:
Firmware is up to date.
2. Prepare the New Update (e.g., version 1.0.2)
- Make changes to your Arduino sketch (e.g., add a new feature to the
loop()). - Important: Change the version variable at the top of your code:
const char* currentFirmwareVersion = "1.0.2"; - In the Arduino IDE, go to Sketch -> Export compiled Binary.
- Navigate to your sketch folder. You will find a folder named
buildcontaining a.binfile.
3. Push the Update to Google Drive
This is a pro-tip from the video: Don't delete the old binary file on Google Drive. If you delete it and upload a new one, the File ID will change, and you'll have to update your links.
Instead, use Google Drive's version history feature:
- Go to Google Drive.
- Upload the new bin file. (Drive keeps the same File ID, so your ESP32 code doesn't need to change!)
- Finally, edit the
version.txtfile on Drive and change the text from1.0.1to1.0.2.
4. Watch the Magic
Restart your ESP32. It will connect to WiFi, check the text file, see "1.0.2", realize it's currently running "1.0.1", download the new binary, flash it, and reboot into the new code automatically!
Key concepts in the code:
WiFiClientSecure: Google Drive uses HTTPS, so we need a secure client.client->setInsecure(): This tells the ESP32 not to worry about validating Google's SSL certificate. This is necessary because keeping root certificates updated on a microcontroller is difficult. Note: This is fine for hobby projects, but be cautious for commercial products.- Heap Checks: Before starting HTTPS connections or downloads, the code checks
ESP.getFreeHeap(). HTTPS requires a significant amount of RAM; if the ESP32 is low on memory, trying to update will cause it to crash.
Conclusion
Using Google Drive for ESP32 OTA updates is a perfect example of how resourcefulness beats expensive infrastructure for maker projects. You now have a system where you can update your devices from anywhere in the world, completely for free.

If you enjoyed this tutorial, be sure to check out the IoT Bhai YouTube Channel for more projects like this. If you run into issues or have ideas for the next video, drop a comment below!