Get Accurate NTP Time from Internet using SIM800L & ESP32(GSM IoT Series #4)
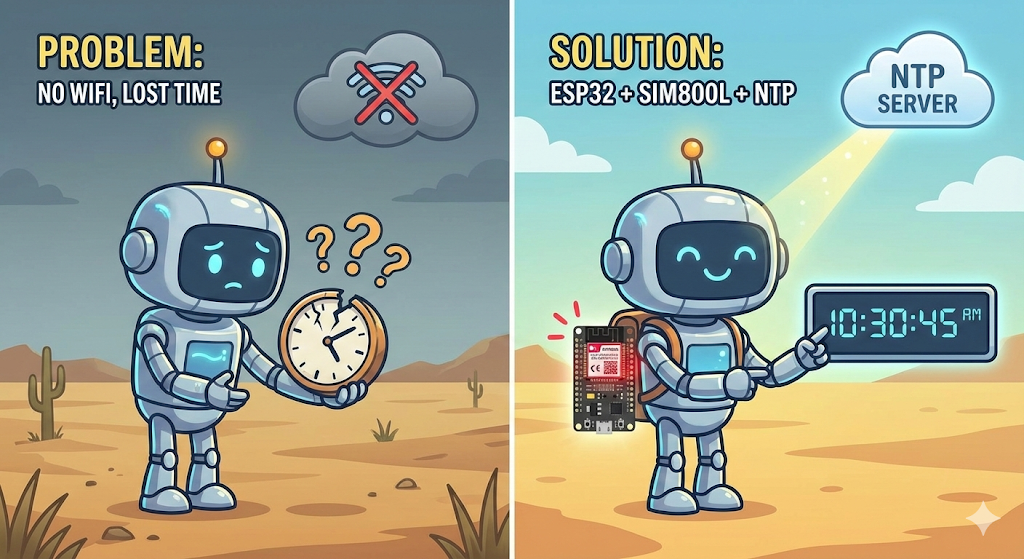
Does your remote IoT project need accurate time but lacks WiFi? Forget expensive RTC modules! In this tutorial, we use the SIM800L GSM module to fetch precise atomic time from an NTP server over GPRS. Perfect for data logging in the field.

In the world of Internet of Things (IoT), keeping accurate time is often critical. Whether you are data logging, setting daily alarms, or timestamping sensor readings, your device needs to know exactly what time it is.
Typically, we rely on WiFi to fetch time or use an external RTC (Real Time Clock) module like the DS3231. But what if your project is in a remote field, on a moving vehicle, or somewhere without WiFi access?
In this tutorial, I will show you how to solve this problem using the SIM800L GSM Module. We will connect an ESP32 to the internet via GPRS (mobile data) and fetch the precise time from an NTP (Network Time Protocol) server. This method requires no extra RTC hardware and ensures your time is always accurate to the second.
❓ Why Is This Useful?
You might be thinking, "My ESP32 has WiFi, why do I need this?"
While WiFi is great for home projects, it isn't available everywhere. Here are a few real-world scenarios where this GSM + NTP method is a life-saver:
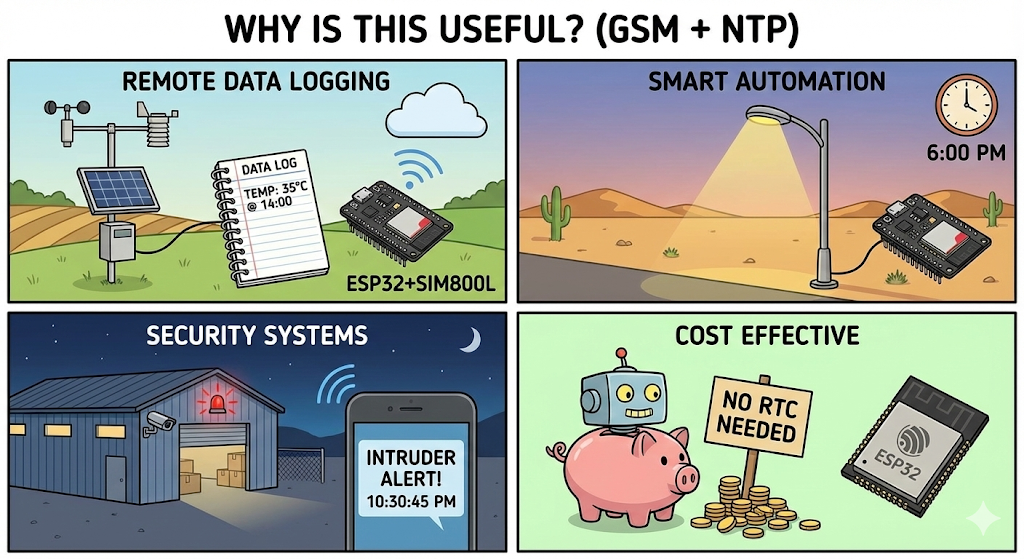
- Remote Data Logging: Imagine a weather station in a farm or a solar monitoring system in a remote field. There is no WiFi, but you still need to timestamp your data (e.g., "Temperature was 35°C at 14:00").
- Smart Automation: You can build automatic street lights or irrigation pumps that turn on/off at specific times of the day, even in the middle of nowhere.
- Security Systems: If an intruder triggers an alarm at a remote warehouse, your system can report the exact time the breach happened, which is crucial for evidence.
- Cost Effective: You don't need to buy a separate RTC (Real Time Clock) module and worry about replacing its coin cell battery every few years.
📹 Video Tutorial
Prefer watching over reading? Check out the full video guide on my YouTube channel here:
Required Component
Hardware
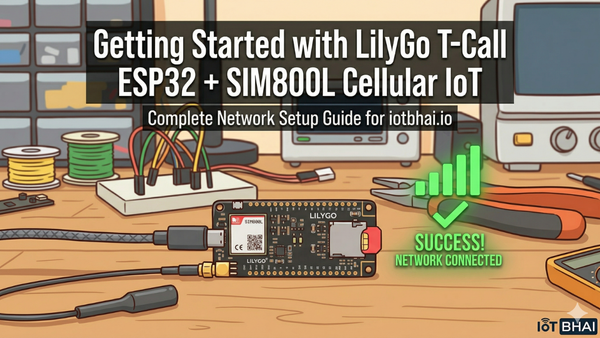
- SIM800L Module with the Header and Antenna soldered
- ESP32 Development Board
- Micro SIM Card (With Credit)
- Battery(Optional)
- DC-DC Booster Module (MT3608 or similar) if you use a Battery(Optional)
- 470 uF 25V Capacitor
- Breadboard
- Connecting wire
- MicroUSB Cable
Software Tools
- Arduino IDE: Make sure you have the latest version installed.
- ESP32 Board Support: You must have the ESP32 board manager installed in your IDE. Need help? Check out my guide: How to Set Up ESP32 in Arduino IDE 2.0 (Windows/Ubuntu)
⚠️ Prerequisites: Read This First!
This is Part 4 of our GSM IoT Series. If you are new here, or if this is your first time working with these modules, I strongly recommend you pause and complete the first two tutorials. They cover the essential wiring and network stability steps you need for today's project to work:
- Part 1: How to Connect SIM800L to ESP32 (Complete Wiring Guide)
- Part 2: SIM800L Network Troubleshooting Guide (Fixing Signal & Power Issues)
Once you have your hardware set up and your SIM card is catching a signal, come back here, and let's get coding!
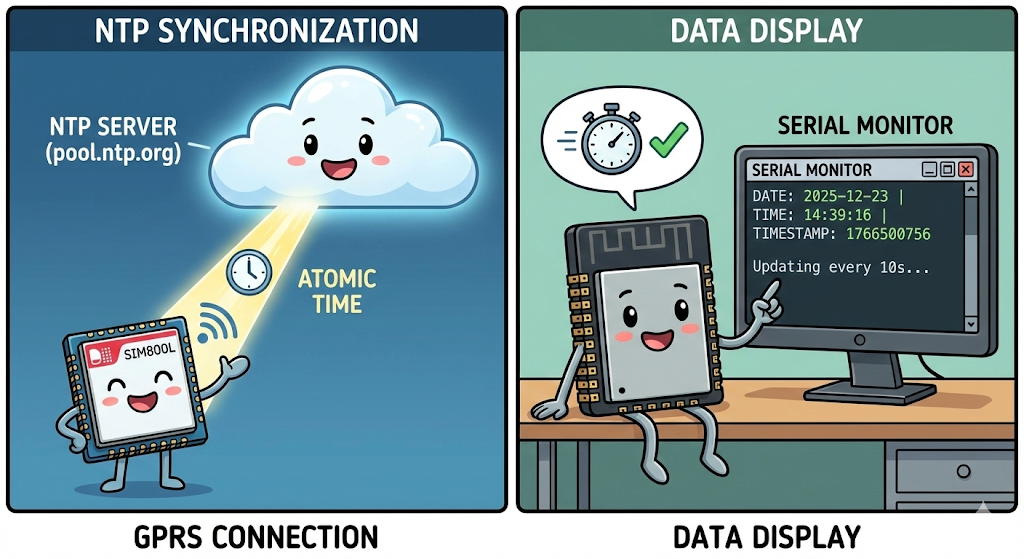
🧠 The Program Flow
Before we jump into the code, let’s understand the flow of the program. I’ve designed the logic to handle network connectivity and time synchronization step-by-step:
- Initialization: When the ESP32 powers on, it first performs a "Hard Reset" on the SIM800L to ensure the modem is fresh and ready.
- Network Search: The system then scans for a cellular provider. It waits until it finds a valid signal before moving forward.
- GPRS Connection: Once registered on the network, it uses your APN settings to connect to the mobile internet (GPRS).
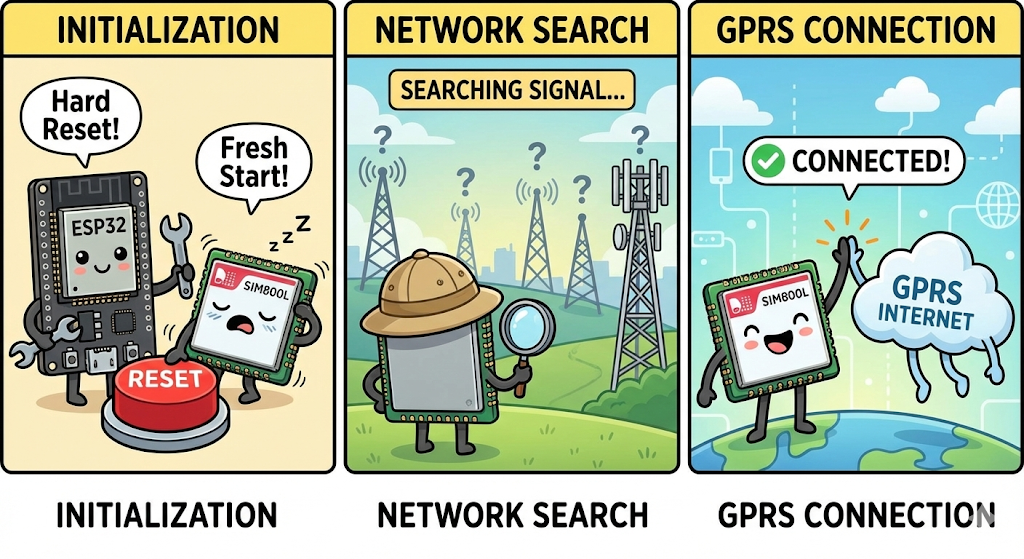
- NTP Synchronization: With internet access established, the module contacts the NTP Server (
pool.ntp.org) to fetch the precise atomic time. - Data Display: Finally, the ESP32 updates its internal clock with this data and begins printing the accurate Date, Time, and Unix Timestamp to the Serial Monitor every 10 seconds.
Hardware Requirements
- ESP32 Development Board
- SIM800L GSM Module
- Li-Ion Battery or Buck Converter (Crucial! Remember, SIM800L needs high current, so USB power often isn't enough.)
- SIM Card (Micro-SIM, 2G compatible)
- Jumper Wires & Breadboard
(Note: If you are unsure about the pinout or how to power the module correctly, please refer to my guide on Connecting SIM800L to ESP32.)
📂 Project Structure: Setting Up in Arduino IDE
To keep our code clean and easy to edit, we will split it into two files:
config.h: Stores your settings (WiFi, APN, Pins) so you can change them easily.main.ino: Contains the actual logic and code.
Step 1: Create the Config File
- Open Arduino IDE and create a new sketch.
- Click the small arrow icon (▼) near the top right of the editor tabs.
- Select "New Tab".
- Name the file
config.hand click OK.
Step 2: Paste the Configuration Code
Copy the code below and paste it into the config.h tab you just created. This is where you will edit your APN and Timezone.
// ESP32 and SIM800l pins
#define MODEM_TX 26
#define MODEM_RX 27
#define MODEM_RST 14
#define MODEM_DTR 25
#define MODEM_RING 34

// APN Settings
const char apn[] = "internet"; // put your SIM APN
const char gprsUser[] = "";
const char gprsPass[] = "";

#define SerialMon Serial
#define SerialAT Serial1
#define TINY_GSM_DEBUG SerialMon
#define GSM_PIN ""
#define NTP_SERVER "132.163.96.5"

const int UTC_OFFSET_HOURS = 6; // Define UTC offset for your timezone (e.g., +6 for Bangladesh)
const char* daysOfTheWeek[7] = {"Sunday", "Monday", "Tuesday", "Wednesday", "Thursday", "Friday", "Saturday"}; // Helper array for printing the day of the week
Step 3: Paste the Main Code
Now, go back to the main tab (the one with the .ino extension) and paste the following logic code. Notice how it includes #include "config.h" at the top.
This is the main program file.
#define TINY_GSM_MODEM_SIM800
#define SerialMon Serial
#define TINY_GSM_DEBUG SerialMon
#define SerialAT Serial1
#define GSM_PIN ""
#include <TinyGsmClient.h>
#include <TimeLib.h>
#include "config.h"
#ifdef DUMP_AT_COMMANDS
#include <StreamDebugger.h>
StreamDebugger debugger(SerialAT, SerialMon);
TinyGsm modem(debugger);
#else
TinyGsm modem(SerialAT);
#endif
TinyGsmClient client(modem);
const int timezoneParam = UTC_OFFSET_HOURS * 4;
void setup() {
SerialMon.begin(115200);
delay(1000);
pinMode(MODEM_RST, OUTPUT);
digitalWrite(MODEM_RST, HIGH);
delay(1000);
digitalWrite(MODEM_RST, LOW);
delay(1000);
digitalWrite(MODEM_RST, HIGH);
delay(1000);
pinMode(MODEM_DTR, OUTPUT);
digitalWrite(MODEM_DTR, HIGH);
pinMode(MODEM_RING, INPUT);
SerialMon.println("Wait ...");
SerialAT.begin(115200, SERIAL_8N1, MODEM_TX, MODEM_RX);
SerialMon.println("Initializing modem ...");
modem.init();
if (GSM_PIN && modem.getSimStatus() != 3) {
modem.simUnlock(GSM_PIN);
}
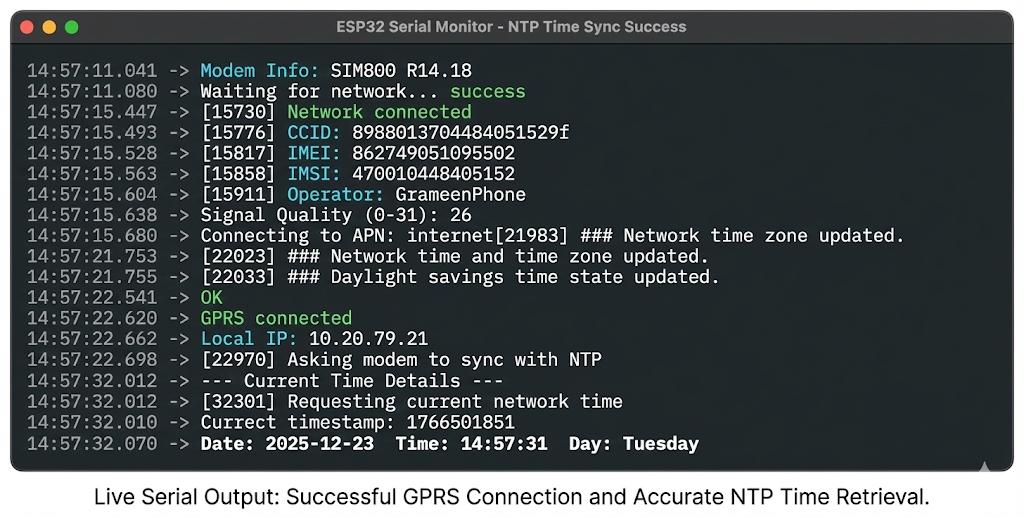
String modemInfo = modem.getModemInfo();
SerialMon.print("Modem Info: ");
SerialMon.println(modemInfo);
SerialMon.print("Wait for network...");
if (!modem.waitForNetwork(600000L, true)) {
SerialMon.println(" fail");
delay(10000);
return;
}
SerialMon.println(" success");
if (modem.isNetworkConnected()) {
DBG("Network connected");
}
String imei = modem.getIMEI();
SerialMon.print("IMEI: ");
SerialMon.println(imei);
delay(500);
String operatorName = modem.getOperator();
SerialMon.print("Operator: ");
SerialMon.println(operatorName);
delay(500);
int signalQuality = modem.getSignalQuality();
SerialMon.print("Signal Quality (0-31): ");
SerialMon.println(signalQuality);
delay(500);
SerialMon.print("Connecting to APN: ");
SerialMon.print(apn);
if (!modem.gprsConnect(apn, gprsUser, gprsPass)) {
SerialMon.println(" fail");
ESP.restart();
}
SerialMon.println(" OK");
if (modem.isGprsConnected()) {
SerialMon.println("GPRS connected");
}
IPAddress localIP = modem.localIP();
SerialMon.print("Local IP: ");
SerialMon.println(localIP);
DBG("Asking modem to sync with NTP");
modem.NTPServerSync("132.163.96.5", timezoneParam);
}
void loop() {
SerialMon.println("--- Current Time Details ---");
int timestamp = get_timestamp();
Serial.print("Currect timestamp: ");
Serial.println(timestamp);
// Print Date in YYYY-MM-DD format
SerialMon.print("Date: ");
SerialMon.print(year());
SerialMon.print("-");
if (month() < 10) { SerialMon.print("0"); }
SerialMon.print(month());
SerialMon.print("-");
if (day() < 10) { SerialMon.print("0"); }
SerialMon.print(day());
// Print Time in HH:MM:SS format
SerialMon.print(" Time: ");
if (hour() < 10) { SerialMon.print("0"); }
SerialMon.print(hour());
SerialMon.print(":");
if (minute() < 10) { SerialMon.print("0"); }
SerialMon.print(minute());
SerialMon.print(":");
if (second() < 10) { SerialMon.print("0"); }
SerialMon.print(second());
// Print the day of the week
SerialMon.print(" Day: ");
SerialMon.println(daysOfTheWeek[weekday() - 1]);
SerialMon.println();
delay(10000);
}
int get_timestamp() {
int year3 = 0;
int month3 = 0;
int day3 = 0;
int hour3 = 0;
int min3 = 0;
int sec3 = 0;
float timezone = 0;
for (int8_t i = 5; i; i--) {
DBG("Requesting current network time");
if (modem.getNetworkTime(&year3, &month3, &day3, &hour3, &min3, &sec3,
&timezone)) {
break;
} else {
DBG("Couldn't get network time, retrying in 15s.");
delay(15000L);
}
}
setTime(hour3, min3, sec3, day3, month3, year3);
int ct = now();
return ct;
}Output
🔍 How it Works: The Logic Behind the Code
Understanding the magic behind the code is just as important as getting it to run. Here is a step-by-step breakdown of what happens when you power on your ESP32 with this sketch.
Step 1: Modem Initialization & GPRS Connection
Before we can get the time, we need a working internet connection.
- Wake-Up Call: In the
setup()function, we first toggle the RST (Reset) pin to ensure the SIM800L module starts fresh. - AT Commands: The ESP32 begins sending "AT commands" over the serial connection to configure the modem.
- Network Registration: The modem searches for a cellular network. The
modem.waitForNetwork()function pauses the code until it finds a signal. - GPRS Attachment: Once registered, the critical step is
modem.gprsConnect(apn, ...). This uses the APN you provided to establish a data connection with your mobile carrier, giving the module an IP address.
Step 2: Requesting Time from the NTP Server
This is where the core action happens.
- We call the function
modem.NTPServerSync(NTP_SERVER, timezoneParam). - Under the hood, the TinyGSM library instructs the SIM800L to open a UDP connection to the specified NTP Server IP (like NIST's
132.163.96.5). - The server responds with a packet containing the current Coordinated Universal Time (UTC).
- The
timezoneParamwe calculated is used to adjust this UTC time to your local time zone right inside the modem.
Step 3: Parsing and Setting the System Time
Now that the modem knows the time, the ESP32 needs to retrieve it and make it usable.
- The
get_timestamp()function callsmodem.getNetworkTime(...). This asks the modem for the synchronized time and breaks it down into individual components: Year, Month, Day, Hour, Minute, and Second. - Crucial Step: These raw numbers are then passed into the
setTime(hour, minute, second, ...)function. This is part of the TimeLib library. - By calling
setTime(), we are effectively setting the ESP32's internal software clock.
Conclusion
And there you have it! You have successfully taught your remote IoT project how to tell time using nothing but a SIM card and the internet.
By following this tutorial, you've unlocked the power of accurate timekeeping in your projects without relying on a WiFi connection or external RTC modules. This is a game-changer for building reliable outdoor devices like weather stations, smart farm monitors, or security systems that need to log data with precise timestamps.
Remember, the key to success is a powerful power supply for the SIM800L and double-checking your APN and Timezone settings.
🚀 What's Next?
This is the 4th video in my GSM IoT Series. In the next episode, we are going to level up significantly. We will learn how to connect the SIM800L to an MQTT Broker.