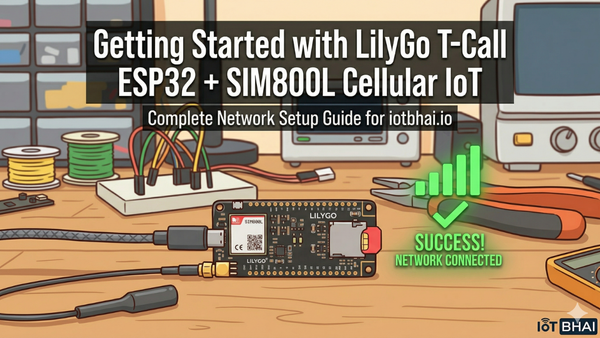
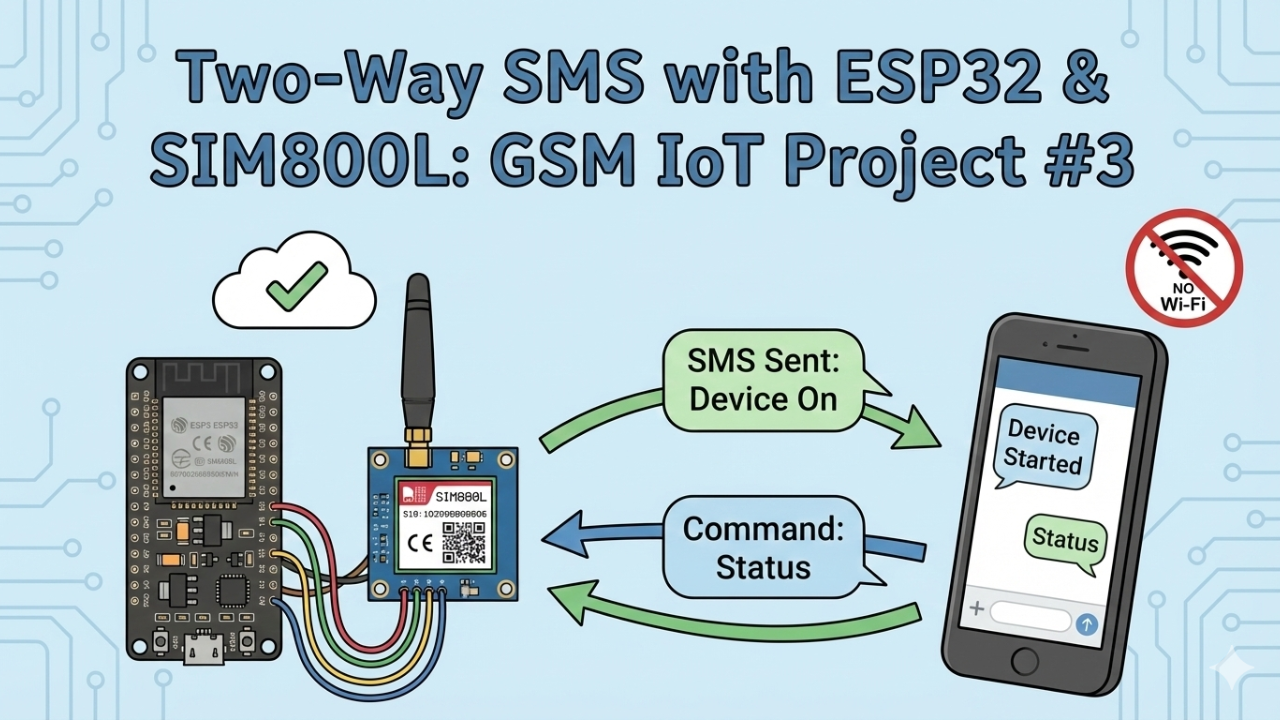
How to Send & Receive SMS with ESP32 and SIM800L (GSM IoT Series #3)
Wi-Fi isn't always an option. In this tutorial, we take our GSM skills to the next level by building a two-way communication system. You'll learn how to make your ESP32 text you automatically and how to query its status from anywhere in the world using simple SMS commands.
Hey everyone! Welcome back to IoT Bhai. Hope you are all doing good!
Today, we are moving forward with our GSM IoT Series. In our previous tutorials, we covered how to wire the SIM800L with the ESP32 and how to troubleshoot common network issues. Now, it’s time to do something cool: Two-way communication.
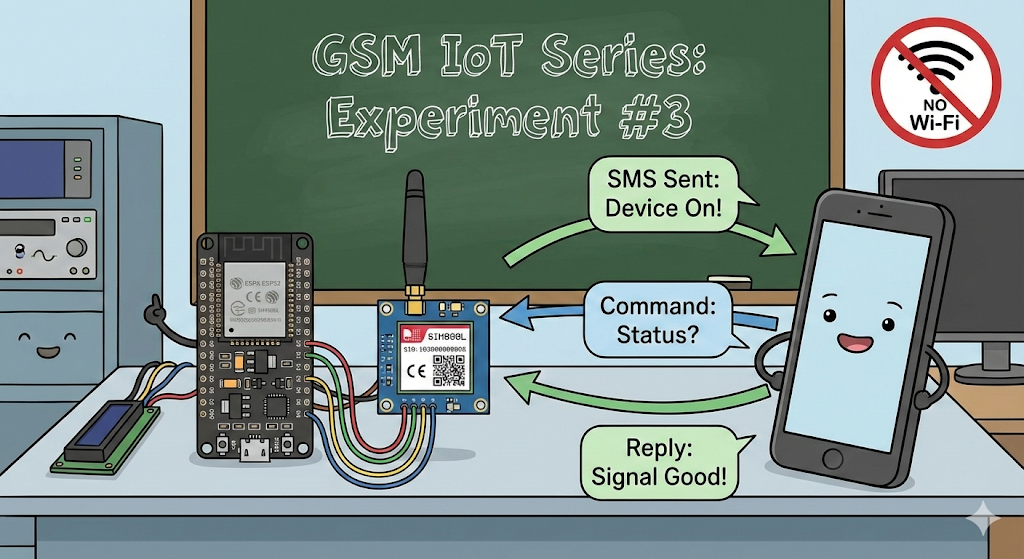
In this experiment (Experiment #3), we will build a system that:
- Sends an SMS automatically when the device powers on.
- Receives SMS commands from your phone.
- Replies with status updates like signal quality and network operator.
This is perfect for remote monitoring projects where Wi-Fi isn't available!
Video Tutorial
Want to see it in action? Watch the full step-by-step video here:
⚠️ Prerequisites: Read This First!
This is Part 3 of our GSM IoT Series. If you are new here, or if this is your first time working with these modules, I strongly recommend you pause and complete the first two tutorials. They cover the essential wiring and network stability steps you need for today's project to work:
- Part 1: How to Connect SIM800L to ESP32 (Complete Wiring Guide)
- Part 2: SIM800L Network Troubleshooting Guide (Fixing Signal & Power Issues)
Once you have your hardware set up and your SIM card is catching a signal, come back here, and let's get coding!
Required Component
Hardware
- SIM800L Module with the Header and Antenna soldered
- ESP32 Development Board
- Micro SIM Card (With Credit)
- Battery(Optional)
- DC-DC Booster Module (MT3608 or similar) if you use a Battery(Optional)
- 470 uF 25V Capacitor
- Breadboard
- Connecting wire
- MicroUSB Cable
Software Tools
- Arduino IDE: Make sure you have the latest version installed.
- ESP32 Board Support: You must have the ESP32 board manager installed in your IDE. Need help? Check out my guide: How to Set Up ESP32 in Arduino IDE 2.0 (Windows/Ubuntu)
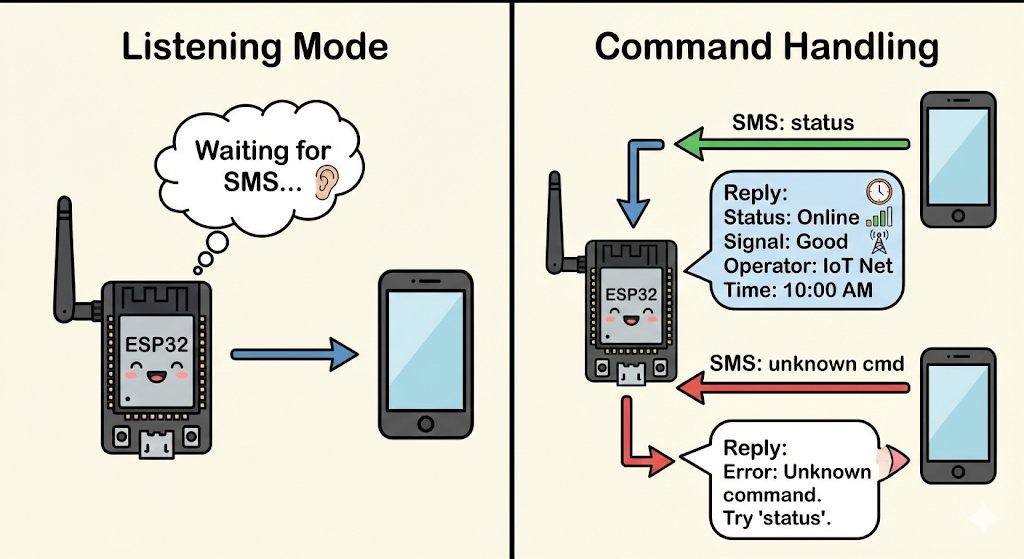
How It Works (The Logic)
Before we jump into the code, let’s understand the flow of the program. I’ve designed the logic to be robust and interactive:
- Initialization: When the ESP32 powers on, it initializes the SIM800L modem.
- Network Connection: It attempts to connect to the cellular network.
- Startup Alert: Once connected, the device immediately sends a text message to your Admin Number saying: "Device Started."
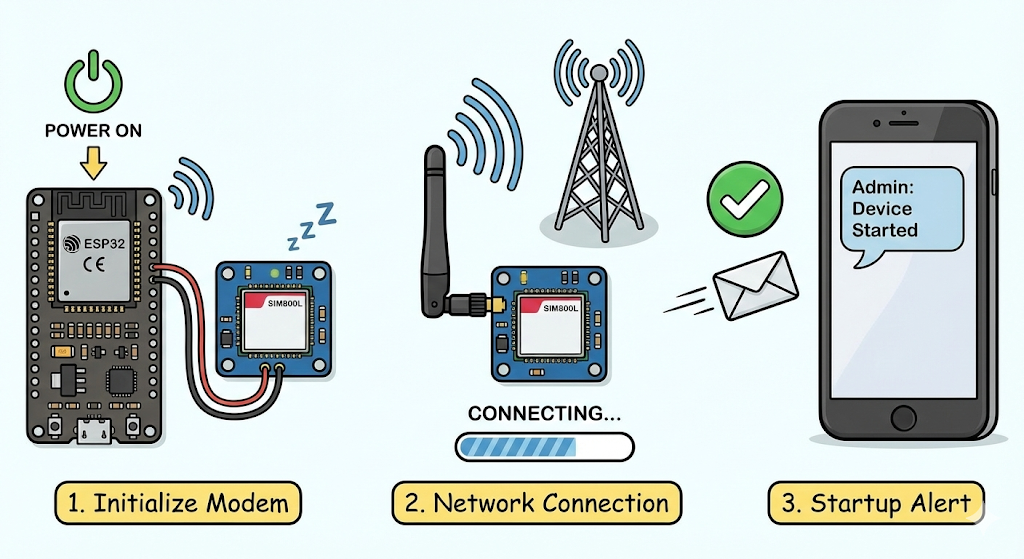
- Listening Mode: The device enters a loop where it waits for incoming SMS messages.
- Command Handling:
- If you send "status": The device gathers data (Time, Operator Name, Signal Quality) and texts it back to you.
- If you send unknown text: It replies with an error message, guiding you to use the correct command.
Hardware Requirements
- ESP32 Development Board
- SIM800L GSM Module
- Li-Ion Battery or Buck Converter (Crucial! Remember, SIM800L needs high current, so USB power often isn't enough.)
- SIM Card (Micro-SIM, 2G compatible)
- Jumper Wires & Breadboard
(Note: If you are unsure about the pinout or how to power the module correctly, please refer to my guide on Connecting SIM800L to ESP32.)
The Code
Below is the full source code for this experiment. It is split into two files: sending_and_receiving_SMS_using_ESP32_and_SIM800L.ino (the main logic) and config.h (where you set your pin definitions and phone number).
1. Configuration File (config.h)
Create a new tab in your Arduino IDE named config.h and paste this code. Don't forget to add your phone number inside the quotes!
// config.h

// ==========================================
// USER SETTINGS
// ==========================================

// Put your phone number with country code (e.g., "+88017XXXXXXXX")
#define ADMIN_NUMBER ""

// SIM Card PIN (Leave empty if your SIM doesn't have a PIN)
#define GSM_PIN ""

// APN Settings (Check your mobile carrier's website)
const char apn[] = "internet";
const char gprsUser[] = "";
const char gprsPass[] = "";

// ==========================================
// PIN DEFINITIONS (ESP32 <-> SIM800L)
// ==========================================
#define MODEM_TX 26
#define MODEM_RX 27
#define MODEM_RST 14
#define MODEM_DTR 25
#define MODEM_RING 34

// Serial Debugger Settings
#define SerialMon Serial
#define SerialAT Serial1
#define TINY_GSM_DEBUG SerialMon
2. Main Sketch (sending_and_receiving_SMS_using_ESP32_and_SIM800L.ino)
This is the main program file.
// sending_and_receiving_SMS_using_ESP32_and_SIM800L.ino
#define TINY_GSM_MODEM_SIM800
#include <TinyGsmClient.h>
#include "config.h"
// Set up the modem and debug streams
#ifdef DUMP_AT_COMMANDS
#include <StreamDebugger.h>
StreamDebugger debugger(SerialAT, SerialMon);
TinyGsm modem(debugger);
#else
TinyGsm modem(SerialAT);
#endif
// Function Prototypes
String extractPhoneNumber(String response);
void handleSms(String number, String msg);
TinyGsmClient client(modem);
// Variables for handling incoming SMS
bool isReceivingMessage = false;
String received_message = "";
String sender_number = "";
void setup() {
// Start Serial Monitor
SerialMon.begin(115200);
delay(1000);
// Initialize Modem Pins
pinMode(MODEM_RST, OUTPUT);
digitalWrite(MODEM_RST, LOW);
delay(100);
digitalWrite(MODEM_RST, HIGH);
delay(1000);
pinMode(MODEM_DTR, OUTPUT);
digitalWrite(MODEM_DTR, HIGH);
pinMode(MODEM_RING, INPUT);
SerialMon.println("Wait ...");
// Initialize Serial communication with SIM800L
SerialAT.begin(115200, SERIAL_8N1, MODEM_TX, MODEM_RX);
delay(3000);
// Restart and Initialize Modem
SerialMon.println("Initializing modem ...");
modem.restart();
delay(3000);
modem.init();
// Unlock SIM if needed
if (GSM_PIN && modem.getSimStatus() != 3) {
modem.simUnlock(GSM_PIN);
}
// Print Modem Info
String modemInfo = modem.getModemInfo();
SerialMon.print("Modem Info: ");
SerialMon.println(modemInfo);
// Connect to Network
SerialMon.print("Waiting for network...");
if (!modem.waitForNetwork()) {
SerialMon.println(" fail");
delay(10000);
return;
}
SerialMon.println(" success");
if (modem.isNetworkConnected()) {
SerialMon.println("Network connected");
}
// Print Network Details
String imei = modem.getIMEI();
SerialMon.print("IMEI: ");
SerialMon.println(imei);
String operatorName = modem.getOperator();
SerialMon.print("Operator: ");
SerialMon.println(operatorName);
int signalQuality = modem.getSignalQuality();
SerialMon.print("Signal Quality (0-31): ");
SerialMon.println(signalQuality);
// Enable Network Time Sync
SerialMon.println("Enabling network time synchronization...");
modem.sendAT("+CLTS=1");
delay(500);
modem.sendAT("&W");
delay(500);
// Restart to apply Time Sync settings
modem.restart();
delay(3000);
modem.waitForNetwork();
// Set SMS mode to Text Mode
modem.sendAT("+CMGF=1");
delay(1000);
// Configure how new SMS are handled (send directly to Serial)
SerialAT.print("AT+CNMI=2,2,0,0,0\r");
delay(1000);
// --- Send Startup SMS ---
String smsMessage = "GSM Device Started";
SerialMon.print("Sending SMS to ");
SerialMon.println(ADMIN_NUMBER);
bool success = modem.sendSMS(ADMIN_NUMBER, smsMessage);
if (success) {
SerialMon.println("SMS sent successfully!");
} else {
SerialMon.println("SMS failed to send.");
}
}
void loop() {
// Listen for data from the Modem
while (SerialAT.available()) {
String response = SerialAT.readStringUntil('\n');
response.trim();
// Check if the response is an incoming SMS
if (response.startsWith("+CMT: ")) {
sender_number = extractPhoneNumber(response);
isReceivingMessage = true;
}
// If the previous line was "+CMT", this line is the actual message content
else if (isReceivingMessage) {
received_message = response;
isReceivingMessage = false;
received_message.trim();
received_message.toLowerCase(); // Make case-insensitive
handleSms(sender_number, received_message);
}
}
}
// Function to handle the logic of incoming messages
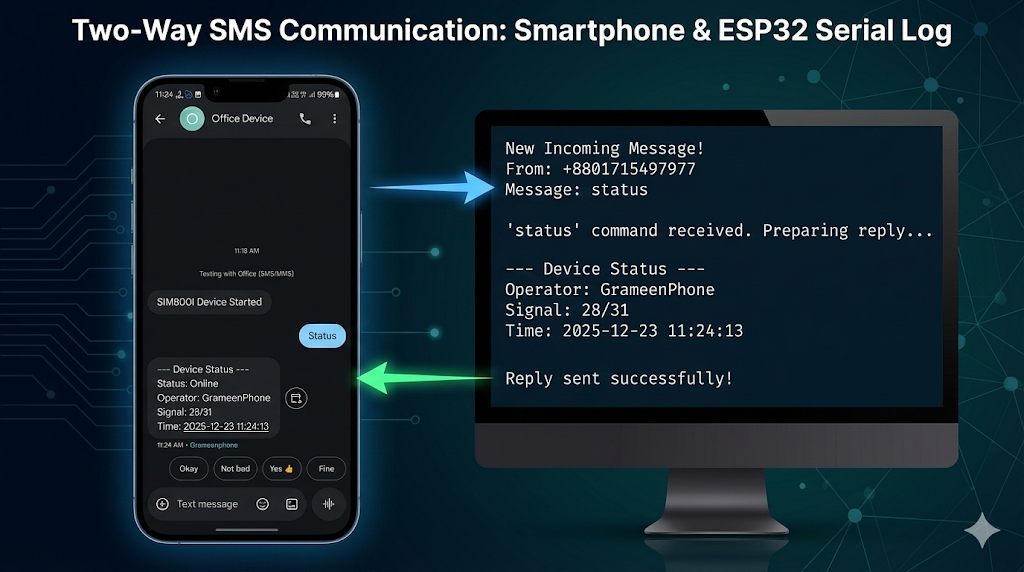
void handleSms(String number, String msg) {
SerialMon.println("New Incoming Message!");
SerialMon.print("From: ");
SerialMon.println(number);
SerialMon.print("Message: ");
SerialMon.println(msg);
// Check for "status" command
if (msg == "status") {
SerialMon.println("'status' command received. Preparing reply...");
// Gather Data
int signalQuality = modem.getSignalQuality();
String operatorName = modem.getOperator();
int year, month, day, hour, min, sec;
float timezone;
String dateTimeStr = "Not available";
// Get Network Time
if (modem.getNetworkTime(&year, &month, &day, &hour, &min, &sec, &timezone)) {
char dateTimeBuffer[25];
sprintf(dateTimeBuffer, "%04d-%02d-%02d %02d:%02d:%02d", year, month, day, hour, min, sec);
dateTimeStr = String(dateTimeBuffer);
}
// Construct the reply message
String reply_message = "--- Device Status ---\n";
reply_message += "Status: Online\n";
reply_message += "Operator: " + operatorName + "\n";
reply_message += "Signal: " + String(signalQuality) + "/31\n";
reply_message += "Time: " + dateTimeStr;
// Send the reply
SerialMon.print("Sending reply: ");
SerialMon.println(reply_message);
bool success = modem.sendSMS(number, reply_message);
if (success) {
SerialMon.println("Reply sent successfully!");
} else {
SerialMon.println("Failed to send reply.");
}
}
// Handle unknown commands
else {
SerialMon.println("Unrecognized command.");
String reply_message = "Unknown command. Try sending 'status'.";
modem.sendSMS(number, reply_message);
}
SerialMon.println();
}
// Helper function to extract phone number from the raw AT response
String extractPhoneNumber(String response) {
int startIndex = response.indexOf("\"") + 1;
int endIndex = response.indexOf("\",", startIndex);
return response.substring(startIndex, endIndex);
}Testing the System
Once you reset the device, watch the Serial Monitor. You should see the modem initializing.
- Step 1: Wait for the network connection. You want to see a Signal Quality (CSQ) value (e.g., 20 is excellent).
Step 2: Check your phone! You should receive a text: "SIM800l Device Started".
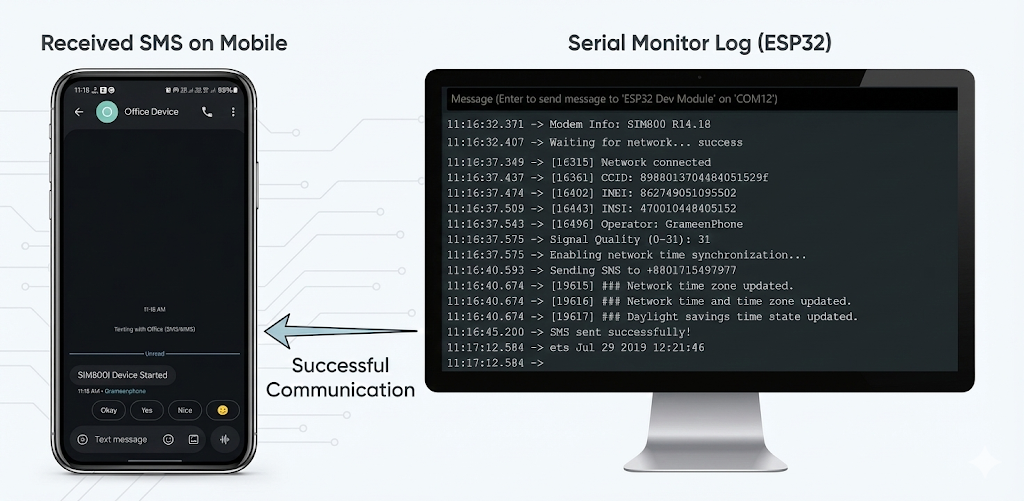
- Step 3: Reply to that text with the word: status.
Step 4: Within a few seconds, the ESP32 will reply with something like:
Status: Online Operator: Grameenphone Signal: 20 Time: 10:30 AM
If you try to send a random word like "Hello", the device is smart enough to reply: "Unknown command. Try sending status."
Code Explanation: How It Works
The code might look long, but it essentially handles three main tasks: Connecting, Listening, and Replying. Let’s break down the critical parts.
1. The Setup (Getting Online)
In the setup() function, we don't just turn the device on; we prepare the SIM800L for reliable communication.
- Modem Restart & Network Check: We force the modem to restart and then use
modem.waitForNetwork()to ensure we are actually connected to a cell tower before proceeding. - Time Sync: We send the command
AT+CLTS=1. This tells the network to send us the current time, which is crucial for our status reports later.
The "I'm Alive" Alert: The very last thing the setup() does is send an SMS to your ADMIN_NUMBER.C++
modem.sendSMS(ADMIN_NUMBER, "SIM800l Device Started");
This is your confirmation that the device has successfully booted up and has a signal.
2. The Loop (Listening for Data)
The loop() function is designed to be non-blocking. It constantly listens to the serial port (SerialAT) connected to the SIM800L.
- Detecting an SMS: When the SIM800L receives a text, it sends a specific code to the ESP32 that starts with
+CMT:. - Extraction: When our code sees
+CMT:, it knows a message has arrived. It immediately:- Extracts the Sender's Phone Number (so we know who to reply to).
- Reads the Message Content (the actual text you sent).
3. The Logic (handleSms)
This is the "brain" of your project. Once we have the message string, we send it to the handleSms function to decide what to do.
- Standardizing Text: We convert the incoming message to lowercase (
received_message.toLowerCase()). This means sending "Status", "STATUS", or "status" will all work the same way. - The "Status" Command: If the message is "status", the ESP32 queries the modem for fresh data:
modem.getSignalQuality(): Checks how strong the signal is (0-31).modem.getOperator(): Checks if you are on Grameenphone, Robi, etc.- It then combines this into a single text and sends it back using
modem.sendSMS().
- Error Handling: If you send a command that isn't programmed (like "Hello"), the code hits the
elseblock and replies: "Unknown command. Try sending 'status'." This makes the device user-friendly!
Why Is This Useful?
This logic is the foundation for almost any GSM IoT project. You can easily modify the "status" command to do other things, such as:
- "Motor On": To turn on a relay.
- "Read Temp": To get data from a DHT11 sensor.
- "Location": To send GPS coordinates.

Conclusion
That’s it for today’s experiment! I hope this helps you build your own SMS-controlled projects. If you have any questions or run into issues, drop a comment and I’ll do my best to help.