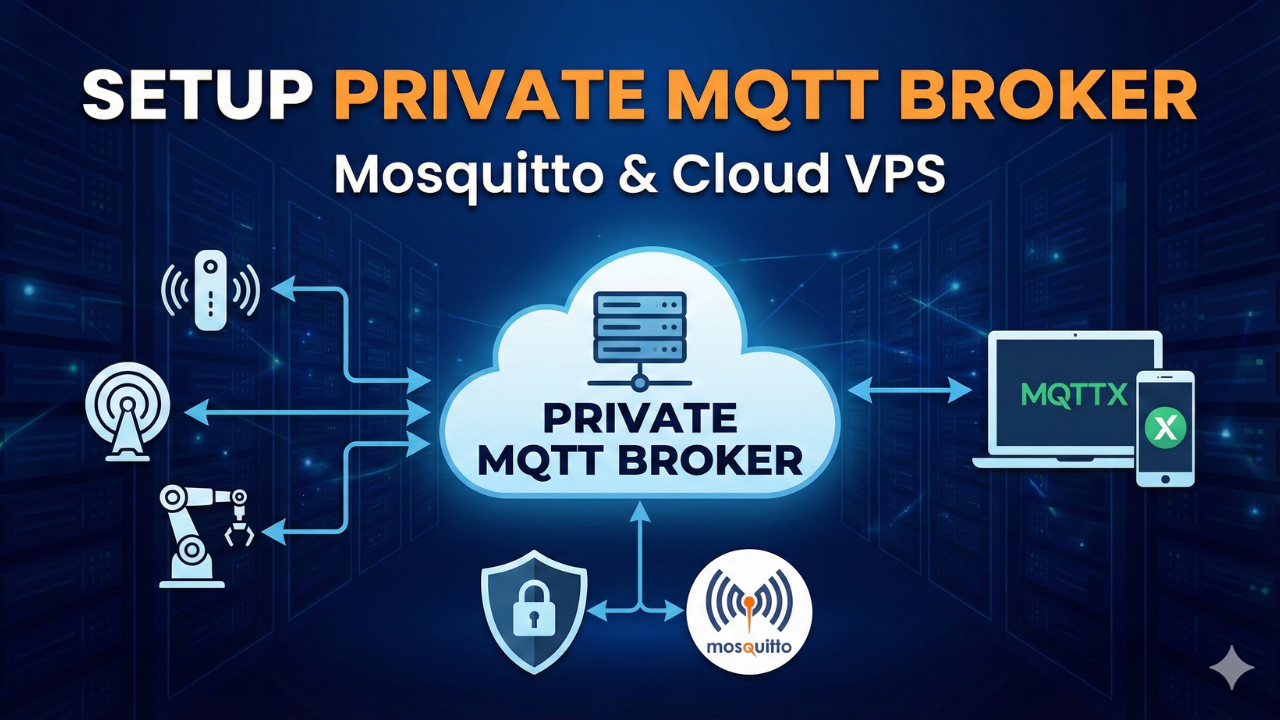
Setting Up Your Private MQTT Broker on a Cloud VPS
Are you ready to take your IoT projects to the next level? Moving from a public broker to a private VPS gives you speed, security, and total control. In this guide, we walk through installing Mosquitto, configuring ports, and testing your connection with MQTTX.
Are you an IoT enthusiast, developer, or student tired of relying on public MQTT brokers with their limitations and security concerns? Do you want full control over your message traffic, ensuring privacy and reliability for your smart devices? Then it's time to set up your own private MQTT broker on a Cloud Virtual Private Server (VPS)!
In this guide, we'll walk you through the entire process, inspired by a fantastic step-by-step video tutorial, to get your Mosquitto MQTT broker up and running securely on a Linode (now Akamai Cloud) VPS.
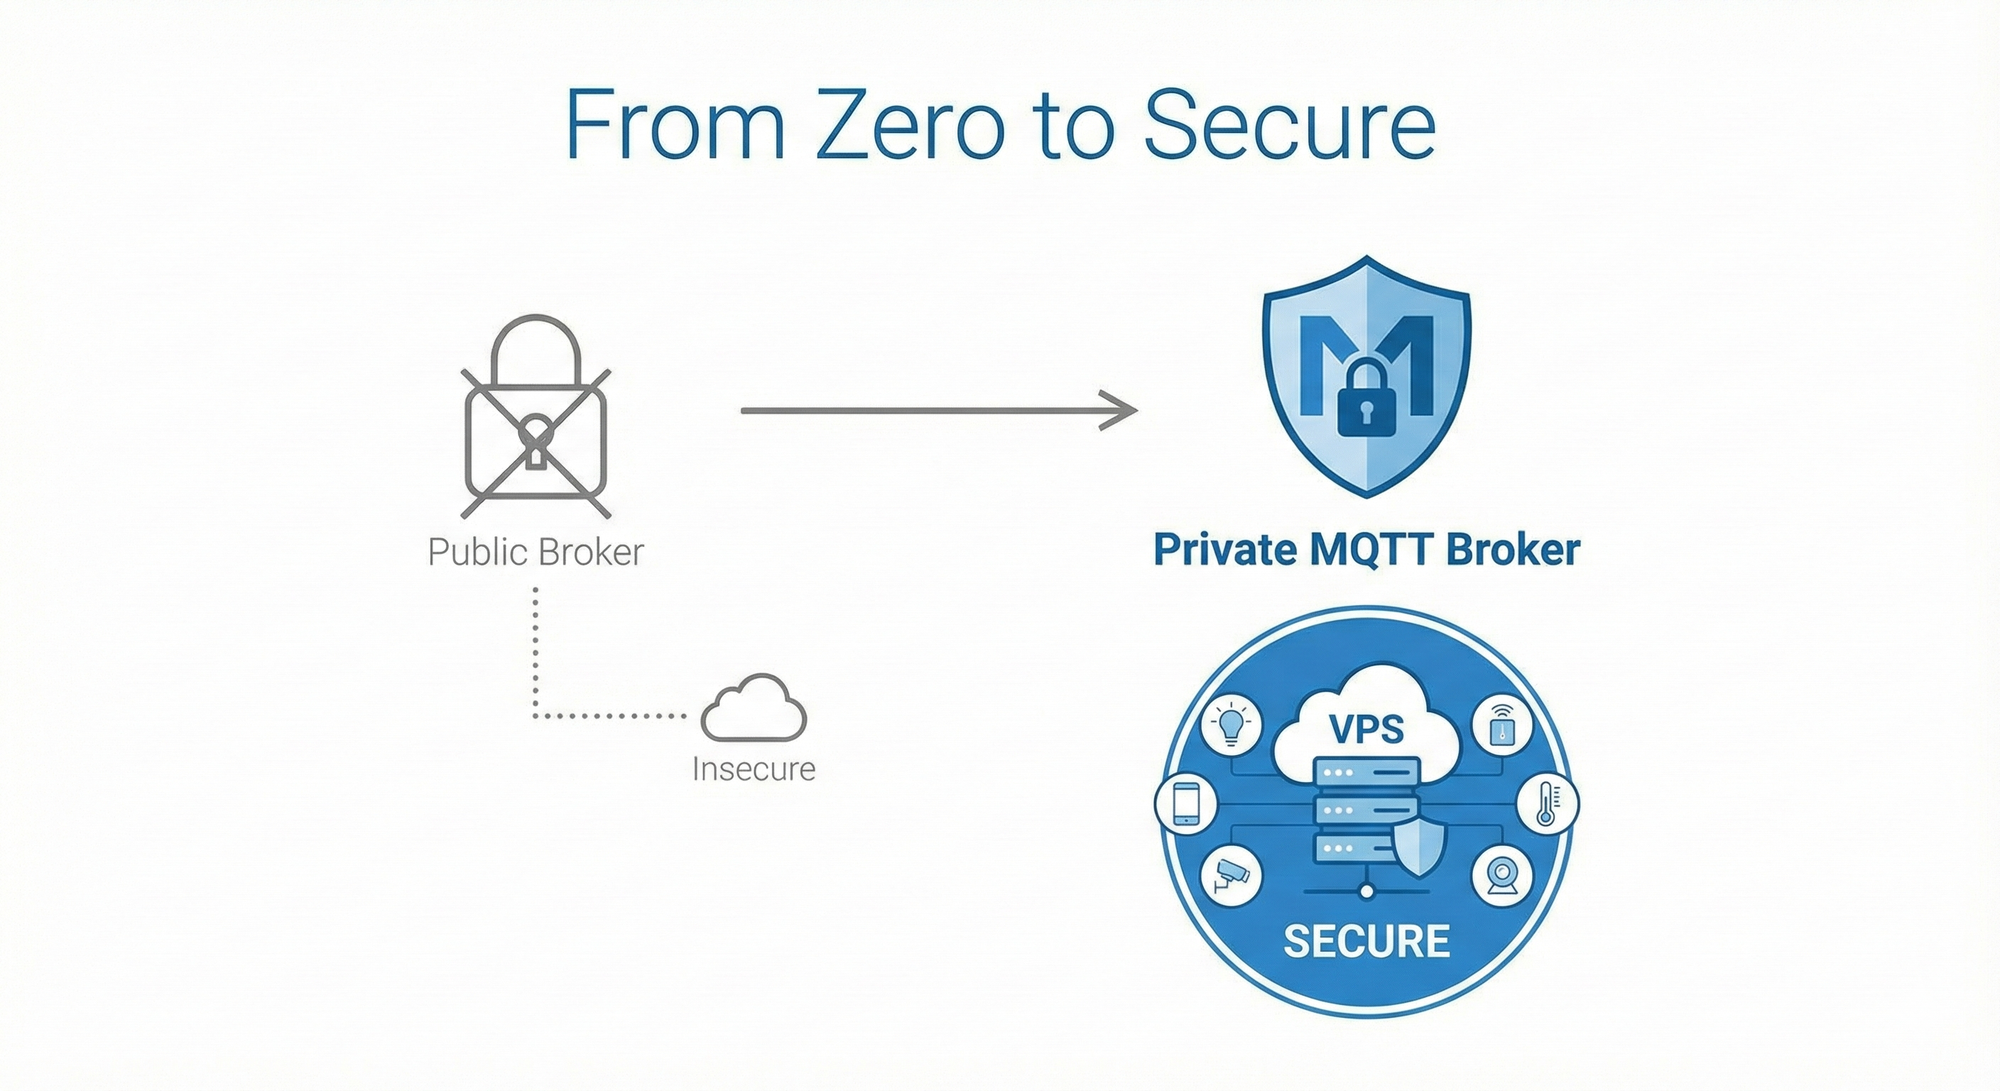
Why go private?
- Security & Privacy: Your data stays with you. No shared resources, no snooping.
- Performance: Dedicated resources mean faster message delivery and higher throughput.
- Control: Customize configurations, manage users, and scale as your IoT network grows.
- Reliability: You're not subject to the uptime or policy changes of third-party services.
Let's dive in!
🎥 Watch the Step-by-Step Video
If you prefer visual instructions, you can follow along with my complete video tutorial here:
Step 1: Provisioning Your Cloud VPS (The Foundation)
Our journey begins in the cloud. We'll use Linode (Akamai Cloud), a popular choice for developers due to its ease of use and competitive pricing. (New users can often find promotional credits, giving you a great sandbox to play in!)
- Sign Up & Log In: If you don't have an account, create one.
- Create a New Linode:
- Choose a Region: Select a data center closest to you or your IoT devices for optimal latency.
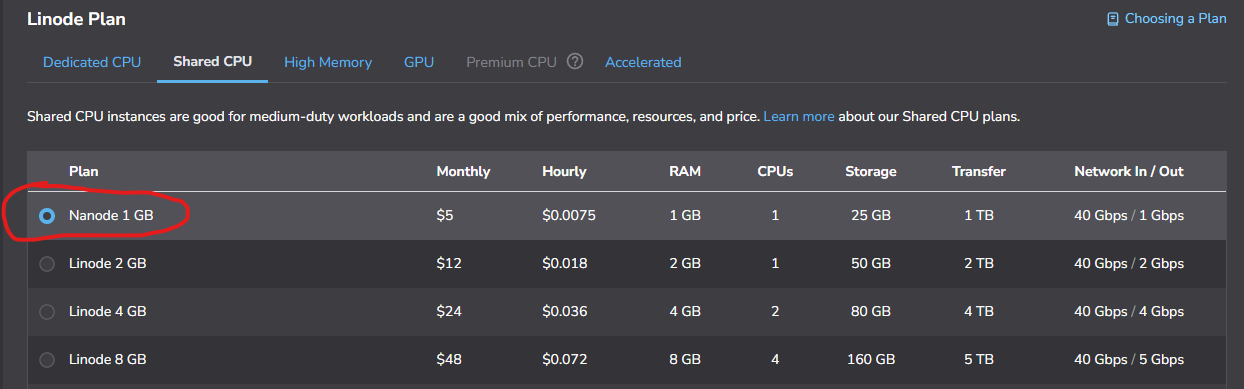
- Operating System: We'll use Ubuntu 24.04 LTS. This is a Long-Term Support release, meaning it gets security updates for years.
- Linode Plan: For a basic MQTT broker, a Shared CPU plan with 1GB RAM is usually sufficient. It's cost-effective and handles a surprising number of connections. If you plan for heavy traffic, you can always scale up later.
- Root Password: This is critical! Set a strong, unique root password. You'll use this to SSH into your server.
- Create Linode: Hit the button and watch your server spin up!
🛑 Wait! Before you continue...
A fresh server needs to be secured before you start installing software. If you haven't configured a non-root user or a basic firewall yet, pause here and follow my guide on
Once you've set up your sudo user and firewall, come back here to install the broker!
Accessing Your Server (SSH):
- Once your Linode is running, note its public IP address.
- For Windows users: I recommend Bitvise SSH Client. It's excellent because it provides both a secure shell terminal and an SFTP client (for file transfers) in one application. Download and install it.
- For macOS/Linux users: You can use your built-in terminal. Open it and type:
ssh root@YOUR_LINODE_IP_ADDRESS - Enter the root password you set earlier. You're in!
Pro-Tip: Always keep your server's IP address and root password secure.
Step 2: Installing & Configuring Mosquitto (The Broker Core)
Now that we have our server, let's install the Mosquitto MQTT broker.
- Update Your Server: First, ensure your server's package list is up to date:
sudo apt update
sudo apt upgrade -y
- Install Mosquitto:
sudo apt install mosquitto mosquitto-clients -y
mosquitto: This is the MQTT broker itself.mosquitto-clients: These are command-line utilities for testing, likemosquitto_pubandmosquitto_sub.
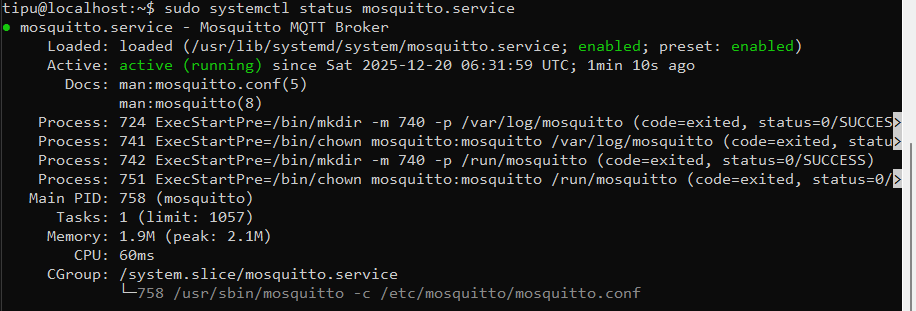
- Verify the Service Status (Crucial Step): Before tweaking any configurations, let's make sure Mosquitto installed correctly and is running.
sudo systemctl status mosquitto.service
- What to look for: You want to see a green
Active: active (running)status.
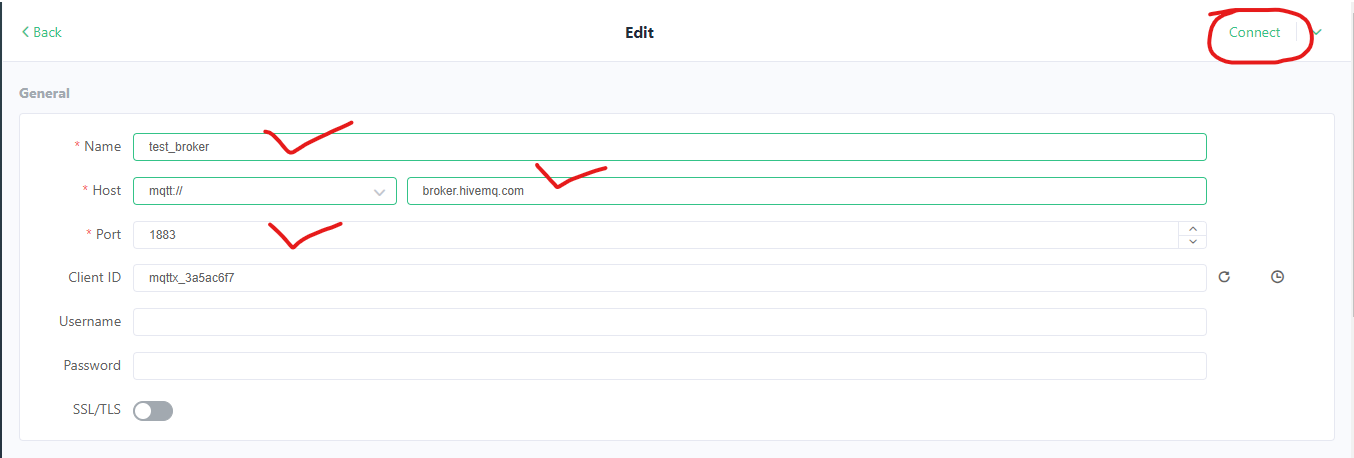
- Initial Connectivity Test (And the Anonymous Trap):
- At this point, if you try to connect from an external MQTT client (like MQTTX – a great desktop client for testing!), it will likely fail. Why? Because by default, Mosquitto is often configured to only listen on
localhostand not allow external connections, and certainly not anonymous ones.
- Configure Mosquitto for External Connections: We need to edit the Mosquitto configuration file.
sudo nano /etc/mosquitto/mosquitto.conf- Save and exit (Ctrl+X, Y, Enter for nano).
Add the following lines to the end of the file:
listener 1883
allow_anonymous true
listener 1883: Tells Mosquitto to listen for incoming connections on the standard MQTT port (1883).allow_anonymous true: For now, we're temporarily allowing connections without a username/password to verify basic connectivity. We will disable this later!
- Restart Mosquitto:
sudo systemctl restart mosquitto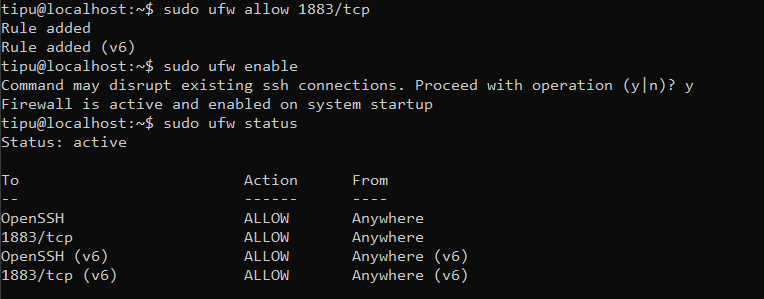
sudo systemctl enable mosquitto # Ensures it starts on boot- Open the Firewall: Even if Mosquitto is listening, your server's firewall
sudo ufw allow 1883/tcp
sudo ufw enable # If not already enabled, confirm with 'y'
sudo ufw status # Verify port 1883 is allowed
You should see something like 1883/tcp ALLOW Anywhere
- Test Again with MQTTX: Now, try connecting with MQTTX to your Linode's public IP address on port 1883. You should be able to connect, publish, and subscribe! This confirms basic connectivity.
Optional: Rapid Testing via Command Line
Before you switch to desktop tools, you can verify everything is working directly from your server's terminal (or another computer with mosquitto-clients installed). This is often faster for debugging.
- Open two terminal windows connected to your server (or use a terminal multiplexer like
tmux).-h localhost: Connects to the local broker.-t "test/topic": The topic to subscribe to.-v: Verbose mode (shows the topic and the message).-m "...": The actual message payload.
In Terminal 2 (The Publisher): Send a message to that same topic:
mosquitto_pub -h localhost -t "test/topic" -m "Hello from the CLI!"
In Terminal 1 (The Subscriber): Run this command to "listen" for messages on the topic test/topic:
mosquitto_sub -h localhost -t "test/topic" -v

Result: You should immediately see "test/topic Hello from the CLI!" it appear in Terminal 1. If this works, your internal broker logic is perfect!
Congratulations! You have a fully functional private MQTT broker running in the cloud. You can send and receive messages from anywhere in the world.
Conclusion: You've Built the Server... Now Build the Device!
Now that your cloud infrastructure is ready, it's time to write some firmware. Check out my complete guide on how to connect an ESP32 to this broker:
👉ESP32 MQTT Beginner Guide: Connect Your Hardware to the Cloud
In that guide, I’ll show you the exact C++ code you need to publish sensor data from an ESP32 directly to the server you just set up.
⚠️ Important: Do Not Stop Here!
But wait—there is a catch.
Right now, your broker is configured to allow Anonymous Access. This means anyone who finds your IP address can connect to your server, read your messages, and even control your IoT devices. This is great for testing, but terrible for production.
In Part 2 of this series, we will turn this into a fortress. We will cover:
- Authentication: How to ban anonymous users and force username/password logins.
- Fixing Permissions: Solving the common "Permission Denied" errors correctly.
- WebSockets: Enabling browser-based connections so you can build cool IoT dashboards.