Introduction
If you've ever wanted to build your own smart home or IoT system, you've probably noticed one major dependency: the cloud.
Many commercial IoT devices send their data through third-party cloud servers. That can work well, but it also means your devices depend on an internet connection and an external service.
What if you could keep your IoT communication completely inside your own network?
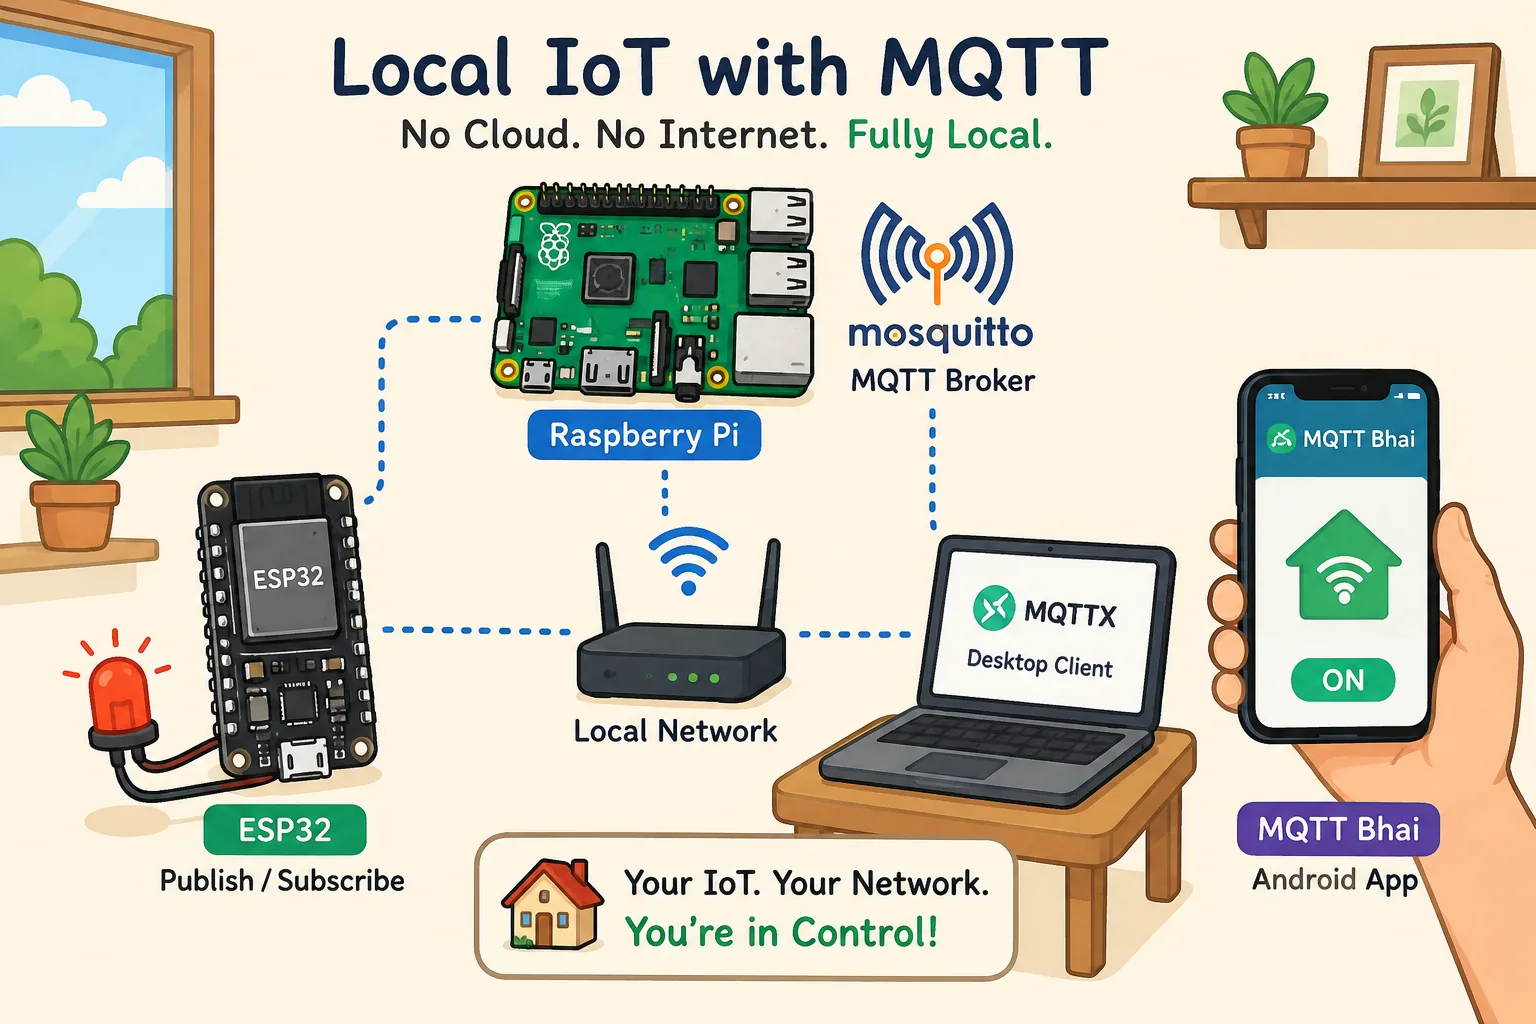
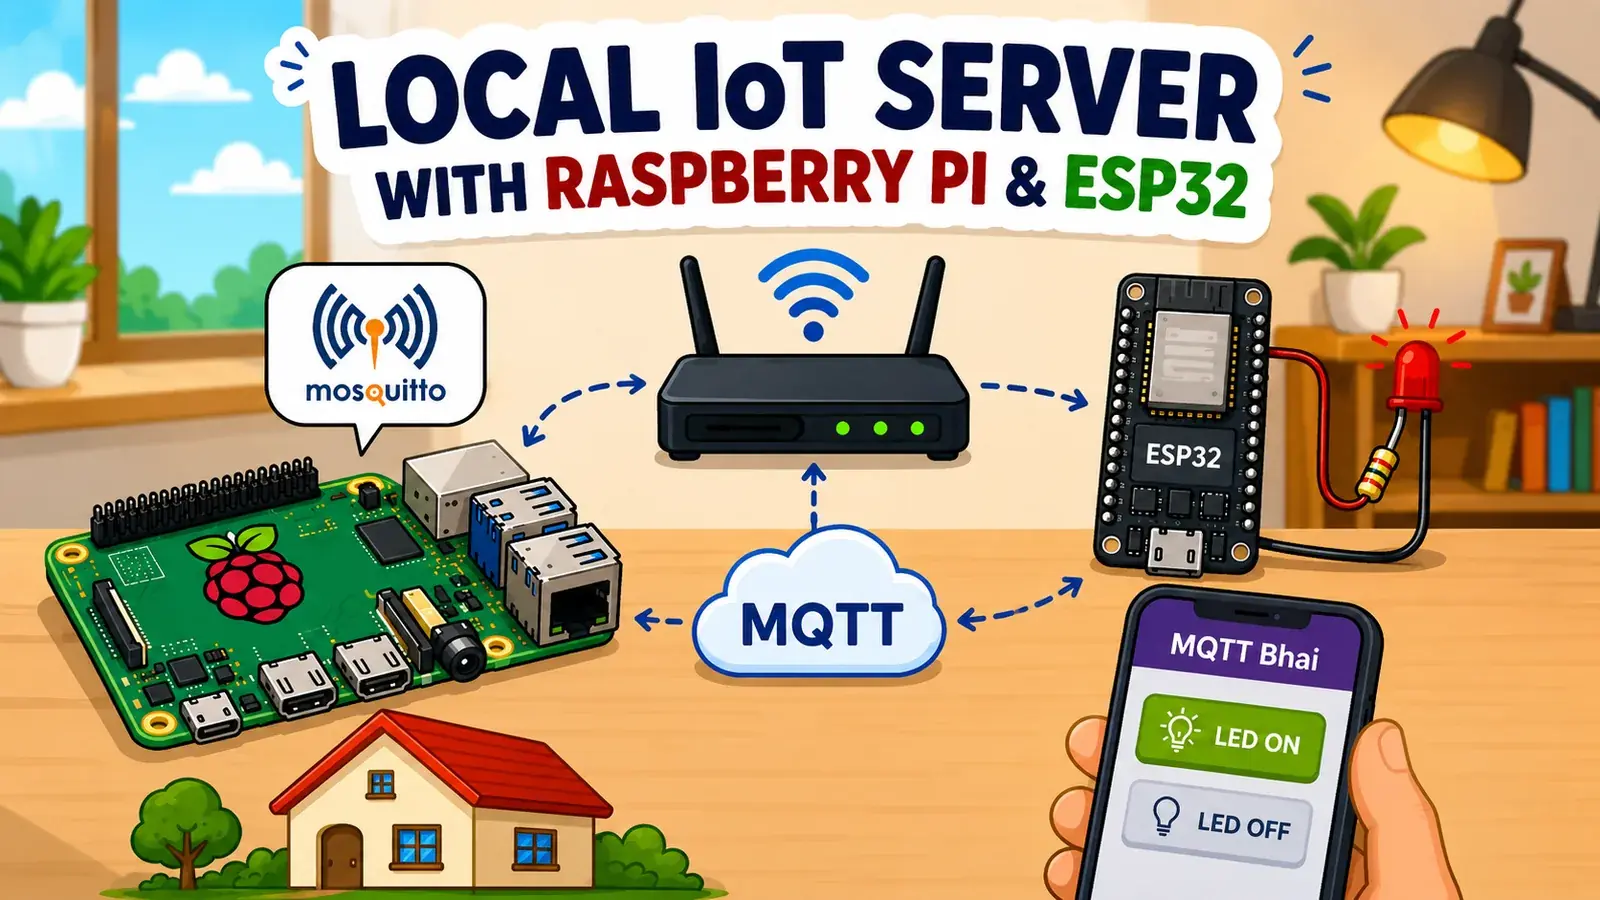
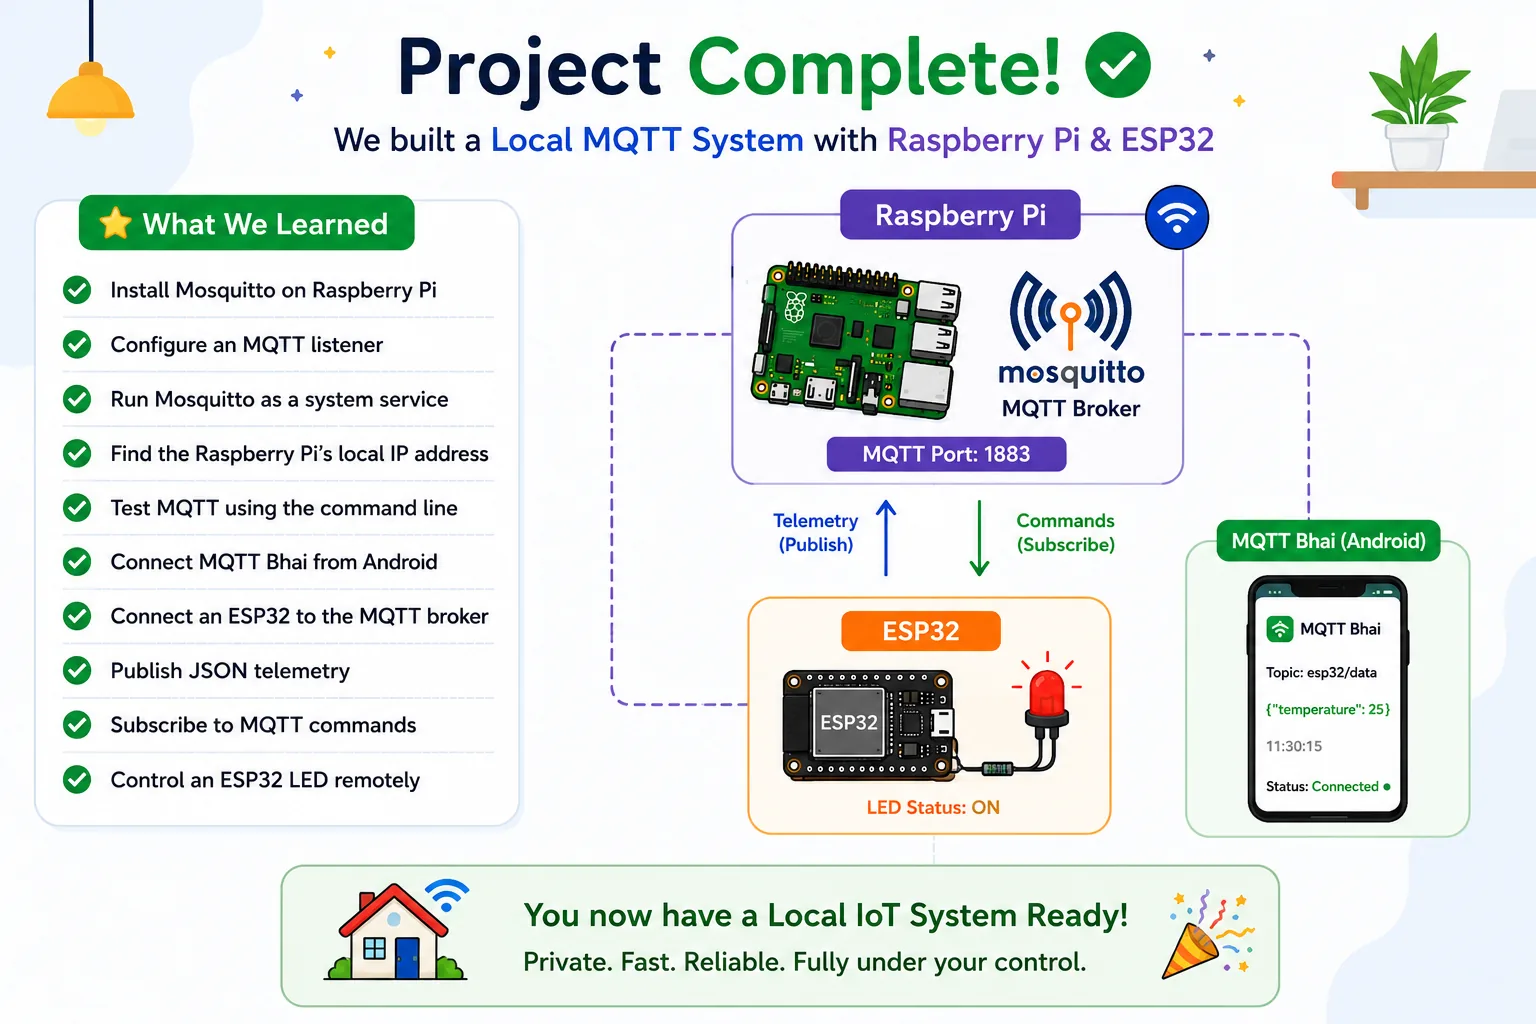
In this project, we'll turn a Raspberry Pi into a local MQTT server using the Mosquitto MQTT Broker. Then we'll connect an ESP32 to the broker and use MQTT to send data and control an LED.
We'll also test the system from both a computer using MQTTX and an Android smartphone using MQTT Bhai.
The result is a simple but powerful local IoT architecture:
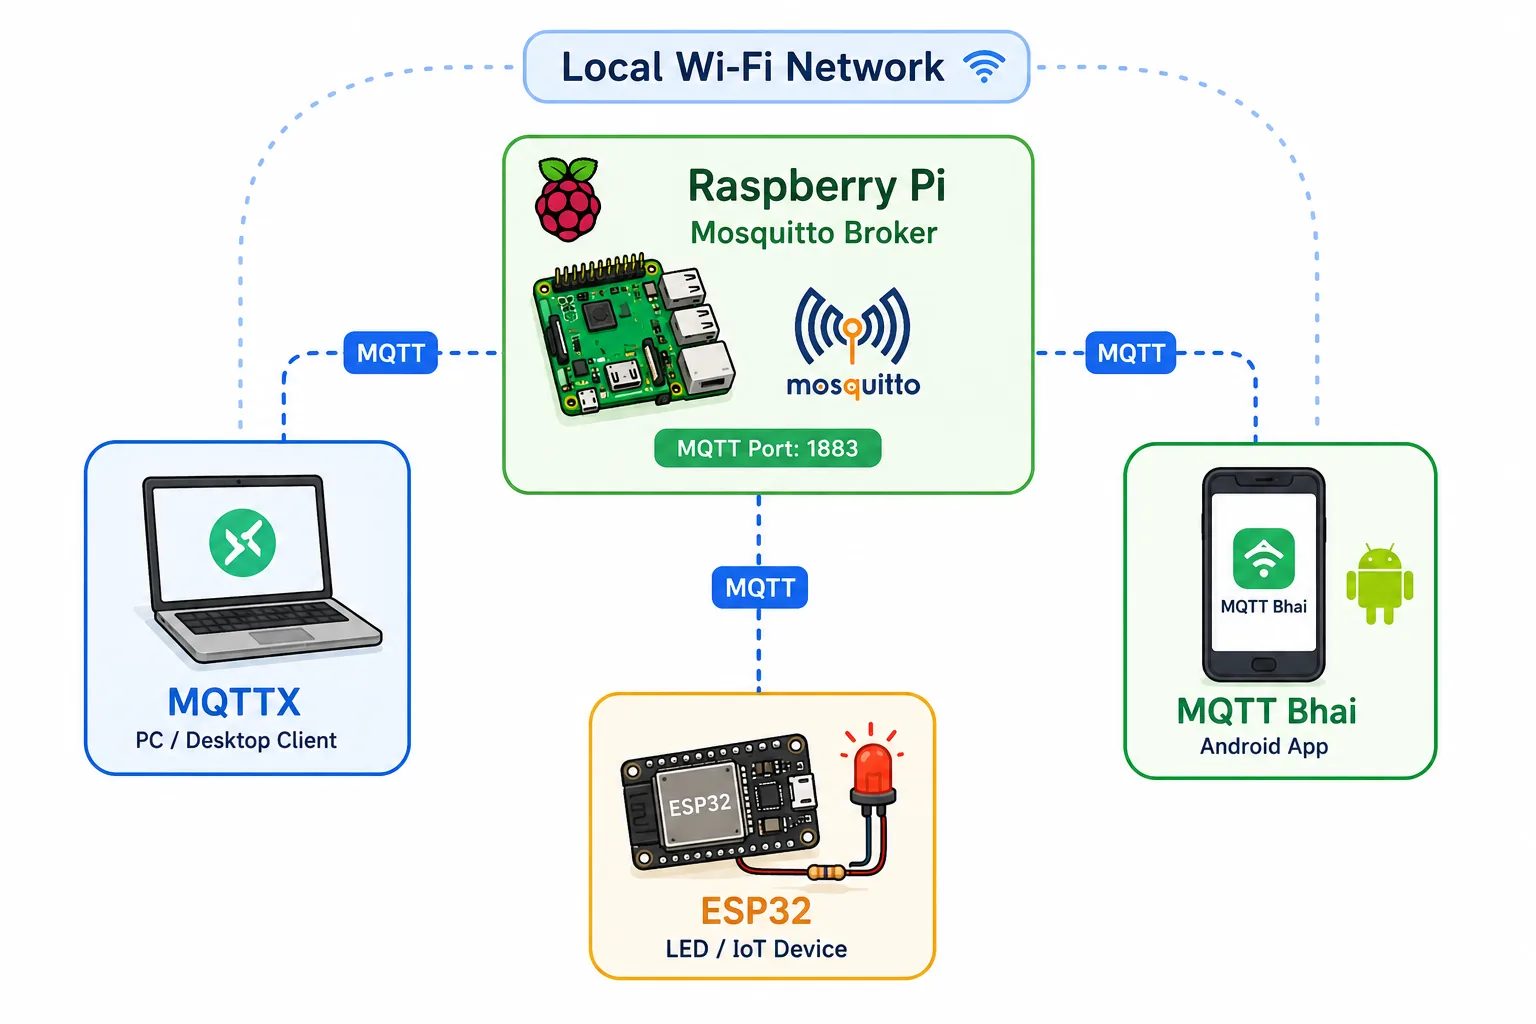
By the end of this tutorial, you'll have a working local MQTT communication system that can be expanded into a complete home automation or IoT platform.
🎥 Watch the Full Video
I've also covered the complete setup step-by-step in the video, including installing Mosquitto, configuring the Raspberry Pi, connecting the ESP32, testing MQTTX, and controlling the ESP32 using MQTT Bhai.
🚀 What We Are Building
The Raspberry Pi will act as our MQTT Broker.
The ESP32 will connect to the Raspberry Pi over Wi-Fi and act as an MQTT client.
The ESP32 will:
- Connect to the local Wi-Fi network
- Connect to the Mosquitto MQTT broker
- Publish telemetry data
- Subscribe to an MQTT command topic
- Receive
onandoffcommands - Control its onboard LED
We can then use either:
- MQTTX from a computer
- MQTT Bhai from an Android smartphone
- MQTT command-line tools from the Raspberry Pi
to communicate with the ESP32.
This creates a simple two-way IoT communication system without requiring an external cloud service.
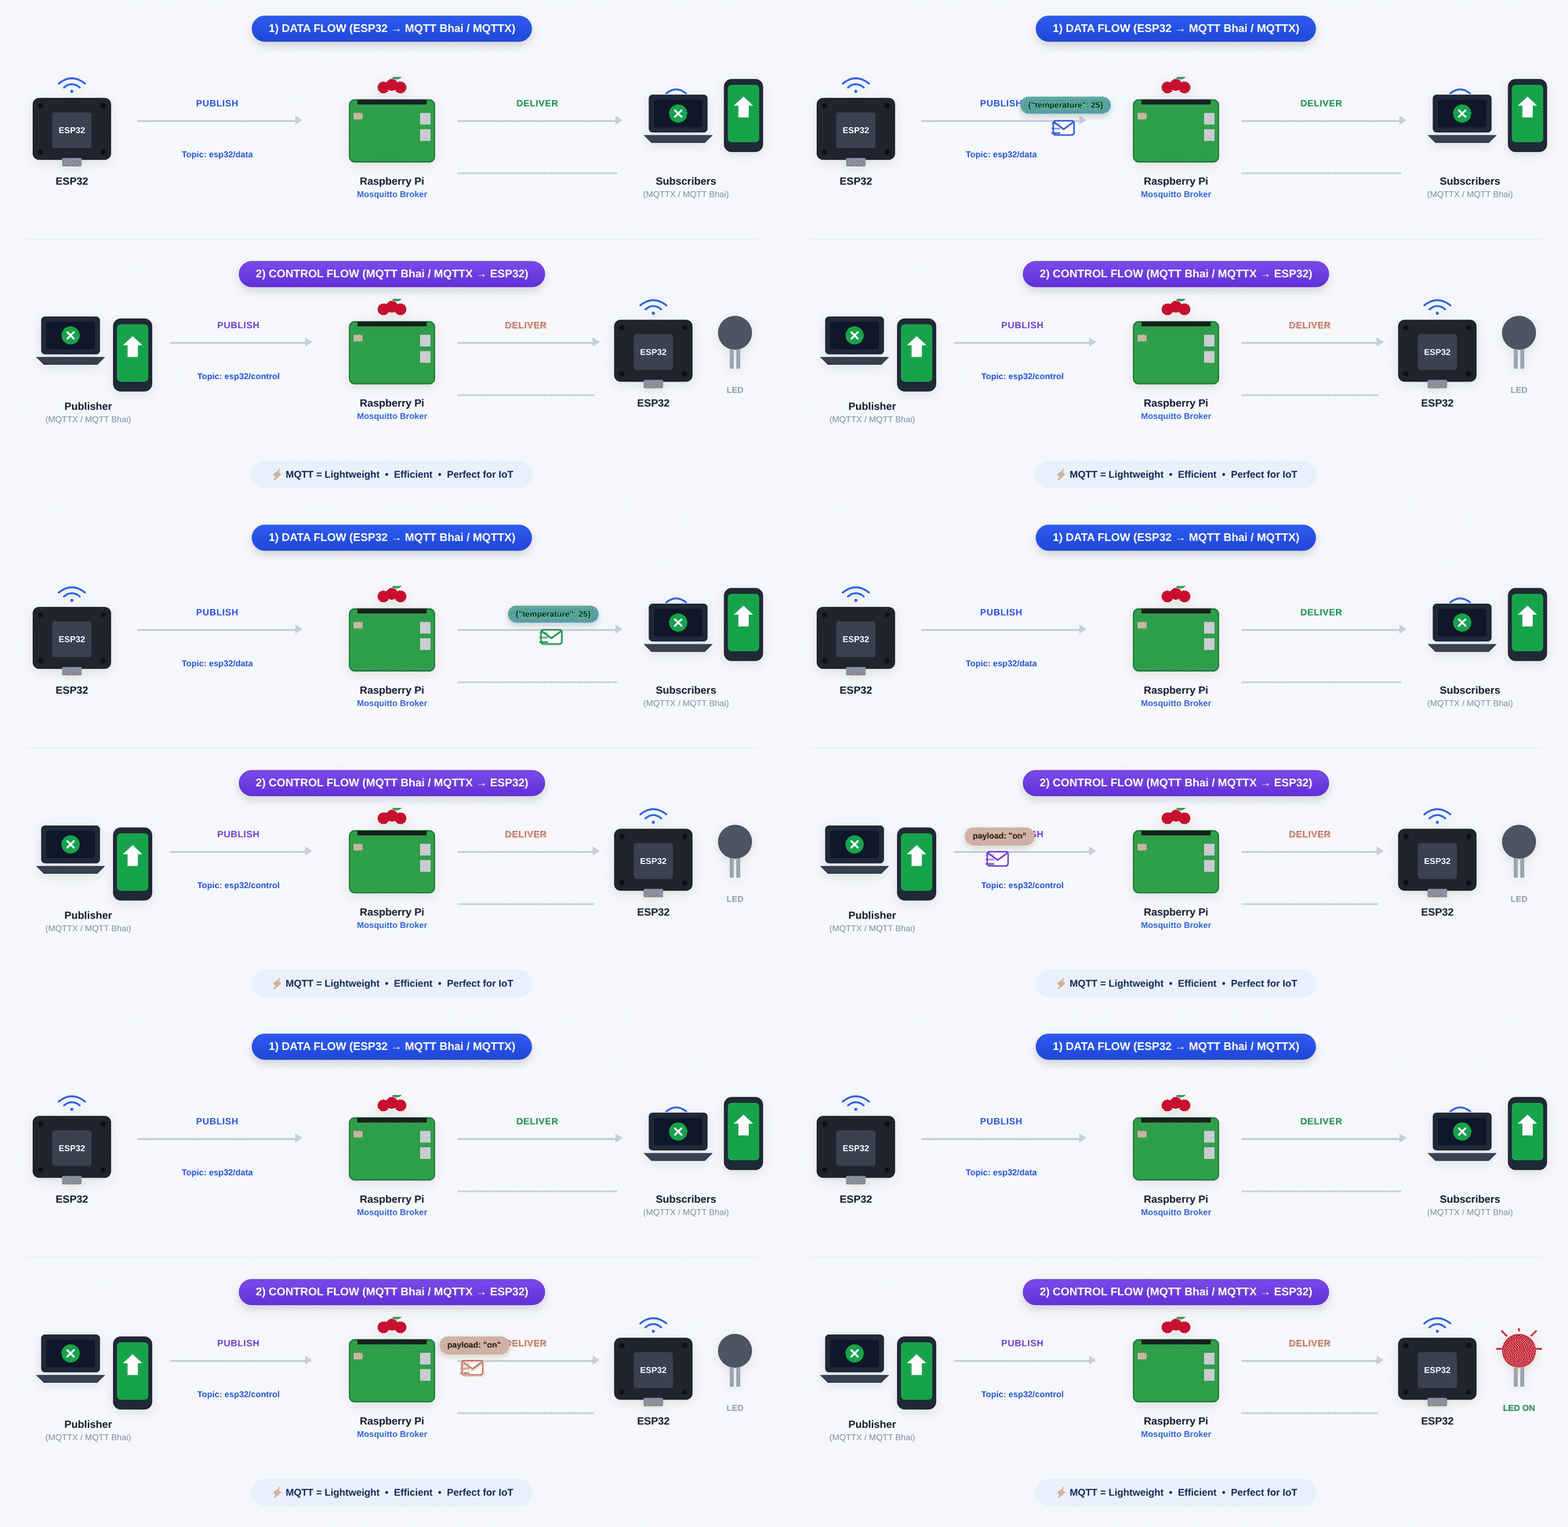
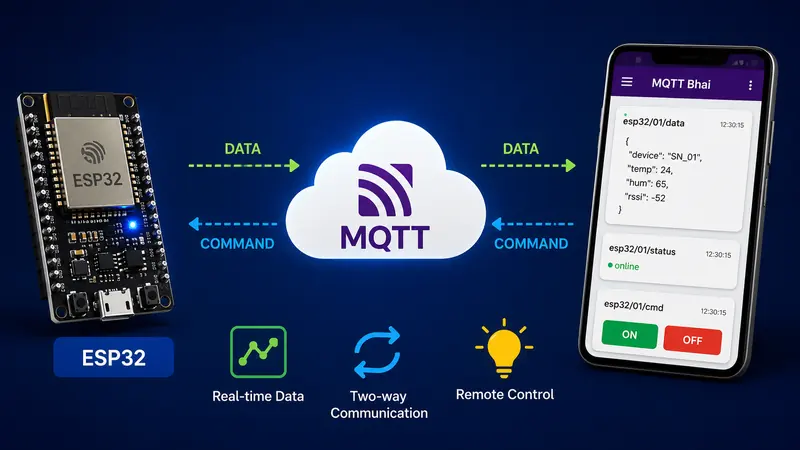
💡 How MQTT Works
Before building the project, let's quickly understand the basic MQTT architecture.
⭐ Project Features
With this project, you'll learn how to:
- Set up a local MQTT broker on Raspberry Pi
- Install and configure Mosquitto
- Understand MQTT Publisher and Subscriber concepts
- Connect ESP32 to a local MQTT broker
- Publish JSON telemetry from ESP32
- Subscribe to MQTT command topics
- Control an ESP32 LED remotely
- Test MQTT communication from an Android phone using MQTT Bhai
- Build an IoT system without relying on cloud services
🛠️ What You'll Need
Hardware
| Component | Quantity | Purchase Link |
|---|---|---|
| Raspberry Pi 3 / 4 / 5 | 1 | Amazon · AliExpress |
| ESP32 Development Board | 1 | Amazon · AliExpress |
| LED | 1 | Amazon |
| 330 Ω Resistor | 1 | Amazon |
| Jumper Wires | As required | Amazon |
| Computer / Laptop | 1 | — |
| Android Smartphone | Optional | — |
💻 Software Requirements
You'll need the following software:
Raspberry Pi
- Raspberry Pi OS
- Mosquitto MQTT Broker
- Mosquitto MQTT Clients
Computer
- Arduino IDE
Android
- MQTT Bhai
📱 MQTT Bhai — Control Your IoT Devices from Android
For this project, we're also going to use MQTT Bhai, an Android MQTT client developed by IoT Bhai.
MQTT Bhai allows you to connect to MQTT brokers, manage multiple broker profiles, subscribe to topics, publish messages, and monitor MQTT traffic directly from your smartphone. It also supports standard TCP and secure SSL/TLS MQTT connections and QoS settings.
Download MQTT Bhai App from Google Play
🔗 Prerequisites
Before starting this tutorial, you should have:
- Raspberry Pi OS installed on your Raspberry Pi
- Your Raspberry Pi connected to your local network
- Arduino IDE installed
- ESP32 board support installed in Arduino IDE
Step 1: Install Mosquitto on Raspberry Pi
The first step is to install the Mosquitto MQTT broker on the Raspberry Pi.
Open a terminal on the Raspberry Pi or connect to it using SSH.
First, update the package list:
sudo apt updateNow install Mosquitto and the MQTT command-line clients:
sudo apt install mosquitto mosquitto-clients -yAfter installation, check the Mosquitto service:
sudo systemctl status mosquitto.serviceIf everything is working correctly, you should see that the service is running.
Step 2: Configure the MQTT Broker
Now we need to configure Mosquitto so devices on our local network can connect to it.
Open the Mosquitto configuration file:
sudo nano /etc/mosq
uitto/mosquitto.conf
Depending on your Mosquitto installation, you can also create a configuration file inside:
/etc/mosquitto/conf.d/For example:
sudo nano /etc/mosquitto/conf.d/default.confAdd:
listener 1883
allow_anonymous true
Let's understand these settings.
listener 1883Port 1883 is the standard TCP port commonly used for MQTT connections without TLS.
This allows devices on your local network to connect to the broker.
allow_anonymous trueThis allows clients to connect without providing a username and password.
This is convenient for a simple local learning project.
However, do not use anonymous access on an MQTT broker exposed directly to the internet.
For a production system, you should configure authentication, access control, and preferably TLS encryption.
Save the configuration and restart Mosquitto:
sudo systemctl restart mosquitto.serviceStep 3: Enable Mosquitto at Boot
We want Mosquitto to start automatically whenever the Raspberry Pi boots.
Run:
sudo systemctl enable mosquitto.serviceYou can verify the service again:
sudo systemctl status mosquitto.serviceNow your Raspberry Pi is ready to act as an MQTT broker.
Step 4: Find Your Raspberry Pi IP Address
The ESP32 needs to know where the MQTT broker is located.
We therefore need the Raspberry Pi's local IP address.
Run:
ifconfigLook for the IP address assigned to your network interface.
For example:
192.168.1.50Your IP address will probably be different.
We'll use:
192.168.1.50as an example throughout this tutorial.
Important: Replace
192.168.1.50with the actual IP address of your Raspberry Pi.
Step 5: Connect MQTT Bhai to the Raspberry Pi
Now let's perform the same MQTT testing from an Android phone.
Install MQTT Bhai from Google Play:
Open the application and create a new broker connection.
Enter your Raspberry Pi's local network details.
For example:
Broker:
192.168.1.50

Port:
1883
Because we're using an unauthenticated local broker for this tutorial, you don't need to enter a username or password.
Save the connection and connect.
Your phone must be connected to the same local network as the Raspberry Pi.
Once connected, subscribe to:
test/topicMQTT Bhai is now waiting for messages published to this topic.
Let's send a message from the Raspberry Pi.
Publish a Message from the Raspberry Pi
Open a terminal on the Raspberry Pi and run:
mosquitto_pub -h localhost -t test/topic -m "Hello from Raspberry Pi"Here:
-h localhosttells the MQTT client to connect to the Mosquitto broker running on the Raspberry Pi.-t test/topicspecifies the MQTT topic.-m "Hello from Raspberry Pi"is the message we want to publish.
As soon as you execute the command, MQTT Bhai should receive the message:
Hello from Raspberry PiThis is a simple but important MQTT test. The Raspberry Pi is acting as the publisher, Mosquitto is acting as the broker, and MQTT Bhai is acting as the subscriber.
Once this works, we know that MQTT Bhai can successfully communicate with the Mosquitto broker over the local network.
Step 6: Install the PubSubClient Library
Open Arduino IDE.
Go to:
Tools → Manage Libraries
Search for:
PubSubClientInstall the PubSubClient library.
This library provides the MQTT client functionality we'll use on the ESP32.
Step 7: Program the ESP32
/*
 * PROFESSIONAL MQTT EXPERIMENT - ESP32
 * * Features:
 * - Non-blocking Architecture (No delay())
 * - Automatic Reconnection (WiFi & MQTT)
 * - LWT (Last Will & Testament) for State Monitoring
 * - JSON Data Serialization
 * - Remote Command Handling
 */

#include <WiFi.h>
#include <PubSubClient.h>
#include <ArduinoJson.h>

// ==========================================
// 1. CONFIGURATION (Edit these)
// ==========================================
const char* ssid = "";
const char* password = "";

// MQTT Broker Settings (Using public HiveMQ for demo, change for production)
const char* mqtt_server = "mqtt.iotbhai.io";
const int mqtt_port = 1883;
const char* mqtt_user = ""; // Leave blank for public brokers
const char* mqtt_pass = "";

// Unique Device ID (Must be unique on the broker)
const char* device_id = "ESP32_Pro_Unit_01";

// Topics (Structure: device_type/device_id/function)
const char* topic_telemetry = "esp32/unit01/data";   // Where we send sensor data
const char* topic_command   = "esp32/unit01/cmd";    // Where we listen for commands
const char* topic_status    = "esp32/unit01/status"; // LWT (Online/Offline)

// ==========================================
// 2. GLOBAL OBJECTS & VARIABLES
// ==========================================
WiFiClient espClient;
PubSubClient client(espClient);

// Timers for non-blocking delays
unsigned long lastMsgTime = 0;
const long interval = 5000; // Send data every 5 seconds

#define LED_PIN 2 // Onboard LED

// ==========================================
// 3. SETUP WIFI
// ==========================================
void setup_wifi() {
  delay(10);
  Serial.println();
  Serial.print("Connecting to WiFi: ");
  Serial.println(ssid);

  WiFi.mode(WIFI_STA);
  WiFi.begin(ssid, password);

  while (WiFi.status() != WL_CONNECTED) {
    delay(500);
    Serial.print(".");
  }

  Serial.println("");
  Serial.println("WiFi connected");
  Serial.print("IP address: ");
  Serial.println(WiFi.localIP());
}

// ==========================================
// 4. CALLBACK (Handle Incoming Messages)
// ==========================================
void callback(char* topic, byte* payload, unsigned int length) {
  Serial.print("Message arrived [");
  Serial.print(topic);
  Serial.print("] ");

  // Convert payload to string for easier handling
  String message;
  for (int i = 0; i < length; i++) {
    message += (char)payload[i];
  }
  Serial.println(message);

  // -- Command Logic --
  // Example: If we receive "ON", turn on LED
  if (String(topic) == topic_command) {
    if (message == "ON") {
      digitalWrite(LED_PIN, HIGH);
      // Feedback: Publish new state immediately
      client.publish(topic_telemetry, "{\"led\": \"ON\"}");
    } else if (message == "OFF") {
      digitalWrite(LED_PIN, LOW);
      client.publish(topic_telemetry, "{\"led\": \"OFF\"}");
    }
  }
}

// ==========================================
// 5. RECONNECT (The Engine Room)
// ==========================================
void reconnect() {
  // Loop until we're reconnected
  while (!client.connected()) {
    Serial.print("Attempting MQTT connection...");

    // --- LWT CONFIGURATION ---
    // define Last Will: Topic, QoS, Retain, Message
    // If this ESP32 dies, the Broker will post "offline" to the status topic automatically.

    if (client.connect(device_id, mqtt_user, mqtt_pass, topic_status, 1, true, "offline")) {
      Serial.println("connected");

      // Once connected, publish an announcement that we are alive (Retained = true)
      client.publish(topic_status, "online", true);

      // Resubscribe to command topics
      client.subscribe(topic_command);
    } else {
      Serial.print("failed, rc=");
      Serial.print(client.state());
      Serial.println(" try again in 5 seconds");
      delay(5000); // Blocking delay here is acceptable as we can't operate without connection
    }
  }
}

// ==========================================
// 6. MAIN SETUP
// ==========================================
void setup() {
  Serial.begin(115200);
  pinMode(LED_PIN, OUTPUT);

  setup_wifi();

  client.setServer(mqtt_server, mqtt_port);
  client.setCallback(callback);
}

// ==========================================
// 7. MAIN LOOP
// ==========================================
void loop() {
  // Ensure we stay connected
  if (!client.connected()) {
    reconnect();
  }
  client.loop(); // Keep MQTT alive

  // --- Non-Blocking Timer for Telemetry ---
  unsigned long now = millis();
  if (now - lastMsgTime > interval) {
    lastMsgTime = now;

    // Create a JSON Document
    JsonDocument doc; // ArduinoJson v7
    doc["device"] = device_id;
    doc["uptime"] = millis() / 1000;
    doc["wifi_rssi"] = WiFi.RSSI();

    // Add dynamic data (simulated sensor)
    doc["temp"] = random(20, 30);

    // Serialize JSON to String
    char buffer[256];
    serializeJson(doc, buffer);

    // Publish to MQTT
    Serial.print("Publishing data: ");
    Serial.println(buffer);
    client.publish(topic_telemetry, buffer);
  }
}
Step 8: Configure the ESP32 Code
Before uploading the code, change:
const char* ssid = "YOUR_WIFI_SSID";
const char* password = "YOUR_WIFI_PASSWORD";
to your actual Wi-Fi credentials.
For example:
const char* ssid = "MyWiFi";
const char* password = "MyPassword";
Then change:
const char* mqtt_server = "192.168.1.50";to the IP address of your Raspberry Pi.
For example:
const char* mqtt_server = "192.168.1.50";Make sure the ESP32 and Raspberry Pi are connected to the same local network.
Step 9: Upload the ESP32 Code
Select your ESP32 board from:
Tools → Board
Then select the appropriate COM port.
Upload the sketch.
After uploading, open the Serial Monitor.
Set the baud rate to:
115200You should see the ESP32 connecting to Wi-Fi.
Then it will attempt to connect to the MQTT broker.
If everything is configured correctly, you'll see:
WiFi connected!
Attempting MQTT connection...connected
The ESP32 will then publish telemetry every five seconds.
For example:
Published: {"temperature": 24}Step 10: Receive ESP32 Data Using MQTT Bhai
Now let's do the same thing from your Android phone.
Open MQTT Bhai and connect to the Raspberry Pi broker.
Subscribe to:
esp32/unit01/dataYou should now see the ESP32 telemetry arriving directly on your smartphone.
📱 Control the ESP32 from MQTT Bhai
This is where MQTT Bhai becomes particularly useful.
From your smartphone:
Topic
esp32/unit01/cmdPayload
onThe ESP32 LED should turn ON.
Then publish:
offThe LED should turn OFF.
You can now control physical hardware from your smartphone through your own Raspberry Pi MQTT server.
🛠️ Troubleshooting
ESP32 Cannot Connect to MQTT
Check the following:
- Raspberry Pi and ESP32 are on the same network
- Raspberry Pi IP address is correct
- Mosquitto is running
- MQTT port is
1883 - The Raspberry Pi firewall isn't blocking port 1883
- Your Mosquitto configuration is correct
Check the broker:
sudo systemctl status mosquittoMQTT Bhai Cannot Connect
Make sure:
- Your Android phone is connected to the same Wi-Fi network as the Raspberry Pi.
- The Raspberry Pi IP address is correct.
- The MQTT port is
1883. - Mosquitto is running.
- The broker allows the connection.
For this tutorial, the connection should look like:
Host: 192.168.1.50
Port: 1883
🔐 A Note About MQTT Security
In this tutorial, we used:
allow_anonymous truebecause we're building a simple local learning environment.
This is convenient, but it should not be considered a production security configuration.
🎯 Conclusion
In this project, we turned a Raspberry Pi into a local MQTT server using the Mosquitto MQTT Broker and connected an ESP32 to it over Wi-Fi.
Join the discussion
Got a question, hit an error, or built this yourself? Share it below — sign in with GitHub to comment.